Install Uniform Connector
Prerequisites#
Before installing Uniform for Sitecore, please confirm the following prerequisites are met:
Installation package for the Connector handy.
Have the Uniform license key handy - This is provided by your Uniform account representative.
Sitecore instance version 8.2 Update-7 or greater installed
Uniform supports both XM and XP topologies.
Your Sitecore site using Sitecore MVC / SXA or Sitecore JSS. Sites built using Web Forms are not supported.
Admin rights to your Sitecore environment.
Ability to edit Sitecore config files.
Option 1: Installing from a Sitecore package#
A Sitecore installation package is the easiest way to get Uniform installed.
The installation option with the Nuget packages is also available for customers who need to integration Uniform with an existing CI/CD process.
1. Install the Sitecore package.#
Use the Sitecore package installation wizard to install the Uniform package. Uniform Package is provided as a zip in the form of Uniform.Sitecore-version.zip (i.e., Uniform.Sitecore-4.0.210223-3.zip).
Depending on your use case, you can install the package either only on your CM (content management) instance or both CM and CD (content delivery) instances.
Also, you can use the same package for CD installation. If installing on CD servers is problematic, as the shell may not be available, consider extracting the package files and deploying them manually. The items will be taken care of by the publishing process.
For non-sandbox environments, we recommend the Nuget package way of adding Uniform to your solution.
2. Configure Uniform license#
You must register your Uniform license key on the Sitecore server. There are multiple ways to do this. These options are evaluated in order, and the uses first option that matches.
Option 1. Sitecore configuration setting
You can set your license key in a Sitecore configuration setting. The setting name must be Uniform.LicenseKey.
See the App_Config\Include\zzz_Uniform\Uniform.LicenseKey.config.example sample file installed with the package. You can change this file's extension from .example to .config and edit the value in there.
<configuration xmlns:patch="http://www.sitecore.net/xmlconfig/"> <sitecore> <settings> <setting name="Uniform.LicenseKey" value="[!!! UNIFORM LICENSE KEY !!!]" /> </settings> </sitecore> </configuration>Option 2. Connection string
You can set your license key in a connection string. The connection string name must be Uniform.LicenseKey. For example:
<add name="Uniform.LicenseKey" connectionString="[!!! UNIFORM LICENSE KEY !!!]" />Option 3. Environment variable (recommended)
You can set your license key in an environment variable UNIFORM_LICENSE_KEY; you may need to restart your Sitecore server, Azure App Service or IIS, after adding or updating this environment variable.
The Uniform license key is validated when the IIS app pool starts. The validation process involves connecting to the Uniform license validation server, so an internet connection is required.
3. Configure Uniform API token#
The Uniform API token is used to secure the Uniform endpoint and will be used as a uniform_token query string when requesting any Uniform services.
This value should be set to a secret value. You can use any value you like; make sure you use the same value in your Next or Nuxt application at a later stage.
There are two locations where you can set this value:
Option 1. Sitecore configuration setting
You can set your the token in a Sitecore configuration setting.
The setting name is Uniform.API.Token. For reference, see the App_Config\Include\zzz_Uniform\Uniform.API.Token.example sample config file that is installed with the package. You can change the extension of this file from .example to .config and edit the value.
<configuration xmlns:patch="http://www.sitecore.net/xmlconfig/"> <sitecore> <settings> <setting name="Uniform.API.Token" value="random-string" /> </settings> </sitecore> </configuration>Option 2. Connection string
Alternatively, you can set the token in a connection string.
The connection string name must be Uniform.API.Token.
For example:
<add name="Uniform.API.Token" connectionString="random-string" />
Option 2: integrating Uniform with your existing solution via Nuget packages#
This option is recommended when you are going though the operationalization steps to integrate Uniform with your environment. In order to faciliate this option, we provide Uniform.SDK.zip with the Visual Studio solution that consists of two projects:
- Uniform.SDK - this contains all config and Nuget dependencies for Uniform.
- Uniform.Items - this project contains serialzied Unicorn items along with Unicorn Nuget packages to facilitate the Unicorn sync.
Depending on where you are in your process, this may be a better alternative to the option with a Sitecore installation package, as it ensures Uniform bits are deployed together with your solution. On top of that, this provides you with a way to start extending Uniform APIs within the Visual Studio project.
Pre-requisites#
UNIFORM_NUGET_ACCESS_TOKENprovided to you by your Uniform representative.- Uniform.SDK.zip package downloaded.
Integration steps#
Unzip the Uniform.SDK.zip file somewhere where you keep your Sitecore codebase.
Run
./Init.ps1 12345678-1234-1234-1234-123456789abc, where the guid is theUNIFORM_NUGET_ACCESS_TOKENwe provided you with.This script is setting environment variable
UNIFORM_NUGET_ACCESS_TOKENwith this value, so you can skip this step and set it manually.This enivronment variable will be used to pull Nuget packages from our feed.
Open the
Uniform.SDK.slnsolution in Visual Studio.Configure Uniform API token via a config patch. For your convenience, the
Uniform.API.Token.config.examplefile under\Uniform.SDK\App_Config\Include\zzz_Uniformis there for your reference. You can either create a new config patch with the same contents, or simply rename the extension of this file to.config. The Uniform API token is used to secure the Uniform endpoint and will be used as uniform_token query string when requesting any of the Uniform services. This value should be set to a secret value. You can use any value you like, just make sure you use the same value in your Next or Nuxt application at a later stage.<configuration xmlns:patch="http://www.sitecore.net/xmlconfig/"> <sitecore> <settings> <setting name="Uniform.API.Token" value="random-string" /> </settings> </sitecore> </configuration>Configure Uniform API token via a config patch. For your convenience, the
Uniform.API.Token.config.examplefile under\Uniform.SDK\App_Config\Include\zzz_Uniformis there for your reference. You can either create a new config patch with the same contents, or simply rename the extension of this file to.config. The Uniform API token is used to secure the Uniform endpoint and will be used as uniform_token query string when requesting any of the Uniform services. This value should be set to a secret value. You can use any value you like, just make sure you use the same value in your Next or Nuxt application at a later stage.<configuration xmlns:patch="http://www.sitecore.net/xmlconfig/"> <sitecore> <settings> <setting name="Uniform.API.Token" value="random-string" /> </settings> </sitecore> </configuration>Gotcha: when renaming the file extensions in Visual Studio, ensure the files retain "Build Action = Content"

Configure Uniform License Key Use the directions from the step above. We recommend configuring the License Key as an environent variable. If for some reason you want to add it to the configuration, use the sample from the
Uniform.LicenseKey.config.examplefile.<configuration xmlns:patch="http://www.sitecore.net/xmlconfig/"> <sitecore> <settings> <setting name="Uniform.LicenseKey" value="[!!! UNIFORM LICENSE KEY !!!]" /> </settings> </sitecore> </configuration>Gotcha: when renaming the file extensions in Visual Studio, ensure the files retain "Build Action = Content"
Restore Nuget Packages for the whole solution.
Install
UnicornNuGet package to the Uniform.Items Visual Studio project, and check README for additional instructionsWhile in Visual Studio, go to "Publish" in context menu of your solution and configure the Visual Studio Publishing profile for the Uniform.SDK and Uniform.Items projects. It should point to your Sitecore website folder.
Run Visual Studio Publish on both projects.
Run Uniorn Sync by invoking
https://your-sitecore-host/unicorn.aspx
Adding your site configuration#
As a part of the deployment, you may want to configure your first site with Uniform.
This activates all Uniform APIs for a given site. The name of the site must correspond to any Sitecore site in configuration, for example: website.
The following config patch contains the barebones configuration necessary to activate site name "website" with Uniform.
<configuration xmlns:patch="http://www.sitecore.net/xmlconfig/" xmlns:set="http://www.sitecore.net/xmlconfig/set/"> <sitecore> <uniform> <siteConfigurations> <siteConfiguration name="website"> <site set:inherits="website" /> </siteConfiguration> </siteConfigurations> </uniform> </sitecore></configuration>After this config is deployed, you should be able to request the map service endpoint:
https://ypur-sitecore-host/uniform/api/content/<your-site-name>/map?uniform_token=your-Uniform.API.Token
Integration with existing solution#
If you already have an existing VS solution, the process of integrating Uniform is a matter of adding the projects from the Uniform.SDK.sln solution to your own solution.
Important: please keep in mind that this solution is using Unicorn v4.1.1, so you if you are already using a different version, you would need to make sure the version used in Uniform.Items is aligned with the version used in your solution.
Installation validation#
Open https://sitecore-host/sitecore/admin/uniform page on your Sitecore instance while being logged in as an administrator, you should see something like this:
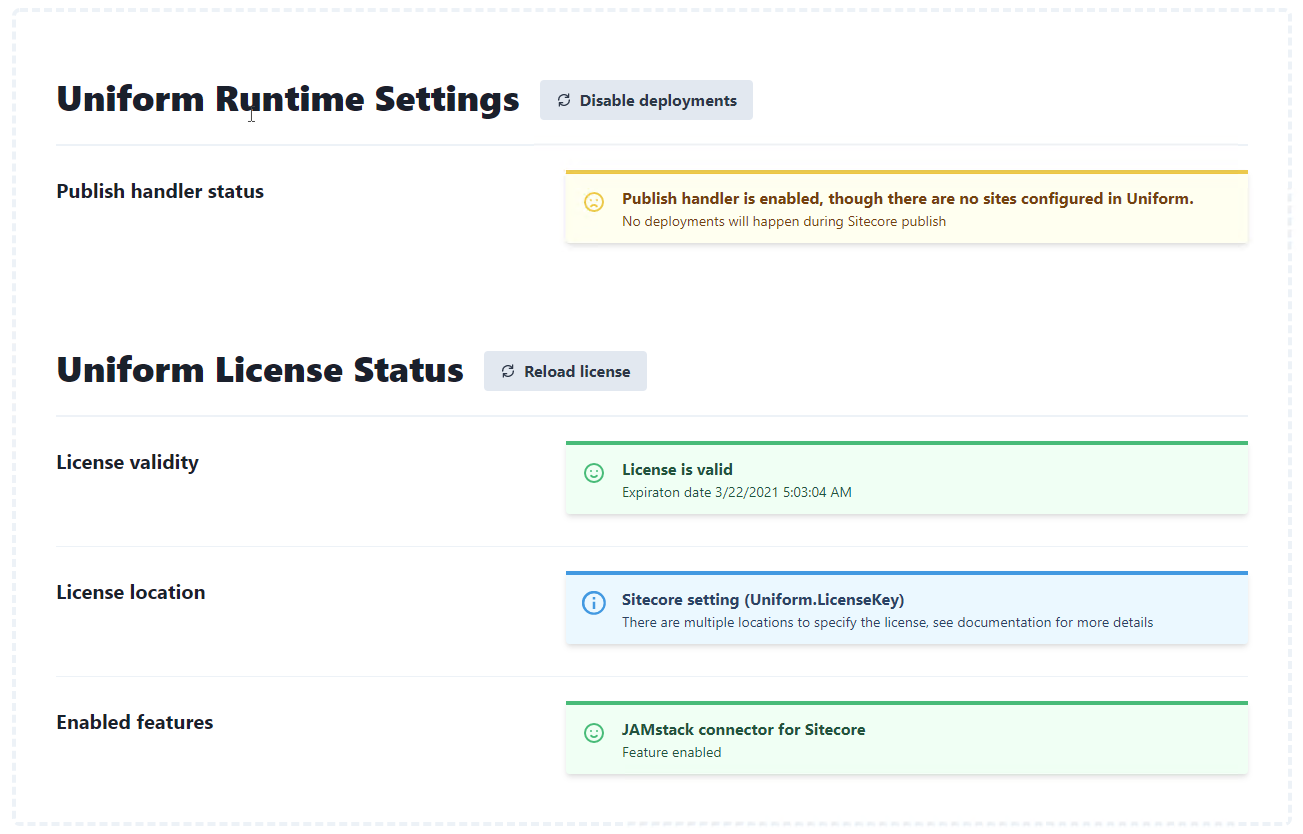
It is expected that the "Publish handler status" can show the warning, as we have not configured any sites yet.
It is essential to check that the license is valid and the Jamstack connector feature is enabled.
If license validation fails, check the following:
- Double-check the license key is copied correctly.
- Ensure your Sitecore server has an internet connection.
- The Sitecore logs may contain more detailed information.