Tutorial: Jamstack for Sitecore JSS (Next.js)
Introduction#
Sitecore JSS brings JavaScript developers first-class support with SDK and LayoutService API.
Uniform makes it possible to implement Jamstack architecture with Sitecore JSS, supporting both React- and Vue-based implementations by providing a starter kit integrated with the Static Site Generation-capable frameworks, Next.js (React) and Nuxt (Vue). The starter kits come pre-wired with Uniform SDK that integrates them with the Uniform APIs running on top of your Sitecore instance. This allows it to handle static site generation and act as a development environment, preview server, and server-side renderable application instance for Experience Editor.
This basic tutorial focuses on React-based framework Next.js, and walk you through the common scenarios around Jamstack, such as:
- Running development server.
- Executing static export of the whole app.
- Running it as a Build Service and receive deployment commands from Sitecore Publishing pipeline.
- Running it as a Preview Service and Rendering Host for Experience Editor.
At the end of this tutorial, you will understand the basics of how Jamstack architecture works with Sitecore JSS and proceed to the next stages.
Prerequisites#
Before setting up your app, please confirm the following prerequisites are met:
- Uniform Connector package installed and configured as per the earlier guide.
- For this particular tutorial, you need Sitecore version 9.x and up due to Sitecore JSS dependency.
- Sitecore JSS Server package is installed and configured according to the official Sitecore JSS documentation here.
- Make sure that you have sufficient permissions to install Sitecore packages in your Sitecore instance.
- Ability to deploy a configuration file to your Sitecore instance's webroot.
- Install Node.js v.12 or higher on your developer machine along with npm. The latest LTS version is recommended.
- Have the npm access token handy- This is provided by your Uniform account representative.
- Git installed, allow you to clone the starter repo.
- Recommended to install Sitecore JSS CLI:
npm i @sitecore-jss/sitecore-jss-cli -g - Grab the value of
Uniform.API.Tokensetting used during Uniform Connector configuration.
Step 1: deploy starter site content items#
Clone the starter repo:
git clone https://github.com/uniformdev/sitecore-jss-nextjs-starterkitUsing Sitecore Installation Wizard, install the
uniform-jss-kit-site.zippackage from this repo'ssitecore\App_Data\packagesfolder.This package contains content items for a couple of pages included in the kit, renderings, templates, and the API key item that we will use later.
Run smart or incremental publishing to ensure the starter site items are in the web database.
Deploy the config files for this starter by copying the files from this repo's
/sitecore/App_Configfolder to your Sitecore installation'sApp_Config\folder subfolder structures should match.This will have Sitecore instance restart.
Step 2: Verify Uniform Map API#
Make two requests to your Sitecore instance where the Uniform Connector is installed with uniform_token query string containing the value of the Uniform.API.Token setting.
The first request is checking if the map service for the
uniform-jss-kitsite is operational:https://YOUR-SITECORE-HOST/uniform/api/content/uniform-jss-kit/map?uniform_token=INSERT-UNIFORM.API.TOKEN-HEREThe second request is similar, and the only difference is the name of the site is
uniform-jss-kit-preview. This is the site that is serving content from themasterdatabase:https://YOUR-SITECORE-HOST/uniform/api/content/uniform-jss-kit-preview/map?uniform_token=INSERT-UNIFORM.API.TOKEN-HEREIn both cases, the expected response looks something like this:
{ "isPage":true, "lastModified":"2021-02-19T17:21:56", "children":{ "about":{ "isPage":true, "lastModified":"2021-02-19T17:10:30", "children":{ }, "name":"About", "id":"f9e9b998-3fcc-4a2d-905e-fa2a35091d8e", "template":"Page" } }, "name":"Home", "id":"041c8a04-1760-42a2-81a3-53ca4ae1f705", "template":"Page"}
Step 3: Configure the app#
Set the npm token so you can download private
@uniformdevnpm packages.You should receive the npm token from your Uniform account representative; if not, send an email to support@uniform.dev.
There are multiple ways to set up the npm token in your environment:
Set the
NPM_TOKENWindows environment variable with the value we provided you by your account representative. You can do it manually:
- or run
$Env:NPM_TOKEN="your-npm-token here"in PowerShell - or
export NPM_TOKEN="your-npm-token here"in Bash.
- or run
Alternative way: This variable is used within the .npmrc file located next to package.json. Manually replace
${NPM_TOKEN}with the value://registry.npmjs.org/:_authToken=npm-token-guid
Run
npm installoryarnand ensure it completes successfully.Run
jss setupto connect JSS frontend to Sitecore. Runjss deploy configto deploy the application config from/sitecore/configfolder into your Sitecore instance.Create
.envfile with connection details to your Sitecore instance.# the Sitecore endpoint where Uniform Connector is installed and configuredUNIFORM_API_URL=http://your-sc-host# the value of the Uniform.API.Token setting specified in Sitecore config file.UNIFORM_API_TOKEN=Uniform.API.Token valueInstead of specifying the .env file, you can use system environment variables instead. For non-developer environments, this is highly recommended.
There are more environment variables available to specify - see the uniform.config.js file for all default values. These environment variables can be overridden according to your environment-specific by corresponding entries to the
.envfile:UNIFORM_API_SITENAME=uniform-jss-kit(Optional) If a self-signed cert is used for your Sitecore instance and connecting over HTTPS, you will likely need to add the following parameter:
NODE_TLS_REJECT_UNAUTHORIZED=0Apply this if you experience connection issues similar to below:
Route data fetch error for route: / { message: 'request to https://sc/sitecore/api/layout/render/jss?item=%2F&sc_lang=en&sc_apikey=eefe326b-aff1-4154-9ae8-2beb85d4b8cb&sc_site=uniform-jss-kit failed, reason: unable to verify the first certificate', type: 'system', errno: 'UNABLE_TO_VERIFY_LEAF_SIGNATURE', code: 'UNABLE_TO_VERIFY_LEAF_SIGNATURE',
Step 4: Run as an SSR server#
Use this mode as a Preview Service, as JSS Rendering Host, and running troubleshooting of the rendering process if any of your pages fail to render during export:
npm run buildnpm run start-server
or npm start which runs build and start-server commands.
This will do the production build and will start SSR server on http://localhost:3000
You are expected to see the starter kit site rendering and working as expected.
🎉 Well done! Now your app is up and running and you are ready for the next step.
Step 5: Run static export from CLI#
npm run exportwill do the build, and static export of this site will place the static files for the exported site under the folder called/out.npx serve outto serve the site locally in the static server onhttp://localhost:5000
The sequence of steps you would do during the release process within your CI/CD pipeline. No code changes would trigger this process from the Sitecore Publishing pipeline, so the pages with the latest content can be exported using the latest version of the code (see Step 7).
🎉 If the site is rendering without issue, congrats! You have successfully decoupled this JSS app from Sitecore, and now it can be deployed virtually anywhere!
Step 6: Trigger static export from the publishing pipeline#
Now that we did a static export from CLI, let's do this from the Sitecore Publishing pipeline. In order to make that happen, we need to start our app as the Build Service, which the Uniform Connector will communicate with in order to trigger the static export.
Since we already deployed the config files during Step 2, let's fire up our app as the Build Service. The Sitecore configuration expects this service to operate at http://localhost:3000 by default. If your service runs on another port, you need to adjust the ServiceUrl value for the uniform-jss-kit site configuration. It can be found in uniform-jss-kit.Uniform.Deployment.HostedService.config file under \App_Config\Include\zzz_uniform-jss-kit:
<configuration xmlns:patch="http://www.sitecore.net/xmlconfig/" xmlns:set="http://www.sitecore.net/xmlconfig/set/"> <sitecore> <uniform> <siteConfigurations> <siteConfiguration name="uniform-jss-kit"> <deployment> <deploymentService set:ref="uniform/services/hostedDeploymentService"> <ServiceUrl>http://localhost:3000</ServiceUrl> </deploymentService> </deployment> </siteConfiguration> </siteConfigurations> </uniform> </sitecore></configuration>Start the Build Service#
Start this app with
npm startand verify the site is up and running onhttp://localhost:3000.Now that Next app is running, it is ready to accept your Sitecore Authoring server's deployment requests.
Publish on any page-level item under the
uniform-jss-kitsite to trigger site deployment: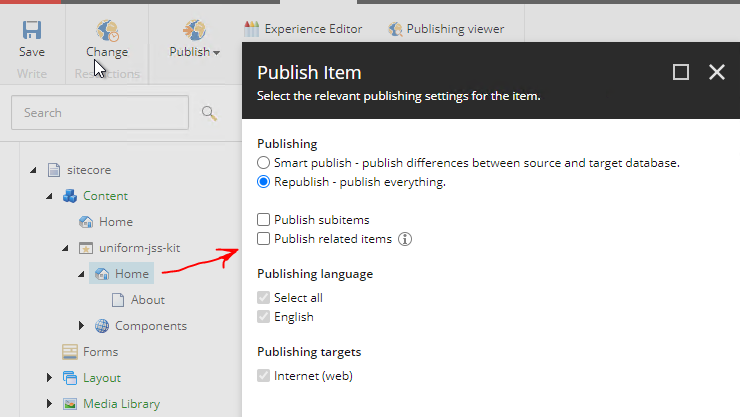
The console where the Build Service runs is expected to see the indication of the deploy request received and export process initiated, ultimately succeeding in a couple of seconds:
02/05-21:58:53 info: Received service status (and version) request02/05-21:58:56 info: Received service status (and version) request02/05-21:58:56 info: Received deploy request.02/05-21:58:56 info: Deploy request contains ENV variables: config will be merged for the current deploy request02/05-21:58:56 info: ENV delta: {}02/05-21:58:56 info: Initializing FakePublishProvider02/05-21:58:56 info: Saving .temp/.publish-map.json02/05-21:58:56 info: Creating output dir: C:\sitecore-jss-nextjs-starterkit\.temp\002/05-21:58:56 info: Starting build and export...02/05-21:58:56 info: UNIFORM_PUBLISH_NEXT_EXPORT_COMMAND is not defined, so switching to default: node node_modules/next/dist/bin/next build && node node_modules/next/dist/bin/next export --outdir "__DIR__"02/05-21:58:56 info: Starting custom exec nextjs export process (with UNIFORM_API_SITENAME = uniform-jss-kit)02/05-21:58:56 info: Received deploy status request, ticket: 0, message: Generating HTML site files02/05-21:58:58 info: Received deploy status request, ticket: 0, message: Generating HTML site files 02/05-21:59:00 info: Received deploy status request, ticket: 0, message: Generating HTML site files 02/05-21:59:02 info: Received deploy status request, ticket: 0, message: Generating HTML site files 02/05-21:59:04 info: Received deploy status request, ticket: 0, message: Generating HTML site files 02/05-21:59:06 info: Received deploy status request, ticket: 0, message: Generating HTML site files 02/05-21:59:06 info: Exporting has succeeded. 02/05-21:59:06 info: Creating .timestamp.txt file 02/05-21:59:06 info: Starting deployment02/05-21:59:06 info: Deploying C:\sitecore-jss-nextjs-starterkit\.temp\0 (FakePublishProvider) 02/05-21:59:06 info: Successfully deployed02/05-21:59:08 info: Received deploy status request, ticket: 0, message: Deployment is completeThe exported site will be created under the \.temp\ folder in an automatically named subfolder.
Optionally, you can cd into that folder and run npx serve . to test if everything got exported successfully.
Note that every time an item is published, the whole site will get re-exported. The incremental static site generation and deployment are possible; it needs to be enabled and configured. Check out this guide on how to configure it.
🎉 Well done! Now you are able to trigger static export not only via CLI but also from Sitecore!
Step 7: Run development server#
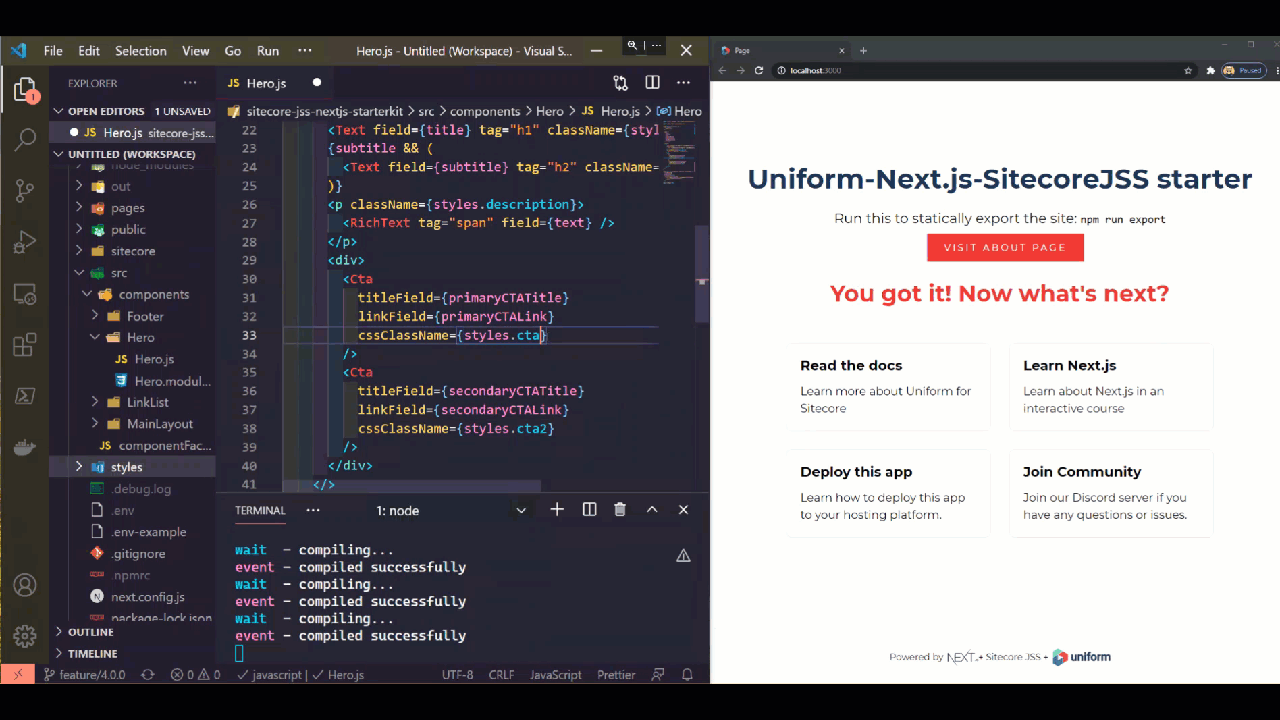
Now let's try to make some code changes and check out the developer experience.
First, we need to start the development server with npm run dev and open http://localhost:3000/ to see the app.
Let's locate one of the components, Hero under src\components\Hero\Hero.js and try changing the cssClassName attribute from styles.cta1 to styles.cta2 and save.
Notice the change got applied instantly - that's the magic of Next.js and hot reloading!
Feel free to change more things around components, add new ones, etc. Sky is the limit here.
Step 8: Setup with JSS Rendering Host#
The Rendering Host capability of Sitecore JSS is supported with this starter kit. It allows for the Next.js app to act as an external renderer to support the Experience Editor and Preview functionality of Sitecore.
There are not many things to set up here or change if you are running with default settings.
Ensure the
scjssconfig.jsonfile is created in your project root. To create, runjss setupCLIThe Sitecore API key for your app has already been installed together with the sample package, so you can use this value when prompted for the Sitecore API Key by the CLI:
eefe326b-aff1-4154-9ae8-2beb85d4b8cbThe resulting
scjssconfig.jsonfile will look like this:{ "sitecore": { "instancePath": "", "apiKey": "eefe326b-aff1-4154-9ae8-2beb85d4b8cb", "deploySecret": "some-value-here-doesnt-matter", "deployUrl": "https://your-sitecore-host/sitecore/api/jss/import", "layoutServiceHost": "https://your-sitecore-host" }}Since the required app configuration has been deployed to your Sitecore instance, you should be able to proceed to the next step.
The settings critical to the Rendering Host operation are located in the
uniform-jss-kit.SiteConfiguration.configfile; notice that:the
serverSideRenderingEngineattribute value is set tohttp- enables Rendering Host capability for this app.the value in
serverSideRenderingEngineEndpointUrlindicates the address of where your Next.js app should run to be reachable from the Sitecore instance:<javaScriptServices> <apps> <app name="uniform-jss-kit" ... serverSideRenderingEngine="http" serverSideRenderingEngineEndpointUrl="http://localhost:3000/api/editing/render" serverSideRenderingEngineApplicationUrl="http://localhost:3000" /> </apps></javaScriptServices>
Run
npm startto start up the server, make sure the page is rendering onhttp://localhost:3000Go to your Sitecore instance and request the home page:
https://sitecore-hostit should render the same app.Open Sitecore Experience Editor, you should be able to edit the content in-line.
Anatomy of the starter kit#
This app is a fairly vanilla Next.js app with minimal dependencies to ensure Uniform plugin is wired up.
/pagesfolder_app.jsoverrides Next.js application; this is where the Uniform plugin for Next.js is initialized and configured, and less important is where the global styles are imported:if (typeof window === 'undefined') { require('@uniformdev/next-jss-server').configure();}_error.js- override for the Next.js error page handling. This file is not critical for the starter kit operation.[[...slug]].js- this part is also vital here, as it essentially defines a default page handling for all the Sitecore-driven routes. These parts are the required scaffolding for all the pages. It ensures the Sitecore context is propagated to child components and renders theMainLayoutcomponent that takes care of rendering the rest.<StaticAssetContextProvider assetPrefix={assetPrefix}> <SitecoreContext componentFactory={componentFactory} layoutData={layoutData} > <MainLayout route={route} /> </SitecoreContext></StaticAssetContextProvider>The implementation of Next.js
getStaticPathsandgetStaticPropsis defined.The
MainLayoutis the root level component and implemented as an example; feel free to change it as you see fit.
/publicfolder - the place to drop any static files for Next.js to serve. Learn more about it here./sitecorethe Sitecore configs are placed to be dropped into your Sitecore instance, so the server-side is configured correctly found in theApp_Configfolder. The Sitecore package with the content items needed for this starter kit are less critical if you are wiring this up to your existing Sitecore JSS app./srcfolder - this is where the presentation components are defined along with the Sitecore JSS componentFactory.The only essential part here is the
componentFactory.jsfile andMainLayoutthat is referenced from[[...slug]].js/outfolder - the destination for the static export goes when you are runningnpm run export(ornpm run export:esi)..temp- the folder for Uniform plugin to export the site to when the process is triggered from Sitecore publishing.next.config.js- main Next.js config file.uniform.config.js- default environment variables for Uniform.uniform.server.js- the next.js server entry point.
Need help?#
Feeling stuck? If you are already a customer, please email us at support@uniform.dev. If you are not a customer yet and evaluating, please join our Discord server, and we will find ways to help you: https://uniform.to/join