Tutorial: Jamstack for Sitecore MVC
Introduction#
This tutorial will guide you through the process of "Jamstackifying," a simple Sitecore MVC site.
As development and exporting layer, we will use React-based framework Next.js and will walk you through the typical scenarios around Jamstack, such as:
- Running Next.js development server.
- Executing static export of the whole app.
- Running it as a Build Service and receive deployment commands from Sitecore Publishing pipeline.
At the end of this tutorial, you will understand the basics of how Jamstack architecture works with Sitecore MVC and proceed to the next stages.
We recommend completing this tutorial with this kit site first before attempting to activate your Sitecore site. You can use the same kit to start your site.
Prerequisites#
Before setting up your app, please confirm the following prerequisites are met:
- Install Uniform Connector needs to be complete; you need Sitecore instance of 8.2 Update-7 or higher running with Uniform Connector package installed and configured.
- Make sure that you have sufficient permissions to install Sitecore packages in your Sitecore instance.
- Ability to deploy a configuration file to your Sitecore instance's webroot.
- Grab the value of
Uniform.API.Tokensetting used during Uniform Connector configuration. For simplicity, we set the token to 12345 in this example, but you can use any custom value. - Node.js v.12 or higher must be installed on your developer machine along with npm. The latest LTS version is recommended.
- Have the npm access token handy- Your Uniform account representative provides this.
- git installed to clone the starter repo.
Step 1. Install and configure the MVC kit site in Sitecore#
We have created a small MVC website with Bootstrap styling that you can install on any Sitecore instance, preferably without other sites or custom code, to avoid possible conflicts with any of the customizations.
To install the website to your Sitecore instance:
Clone the starter repo
git clone https://github.com/uniformdev/sitecore-mvc-nextjs-starterkitInstall the Sitecore package from the
sitecore\App_Data\packagesof this repo.Run smart or incremental publishing to ensure the starter site items are in the web database.
Deploy the config files for this starter by copying the files from this repo's
/sitecore/App_Configfolder to your Sitecore installation'sApp_Configfolder; subfolder structures should match.This will have Sitecore instance restart.
The only enabled config file has
uniform-mvc-kitsite definition for Sitecore so that when you loadhttps://your-sitecore-hostin the next step, you'll get our sample site and not the default Sitecore site.Verify MVC kit site is running
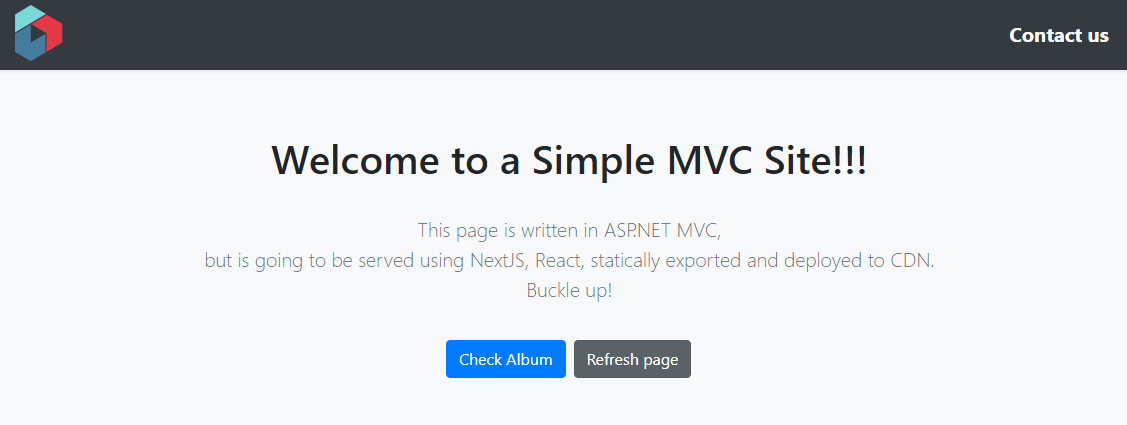
Try load your
https://your-sitecore-host. This is what you should see: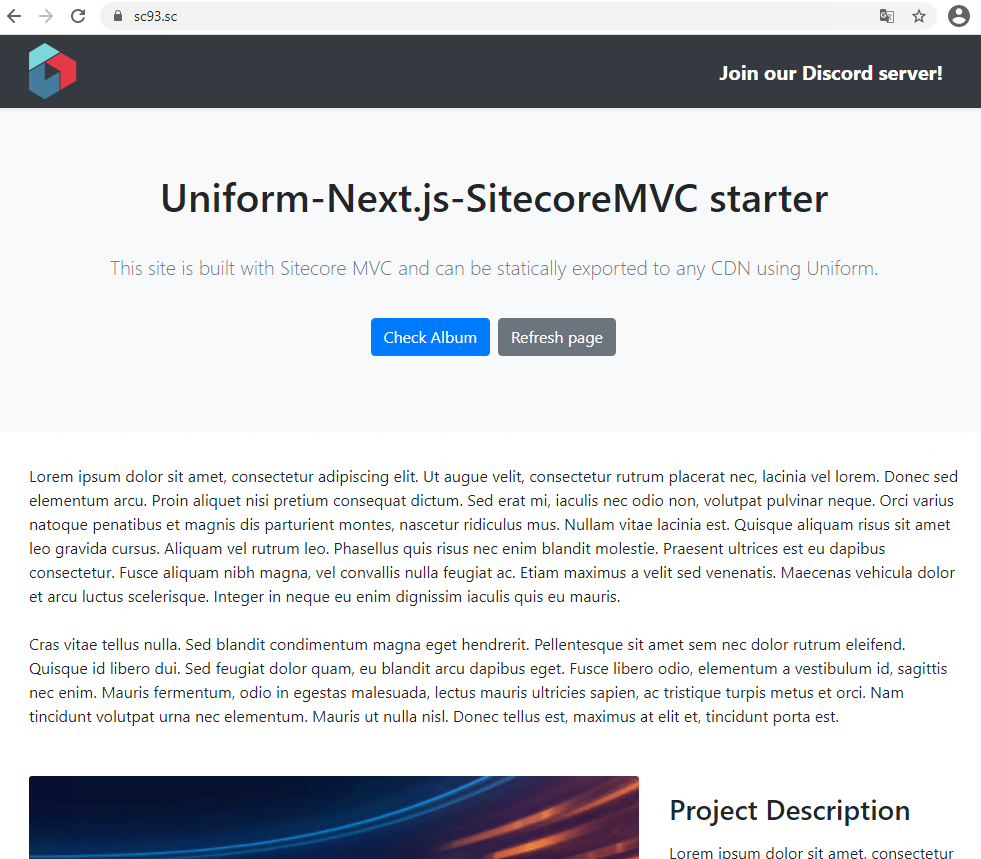
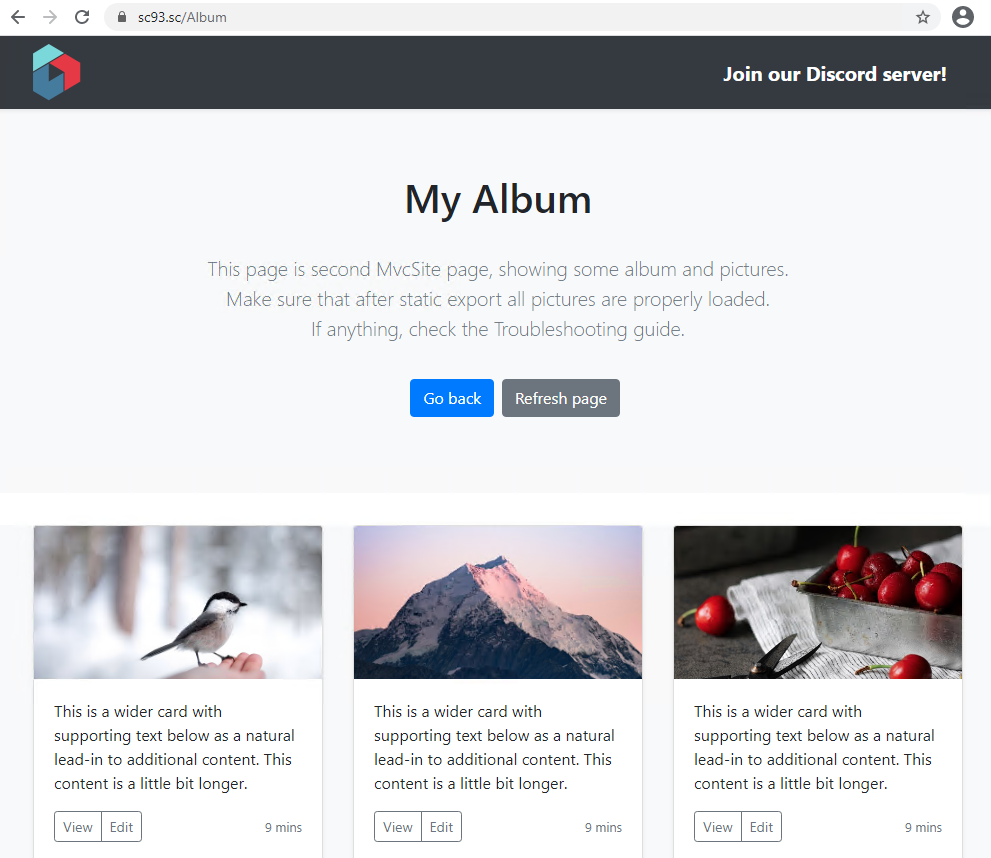
And if you click on "Check Album" button, it should lead you to the page with some nice Unsplash pictures:
If you have not installed Uniform Connector at this step - install it now. The rest of the tutorial will help you become familiar with using Uniform Connector. Refer to Step 1 of Getting Started: Install Uniform Connector
Step 2: Verify Uniform APIs are functional#
Make two requests to your Sitecore instance where the Uniform Connector is installed with uniform_token query string containing the value of the Uniform.API.Token setting.
First request is checking if the map service for the
uniform-mvc-kitsite is operational:https://YOUR-SITECORE-HOST/uniform/api/content/uniform-mvc-kit/map?uniform_token=INSERT-UNIFORM.API.TOKEN-HEREHere is the expected response:
{ "isPage":true, "lastModified":"2021-02-22T19:44:50", "children":{ "album":{ "isPage":true, "lastModified":"2021-02-22T19:11:02", "children":{ }, "name":"Album", "id":"6adef144-6c4a-471a-b785-b32924237f07", "template":"AlbumPage" } }, "name":"Home", "id":"33eba0c0-b589-4784-931d-af0668a00a7c", "template":"Page"}The second request is checking if the page service is operational:
https://YOUR-SITECORE-HOST/uniform/api/content/uniform-mvc-kit/page?uniform_token=INSERT-UNIFORM.API.TOKEN-HEREThe expected response will look like this (compressed for brevity):
{ "renderings":[ ... ], "datasources":{ ... }, "mvc":{ ... }, "fields":{ "actiontext":"Check Album", "pagetitle":"Homepage", "title":"Uniform-Next.js-SitecoreMVC starter", "actiontarget":"/album", "text":"This site is built with Sitecore MVC and can be statically exported to any CDN using Uniform.", "_lang":"en", "_rev":"ff30ad16-98d6-46c9-ad3c-2f71a93897a4", "_url":"/" }, "name":"Home", "id":"33eba0c0-b589-4784-931d-af0668a00a7c", "template":"Page"}
Step 3: Configure the app#
For reference, by app, we mean sitecore-mvc-nextjs-starterkit app, the rrepository you've cloned in the first step. It is standalone and can be located in any folder and even on another server, as long as your Sitecore instance with Uniform Connector is reachable from it.
Set the npm token so that you can download private
@uniformdevnpm packages.You should receive the npm token from your Uniform account representative; if not, send an email to support@uniform.dev.
There are multiple ways to set the npm token in your environment:
Set the
NPM_TOKENWindows environment variable with the value we provided you by your account representative. You can do it manually:
- or run
$Env:NPM_TOKEN="your-npm-token here"in PowerShell - or
export NPM_TOKEN="your-npm-token here"in Bash.
- or run
Alternative way. This variable is used within the .npmrc file located next to package.json, in the root of
sitecore-mvc-nextjs-starterkit. So you can just manually replace${NPM_TOKEN}with the value://registry.npmjs.org/:_authToken=npm-token-guid
Run
npm installoryarnand ensure it completes successfully.Create
.envfile in the root of the app with connection details to your Sitecore instance.
# the Sitecore endpoint where Uniform Connector is installed and configuredUNIFORM_API_URL=http://your-sitecore-host# the value of the Uniform.API.Token setting specified in Sitecore config file.UNIFORM_API_TOKEN=12345Instead of specifying the .env file, you can use system environment variables instead. For non-developer environments, this is highly recommended. There are more environment variables available you can specify if needed. See uniform.config.js file to see some of the defaults. These environment variables can be overridden according to your environment-specific by corresponding entries to the .env file.
- (Optional, but highly recommended) If a self-signed cert is used for your Sitecore instance and you are connecting over HTTPS, you will likely need to add the following parameter.
NODE_TLS_REJECT_UNAUTHORIZED=0Otherwise, as you may experience connection issues like these:
Route data fetch error for route: / { message: 'reason: unable to verify the first certificate', type: 'system', errno: 'UNABLE_TO_VERIFY_LEAF_SIGNATURE', code: 'UNABLE_TO_VERIFY_LEAF_SIGNATURE',In the end, your .env file is going to look like this:
# the Sitecore endpoint where Uniform Connector is installed and configuredUNIFORM_API_URL=http://your-sitecore-host# the value of the Uniform.API.Token setting specified in Sitecore config file.UNIFORM_API_TOKEN=12345#if you are running on https, this variable is also needed, otherwise you'll receive "Unable to verify leaf-signature" errors:NODE_TLS_REJECT_UNAUTHORIZED=0You can also use .env-example file that is coming with sitecore-mvc-nextjs-starterkit by renaming it to .env and updating settings above. Just make sure that all settings related to azure publishing are disabled for now - we are going to work with them in additional chapters.
Step 4: Run as an SSR server#
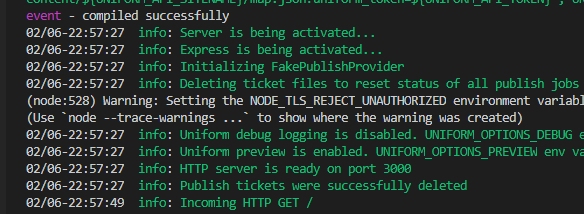
After you are done with all the configurations on the previous steps, you should be able now to run yarn start . After your app finishes building, you'll see messages like this in the terminal:
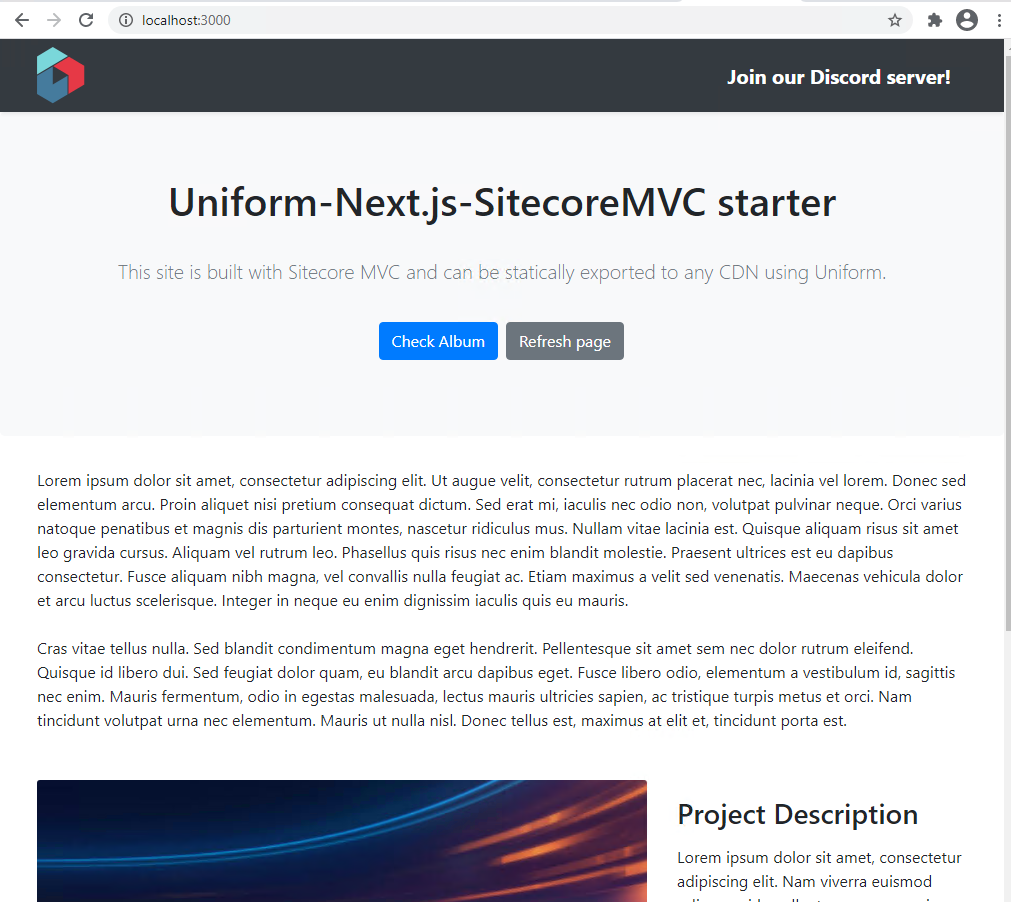
Now try to request http://localhost:3000 in your browser. If everything went well, you should see exactly the same that your MVC website renders. However, now it is already an app where each component was server-side rendered by Next.js and the most important step on the way to static generation:
Before going to the next step, make sure that your app is server-side rendered correctly, you can navigate between the pages, and don't get any server errors in the terminal or console.
Step 5: Run static export from CLI#
Now, let's export our whole site!
Simply run
yarn export(ornpm run export:esi) and watch app being built and exported. After export finishes, you should see a folder namedoutadded under the root of your app: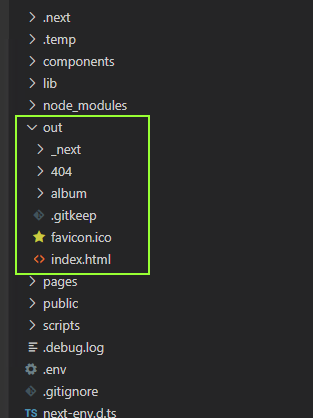
Run
npx serve outwhich starts a static file server on the/outfolder. It will catch all requests going to localhost:5000 and serve them with static content from this folder. You should be able to see something like this in console:
Browse http://localhost:5000 and check that you get the same content as before.
This is the sequence of steps (except for the npx serve out part) you would do during release process within your CI/CD pipeline.
🎉 Congrats! You have successfully decoupled this MVC app from Sitecore, and now it can be deployed virtually anywhere!
Step 6. Trigger static export from the publishing pipeline#
Now that we did a static export from CLI, let's do this from the Sitecore Publishing pipeline. In order to make that happen, we need to start our app as the Build Service, which the Uniform Connector will communicate with to trigger the static export.
Why do we need it? Remember, static sites are truly static. They only have html/css/js files. So if anything changes in your content, for example, if one of the content editors changes the title of some page, this needs to be reflected in our static site. Simply speaking, one of .html pages in our out folder needs to be updated. How are the pages getting updated? The only way is to run yarn export again, which will pick up the content. But running yarn export manually every time when one of your content editors changes some page would be tiresome, right? Therefore we've integrated our static process with the Sitecore publishing pipeline. yarn export will be seamlessly triggered every time when someone publishes content in Sitecore. Let's make it work!
Start the Build Service#
Activate the config file that defines a self hosted deployment service by changing the extension of the
App_Config\Include\zzz_uniform-mvc-kit\uniform-mvc-kit.Uniform.Deployment.Hosted.config.disabledfile from.disabledto.config.This enables Uniform Connector to communicate with our service via
ServiceUrland start static export process after publishing:<sitecore> <uniform> <siteConfigurations> <siteConfiguration name="uniform-mvc-kit"> <deployment> <deploymentService set:ref="uniform/services/hostedDeploymentService"> <ServiceUrl>http://localhost:3000</ServiceUrl> </deploymentService> </deployment> </siteConfiguration> </siteConfigurations> </uniform> </sitecore>This change will restart Sitecore.
If your service runs on another port, you would need to adjust the
ServiceUrlvalue foruniform-mvc-kitsite configuration.Start the Next.js app with
yarn startand verify the site is up and running onhttp://localhost:3000Now that Next.js app is running, it is ready to accept deployment requests from your Sitecore Authoring server.Publish on any page-level item under the
uniform-mvc-kititem in order to trigger site deployment. You can also change this item to see the difference, for example, let's add some exclamation marks to Home item's title: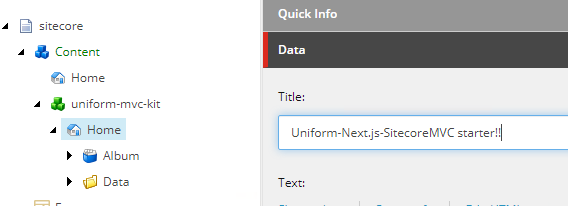
While publishing is going through, check the console log of the window where Build Service is running.
The console where the Build Service runs is expected to see the indication of the deploy request received and export process initiated and ultimately succeeding in a couple of seconds:
02/01-11:00:28 info: Received service status (and version) request02/01-11:00:30 info: Received service status (and version) request02/01-11:00:30 info: Received deploy request.02/01-11:00:30 info: Deploy request contains ENV variables: config will be merged for the current deploy request02/01-11:00:30 info: ENV delta: {}02/01-11:00:30 info: Initializing FakePublishProvider02/01-11:00:30 info: Saving .temp/.publish-map.json02/01-11:00:30 info: Creating output dir: C:\projects\exportedapp\exportedapp\.temp\102/01-11:00:30 info: Starting build and export...02/01-11:00:30 info: UNIFORM_PUBLISH_NEXT_EXPORT_COMMAND is not defined, so switching to default: node node_modules/next/dist/bin/next build && node node_modules/next/dist/bin/next export --outdir "__DIR__"02/01-11:00:30 info: Starting custom exec nextjs export process (with UNIFORM_API_SITENAME = mvcsite)02/01-11:00:30 info: Received deploy status request, ticket: 1, message: Generating HTML site files02/01-11:00:32 info: Received deploy status request, ticket: 1, message: Generating HTML site files02/01-11:00:34 info: Received deploy status request, ticket: 1, message: Generating HTML site files02/01-11:00:36 info: Received deploy status request, ticket: 1, message: Generating HTML site files02/01-11:00:38 info: Received deploy status request, ticket: 1, message: Generating HTML site files02/01-11:00:40 info: Received deploy status request, ticket: 1, message: Generating HTML site files02/01-11:00:42 info: Received deploy status request, ticket: 1, message: Generating HTML site files02/01-11:00:44 info: Received deploy status request, ticket: 1, message: Generating HTML site files02/01-11:00:44 info: Exporting has succeeded.02/01-11:00:44 info: Creating .timestamp.txt file02/01-11:00:44 info: Starting deployment02/01-11:00:44 info: Deploying C:\projects\exportedapp\exportedapp\.temp\1 (FakePublishProvider)02/01-11:00:44 info: Successfully deployed02/01-11:00:46 info: Received deploy status request, ticket: 1, message: Deployment is completeThis time the exported site will be created under
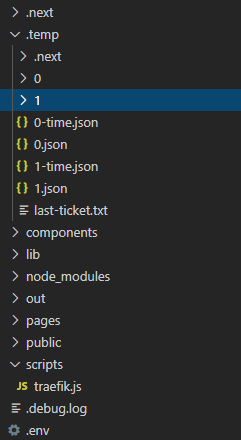
\.temp\folder in an automatically named subfolder.Optionally, you can cd into that folder and run
npx serve .to test if everything got exported successfully.For example, I tried to run publishing a couple of times and this is the structure I'll get in my .temp folder:
Now you can do cd .temp\1 and then npx serve
This will start localhost:5000 with our static site and updated title. Alternatively, I can run npx serve .temp\1 to achieve the same result:
Note that every time an item is published, the whole site will get re-exported. The incremental static site generation and deployment are possible, it needs to be enabled and configured.
Well done! Now you are able to trigger static export not only via CLI but also from Sitecore!
At this step, the most important part of the static generation of the Sitecore MVC site is done. You can now run through this tutorial with your own MVC website. The real-world MVC websites are usually quite a bit more complicated, therefore don't be discouraged if the process won't be as smooth as a tutorial.
Step 7: Run development server#
Note, that you can also use yarn dev or npm run dev to start the app in development mode.
Since there are no functional components or any presentation code in the kit out of the box, just the scaffolding, this mode is unlikely useful until you start rewriting components in React (which is covered in a separate guide).
Appendix
How come the images are loading?#
For the sake of simplicity, the /-/media URLs are re-configured to be served with a Sitecore server URL, meaning that they will be loaded from the Sitecore origin server, even when the site is statically exported. This is done in sitecore\App_Config\Include\zzz_uniform-mvc-kit\uniform-mvc-kit.Uniform.Deployment.Media.Sitecore.config file:
<setting name="Media.AlwaysIncludeServerUrl" set:value="true" />There are multiple ways to handle media serving with Jamstack worth considering when you are planning your effort:
Load all
/-/mediarequests from the Sitecore origin (with a CDN configured in front of it for global distribution and runtime image optimizations). This technique is nothing new and has been used for years and will likely require changing another setting:<setting name="Media.MediaLinkServerUrl" set:value="https://assets.yoursite.com" />Offload media to another origin (Azure Blob Storage) and serve it outside of Sitecore (with a CDN configured in front of it for global distribution and runtime image optimizations).
In order to facilitate that, Uniform comes with a Media Sync feature that you can configure to sync all or selected media items into a blob storage container, therefore offloading media serving from Sitecore even during cache misses. The use of an image-optimization capable CDN is still recommended to gain better performance and greener Lighthouse scores.
Anatomy of the starter kit#
This app is a fairly vanilla Next.js app with minimal dependencies to ensure Uniform plugin is wired up.
/pagesfolder_document.js- allows to add necessary data to pages, e.g. styles (test.css is in /public/styles/ folder):const uniformHead = head.filter((el) => el.type !== "meta");uniformHead.push(<link rel="stylesheet" href="/styles/test.css" />);[[...slug]].js- this part is also very important here, as it essentially defines a default page handling for all the Sitecore-driven routes. These parts are the required scaffolding for all the pages. This ensures the Uniform context is propagated to child components that the<Placeholder />component renders. This is where the implementation of Next.jsgetStaticPathsandgetStaticPropsis defined.<UniformContextProvider logger={createConsoleLogger()} componentMap={componentsIndex}> <PageComponent {...props}> {(renderingContext) => ( <Placeholder placeholderKey="/" renderingContext={renderingContext} /> )} </PageComponent></UniformContextProvider>
/publicfolder - the place to drop any static files for Next.js to serve. Learn more about it here./sitecorefolder - this is where the Sitecore configs are placed to be dropped into your Sitecore instance so the server-side is configured correctly (foundApp_Configfolder) and the Sitecore package with the content items needed for this starter kit (these are less critical if you are wiring this up to your existing Sitecore MVC site)./outfolder - this is where the static export goes when your are runningnpm run export(ornpm run export:esi)..temp- this is the folder for Uniform plugin to export the site to when the process is triggered from Sitecore publishing.next.config.js- main Next.js config fileuniform.config.js- default environment variables for Uniform.server.js- the next.js server entry point.
Need help?#
Feeling stuck? If you are already a customer, please email us at support@uniform.dev. If you are not a customer yet and evaluating, please join our Discord server and we will find ways to help you: https://uniform.to/join