How to create a Site Configuration
Introduction#
Uniform Connector introduces a concept of Site Configurations, an entity that encompasses all the site-level configuration settings and extends the concept of a "site" in Sitecore. You must have a valid Site Configuration before Uniform API can be activated as all content APIs are scoped to a given Site Configuration.
You can have multiple Site Configurations that rely on the same Sitecore site definition, but override other settings, such as languages (useful for the multi-lingual scenarios), target database (useful when you need to configure a pre-production site), and specify different deployment, Content Sync, and Media Sync settings.
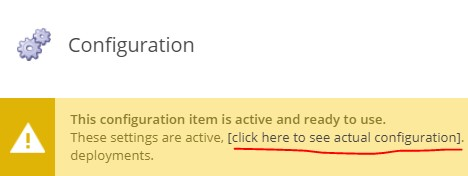
A Site Configuration can be defined in Sitecore items as well as in the Sitecore configuration files. A given Site Configuration can source its settings from both an item and a config file element. In such cases, the settings defined on content items replace settings defined in config files. Always refer to the warning message shown at the top of Content Editor on these items.
Why would you choose to store Site Configuration in items instead of config files? We recommend using config files for production. Using Sitecore items avoids the restarts of the worker process every time you need to change a configuration and therefore can be disruptive when you are just exploring and building a prototype, for example. At any point you can switch to the config file based approach. In fact, you can preview a config file representation of Sitecore item-based configuration using the link in the warning bar when selecting the "Configuration" node:
Defining a Site Configuration using Sitecore items#
All Site Configurations for Uniform are managed in the master database under /sitecore/system/Uniform/SiteConfigurations
In order to start configuring your site in items, right click on the "Site Configurations" item and select Insert:
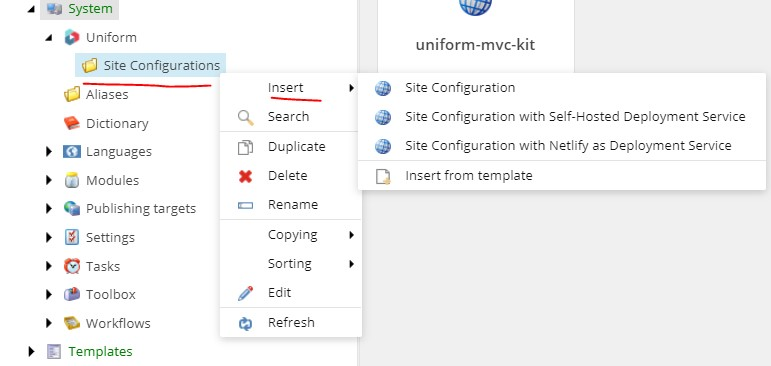
Pick one of the options from the menu. The "Site Configuration" option comes without any pre-configured services.
Other options provide a more convenient faster way to scaffold a configuration subitem for a desired type of deployment service (Self-Hosted or Netlify).
The name of the Site Configuration can be arbitrary, but it usually corresponds or relates to a name of your existing Sitecore site.
After creation, navigate to the "Configuration" subitem and notice that you can setup which site this Site Configuration should inherit from. In this case, in inherits its settings from one of the default sites called "website".

At this point, you can override such settings as database, language, device, etc. but this is completely optional.
Make sure your site configuration is ok#
Follow these steps below to verify your site configuration and test Uniform Content APIs.
Defining a Site Configuration using config files#
You can define the Site Configuration in a config patch file instead.
All you need to do is insert the <siteConfiguration name="site-config-name" /> element under /sitecore/uniform/siteConfigurations node. The child <site /> node can inherit any existing site, therefore this config patch needs to come after any of the existing config files that define your existing site configuration. You can override any of the site attributes here:
<configuration xmlns:patch="http://www.sitecore.net/xmlconfig/" xmlns:set="http://www.sitecore.net/xmlconfig/set/"> <sitecore> <uniform> <siteConfigurations> <siteConfiguration name="website-en-ca"> <site set:inherits="website" language="en-CA" /> </siteConfiguration> </siteConfigurations> </uniform> </sitecore></configuration>Make sure your site configuration is ok#
Follow these steps below to verify your site configuration and test Uniform Content APIs.
Verify your Site Configuration#
To verify that your site is configured, make a request to the following endpoint using your Sitecore site name as the value of the siteConfiguration query string parameter:
https://your-sitecore-instance/sitecore/admin/uniform?siteConfiguration=your-site-name
If the site is configured correctly, you should get the following response:
<siteConfiguration name="your-site-name"> <site inherits="your-site-name"/></siteConfiguration>If instead, you get the following error, then you likely missed one of the steps above.
Server Error in '/' Application.The '**your-site-name**' site doesn't exist.Description: An unhandled exception occurred during the execution of the current web request. Please review the stack trace for more information about the error and where it originated in the code.
Exception Details: System.InvalidOperationException: The '**your-site-name**' site doesn't exist.
Test Uniform content APIs#
- Make a GET request in your browser to the Map Service using the name of the Site Configuration and verify you are getting the JSON back with the page hierarchy of a given site. The Map Service reference is described here.
- If configuring an MVC site, make a GET request to the Page Service and verify you are getting the JSON back with the page hierarchy of a given site. The Page Service reference is described here.
Mutlilingual Site Configurations#
Uniform supports one language per Site Configuration.
This means that if you are running a multi-lingual setup where you do not have dedicated sites configured per language (you share a single <site /> element),
you must define multiple Site Configurations where you can override the language.
In the example below, the same Sitecore site definition "habitat" is used for two different Uniform Site Configurations, where each specifies the desired content language:
<siteConfiguration name="habiat_en">  <site inherits="habitat" language="en" /></siteConfiguration>
<siteConfiguration name="habitat_fr">  <site inherits="habitat" language="fr" /></siteConfiguration>
This means that "en" language will be used for all Uniform API requests to the habiat_en Site Configuration, in all flavors of Content services:
http://localhost/uniform/api/content/habiat_en/maphttp://localhost/uniform/api/content/habiat_en/page
and the context language will be switched to fr when the habitat_fr Site Configuration is used:
http://localhost/uniform/api/content/habitat_fr/maphttp://localhost/uniform/api/content/habitat_fr/page
Adjust FetchHost setting#
You may or may not need to adjust this setting. Typically, this is recommended for multisite environments or when the Page Service API is not responding correctly or you need to scale out execution.
In order to support the MVC mode, the Uniform Page Service API makes HTTP requests to retrieve the HTML of the MVC View and Controller renderings.
This mechanism can either make a callback to same instance where the Page Service runs (typically, a Content Management instance, but it can also be a Content Delivery instance depending on your use case) or it make call any other Sitecore instance out there with the Uniform Connector installed.
Long story short, the Page Service needs to know the endpoint to make the call to.
By default, it will use the values of targetHostName and hostName (if specified and in that order) attributes of the context site associated with a given Site Configuration.
If none of those attributes are specified on a given site, the value that Sitecore.Globals.ServerUrl returns will be used.
Sometimes you need to override this logic of resolving the endpoint.
This is what the FetchHost settings you to do.
You can explicitly configure the server URI that will be used for Uniform API requests.
The Media Sync feature does not support the
FetchHostsetting, because Uniform processes the media without additional HTTP requests.
Configuration#
The FetchHost setting is configured per site.
Option 1: in configuration files (recommended)#
Define the fetchHost attribute for the <site /> configuration element with the URI of the Sitecore server to use:
<configuration> <sitecore> <uniform> <siteConfigurations> <siteConfiguration name="your-site"> <site inherits="your-site" fetchHost="http://your-sitecore-server/"/> </siteConfiguration> </siteConfigurations> </uniform> </sitecore></configuration>Option 2: in Sitecore items#
Set the value of the FetchHost field of the appropriate Site Configuration item:

Debugging#
If you received a DEBUG build from our support team, you can see the fetch host being logged in Sitecore log files:
INFO == UNIFORM == Fetching URI: http://mvc-sc.unfrm.space/uniform/api/content/mvcsite/map?uniform_token=12345What's next?#
- You can now start running static exports without Sitecore Publishing from your Next / Nuxt app with
npm run export. - Head over to the next section - "How to add a Deployment Service to existing Site Configuration".
You must configure Deployment Service before you can trigger any Sitecore Publishing related functionality.