How to deploy to Cloudflare Workers (production)
important
In a future release Uniform will provide instructions on how to configure a production environment using KV storage in a way that ensures uptime. In the meantime, it is recommended that a different storage location (e.g. Azure Blob storage) be used for production environments.
If you are configuring a development or test environment, you might want to use the instructions in How to deploy to Cloudflare Workers (development). That guide uses Cloudflare for request handling and storage (as opposed to these instructions that use Cloudflare for request handling and Azure Blob Storage for file storage).
Introduction#
The following diagram illustrates the components involved with deploying a Sitecore site to Cloudflare.
%3Bfill%3A%23ECECFF%3B%7D%23mermaid-1755859218390%20text.actor%26gt%3Btspan%7Bfill%3Ablack%3Bstroke%3Anone%3B%7D%23mermaid-1755859218390%20.actor-line%7Bstroke%3Agrey%3B%7D%23mermaid-1755859218390%20.messageLine0%7Bstroke-width%3A1.5%3Bstroke-dasharray%3Anone%3Bstroke%3A%23333%3B%7D%23mermaid-1755859218390%20.messageLine1%7Bstroke-width%3A1.5%3Bstroke-dasharray%3A2%2C2%3Bstroke%3A%23333%3B%7D%23mermaid-1755859218390%20%23arrowhead%20path%7Bfill%3A%23333%3Bstroke%3A%23333%3B%7D%23mermaid-1755859218390%20.sequenceNumber%7Bfill%3Awhite%3B%7D%23mermaid-1755859218390%20%23sequencenumber%7Bfill%3A%23333%3B%7D%23mermaid-1755859218390%20%23crosshead%20path%7Bfill%3A%23333%3Bstroke%3A%23333%3B%7D%23mermaid-1755859218390%20.messageText%7Bfill%3A%23333%3Bstroke%3A%23333%3B%7D%23mermaid-1755859218390%20.labelBox%7Bstroke%3Ahsl(259.6261682243%2C%2059.7765363128%25%2C%2087.9019607843%25)%3Bfill%3A%23ECECFF%3B%7D%23mermaid-1755859218390%20.labelText%2C%23mermaid-1755859218390%20.labelText%26gt%3Btspan%7Bfill%3Ablack%3Bstroke%3Anone%3B%7D%23mermaid-1755859218390%20.loopText%2C%23mermaid-1755859218390%20.loopText%26gt%3Btspan%7Bfill%3Ablack%3Bstroke%3Anone%3B%7D%23mermaid-1755859218390%20.loopLine%7Bstroke-width%3A2px%3Bstroke-dasharray%3A2%2C2%3Bstroke%3Ahsl(259.6261682243%2C%2059.7765363128%25%2C%2087.9019607843%25)%3Bfill%3Ahsl(259.6261682243%2C%2059.7765363128%25%2C%2087.9019607843%25)%3B%7D%23mermaid-1755859218390%20.note%7Bstroke%3A%23aaaa33%3Bfill%3A%23fff5ad%3B%7D%23mermaid-1755859218390%20.noteText%2C%23mermaid-1755859218390%20.noteText%26gt%3Btspan%7Bfill%3Ablack%3Bstroke%3Anone%3B%7D%23mermaid-1755859218390%20.activation0%7Bfill%3A%23f4f4f4%3Bstroke%3A%23666%3B%7D%23mermaid-1755859218390%20.activation1%7Bfill%3A%23f4f4f4%3Bstroke%3A%23666%3B%7D%23mermaid-1755859218390%20.activation2%7Bfill%3A%23f4f4f4%3Bstroke%3A%23666%3B%7D%23mermaid-1755859218390%20%3Aroot%7B--mermaid-font-family%3A%22trebuchet%20ms%22%2Cverdana%2Carial%2Csans-serif%3B%7D%3C%2Fstyle%3E%3Cg%3E%3C%2Fg%3E%3Cg%3E%3Cline%20id%3D%22actor0%22%20x1%3D%2275%22%20y1%3D%225%22%20x2%3D%2275%22%20y2%3D%22594%22%20class%3D%22actor-line%22%20stroke-width%3D%220.5px%22%20stroke%3D%22%23999%22%3E%3C%2Fline%3E%3Crect%20x%3D%220%22%20y%3D%220%22%20fill%3D%22%23eaeaea%22%20stroke%3D%22%23666%22%20width%3D%22150%22%20height%3D%2265%22%20rx%3D%223%22%20ry%3D%223%22%20class%3D%22actor%22%3E%3C%2Frect%3E%3Ctext%20x%3D%2275%22%20y%3D%2232.5%22%20dominant-baseline%3D%22central%22%20alignment-baseline%3D%22central%22%20class%3D%22actor%22%20style%3D%22text-anchor%3A%20middle%3B%20font-size%3A%2014px%3B%20font-weight%3A%20400%3B%20font-family%3A%20Open-Sans%2C%20sans-serif%3B%22%3E%3Ctspan%20x%3D%2275%22%20dy%3D%22-7%22%3EPublishing%20process%3C%2Ftspan%3E%3C%2Ftext%3E%3Ctext%20x%3D%2275%22%20y%3D%2232.5%22%20dominant-baseline%3D%22central%22%20alignment-baseline%3D%22central%22%20class%3D%22actor%22%20style%3D%22text-anchor%3A%20middle%3B%20font-size%3A%2014px%3B%20font-weight%3A%20400%3B%20font-family%3A%20Open-Sans%2C%20sans-serif%3B%22%3E%3Ctspan%20x%3D%2275%22%20dy%3D%227%22%3E(Sitecore)%3C%2Ftspan%3E%3C%2Ftext%3E%3C%2Fg%3E%3Cg%3E%3Cline%20id%3D%22actor1%22%20x1%3D%22323%22%20y1%3D%225%22%20x2%3D%22323%22%20y2%3D%22594%22%20class%3D%22actor-line%22%20stroke-width%3D%220.5px%22%20stroke%3D%22%23999%22%3E%3C%2Fline%3E%3Crect%20x%3D%22248%22%20y%3D%220%22%20fill%3D%22%23eaeaea%22%20stroke%3D%22%23666%22%20width%3D%22150%22%20height%3D%2265%22%20rx%3D%223%22%20ry%3D%223%22%20class%3D%22actor%22%3E%3C%2Frect%3E%3Ctext%20x%3D%22323%22%20y%3D%2232.5%22%20dominant-baseline%3D%22central%22%20alignment-baseline%3D%22central%22%20class%3D%22actor%22%20style%3D%22text-anchor%3A%20middle%3B%20font-size%3A%2014px%3B%20font-weight%3A%20400%3B%20font-family%3A%20Open-Sans%2C%20sans-serif%3B%22%3E%3Ctspan%20x%3D%22323%22%20dy%3D%22-7%22%3EUniform%20service%3C%2Ftspan%3E%3C%2Ftext%3E%3Ctext%20x%3D%22323%22%20y%3D%2232.5%22%20dominant-baseline%3D%22central%22%20alignment-baseline%3D%22central%22%20class%3D%22actor%22%20style%3D%22text-anchor%3A%20middle%3B%20font-size%3A%2014px%3B%20font-weight%3A%20400%3B%20font-family%3A%20Open-Sans%2C%20sans-serif%3B%22%3E%3Ctspan%20x%3D%22323%22%20dy%3D%227%22%3E(Node.js)%3C%2Ftspan%3E%3C%2Ftext%3E%3C%2Fg%3E%3Cg%3E%3Cline%20id%3D%22actor2%22%20x1%3D%22533%22%20y1%3D%225%22%20x2%3D%22533%22%20y2%3D%22594%22%20class%3D%22actor-line%22%20stroke-width%3D%220.5px%22%20stroke%3D%22%23999%22%3E%3C%2Fline%3E%3Crect%20x%3D%22448%22%20y%3D%220%22%20fill%3D%22%23eaeaea%22%20stroke%3D%22%23666%22%20width%3D%22170%22%20height%3D%2265%22%20rx%3D%223%22%20ry%3D%223%22%20class%3D%22actor%22%3E%3C%2Frect%3E%3Ctext%20x%3D%22533%22%20y%3D%2232.5%22%20dominant-baseline%3D%22central%22%20alignment-baseline%3D%22central%22%20class%3D%22actor%22%20style%3D%22text-anchor%3A%20middle%3B%20font-size%3A%2014px%3B%20font-weight%3A%20400%3B%20font-family%3A%20Open-Sans%2C%20sans-serif%3B%22%3E%3Ctspan%20x%3D%22533%22%20dy%3D%22-7%22%3EUniform%20page%20service%3C%2Ftspan%3E%3C%2Ftext%3E%3Ctext%20x%3D%22533%22%20y%3D%2232.5%22%20dominant-baseline%3D%22central%22%20alignment-baseline%3D%22central%22%20class%3D%22actor%22%20style%3D%22text-anchor%3A%20middle%3B%20font-size%3A%2014px%3B%20font-weight%3A%20400%3B%20font-family%3A%20Open-Sans%2C%20sans-serif%3B%22%3E%3Ctspan%20x%3D%22533%22%20dy%3D%227%22%3E(Sitecore)%3C%2Ftspan%3E%3C%2Ftext%3E%3C%2Fg%3E%3Cg%3E%3Cline%20id%3D%22actor3%22%20x1%3D%22743%22%20y1%3D%225%22%20x2%3D%22743%22%20y2%3D%22594%22%20class%3D%22actor-line%22%20stroke-width%3D%220.5px%22%20stroke%3D%22%23999%22%3E%3C%2Fline%3E%3Crect%20x%3D%22668%22%20y%3D%220%22%20fill%3D%22%23eaeaea%22%20stroke%3D%22%23666%22%20width%3D%22150%22%20height%3D%2265%22%20rx%3D%223%22%20ry%3D%223%22%20class%3D%22actor%22%3E%3C%2Frect%3E%3Ctext%20x%3D%22743%22%20y%3D%2232.5%22%20dominant-baseline%3D%22central%22%20alignment-baseline%3D%22central%22%20class%3D%22actor%22%20style%3D%22text-anchor%3A%20middle%3B%20font-size%3A%2014px%3B%20font-weight%3A%20400%3B%20font-family%3A%20Open-Sans%2C%20sans-serif%3B%22%3E%3Ctspan%20x%3D%22743%22%20dy%3D%22-7%22%3EAzure%3C%2Ftspan%3E%3C%2Ftext%3E%3Ctext%20x%3D%22743%22%20y%3D%2232.5%22%20dominant-baseline%3D%22central%22%20alignment-baseline%3D%22central%22%20class%3D%22actor%22%20style%3D%22text-anchor%3A%20middle%3B%20font-size%3A%2014px%3B%20font-weight%3A%20400%3B%20font-family%3A%20Open-Sans%2C%20sans-serif%3B%22%3E%3Ctspan%20x%3D%22743%22%20dy%3D%227%22%3EBlob%20Storage%3C%2Ftspan%3E%3C%2Ftext%3E%3C%2Fg%3E%3Cg%3E%3Cline%20id%3D%22actor4%22%20x1%3D%22943%22%20y1%3D%225%22%20x2%3D%22943%22%20y2%3D%22594%22%20class%3D%22actor-line%22%20stroke-width%3D%220.5px%22%20stroke%3D%22%23999%22%3E%3C%2Fline%3E%3Crect%20x%3D%22868%22%20y%3D%220%22%20fill%3D%22%23eaeaea%22%20stroke%3D%22%23666%22%20width%3D%22150%22%20height%3D%2265%22%20rx%3D%223%22%20ry%3D%223%22%20class%3D%22actor%22%3E%3C%2Frect%3E%3Ctext%20x%3D%22943%22%20y%3D%2232.5%22%20dominant-baseline%3D%22central%22%20alignment-baseline%3D%22central%22%20class%3D%22actor%22%20style%3D%22text-anchor%3A%20middle%3B%20font-size%3A%2014px%3B%20font-weight%3A%20400%3B%20font-family%3A%20Open-Sans%2C%20sans-serif%3B%22%3E%3Ctspan%20x%3D%22943%22%20dy%3D%22-7%22%3ECloudflare%3C%2Ftspan%3E%3C%2Ftext%3E%3Ctext%20x%3D%22943%22%20y%3D%2232.5%22%20dominant-baseline%3D%22central%22%20alignment-baseline%3D%22central%22%20class%3D%22actor%22%20style%3D%22text-anchor%3A%20middle%3B%20font-size%3A%2014px%3B%20font-weight%3A%20400%3B%20font-family%3A%20Open-Sans%2C%20sans-serif%3B%22%3E%3Ctspan%20x%3D%22943%22%20dy%3D%227%22%3ECDN%3C%2Ftspan%3E%3C%2Ftext%3E%3C%2Fg%3E%3Cdefs%3E%3Cmarker%20id%3D%22arrowhead%22%20refX%3D%229%22%20refY%3D%225%22%20markerUnits%3D%22userSpaceOnUse%22%20markerWidth%3D%2212%22%20markerHeight%3D%2212%22%20orient%3D%22auto%22%3E%3Cpath%20d%3D%22M%200%200%20L%2010%205%20L%200%2010%20z%22%3E%3C%2Fpath%3E%3C%2Fmarker%3E%3C%2Fdefs%3E%3Cdefs%3E%3Cmarker%20id%3D%22crosshead%22%20markerWidth%3D%2215%22%20markerHeight%3D%228%22%20orient%3D%22auto%22%20refX%3D%2216%22%20refY%3D%224%22%3E%3Cpath%20fill%3D%22black%22%20stroke%3D%22%23000000%22%20stroke-width%3D%221px%22%20d%3D%22M%209%2C2%20V%206%20L16%2C4%20Z%22%20style%3D%22stroke-dasharray%3A%200%2C%200%3B%22%3E%3C%2Fpath%3E%3Cpath%20fill%3D%22none%22%20stroke%3D%22%23000000%22%20stroke-width%3D%221px%22%20d%3D%22M%200%2C1%20L%206%2C7%20M%206%2C1%20L%200%2C7%22%20style%3D%22stroke-dasharray%3A%200%2C%200%3B%22%3E%3C%2Fpath%3E%3C%2Fmarker%3E%3C%2Fdefs%3E%3Cdefs%3E%3Cmarker%20id%3D%22filled-head%22%20refX%3D%2218%22%20refY%3D%227%22%20markerWidth%3D%2220%22%20markerHeight%3D%2228%22%20orient%3D%22auto%22%3E%3Cpath%20d%3D%22M%2018%2C7%20L9%2C13%20L14%2C7%20L9%2C1%20Z%22%3E%3C%2Fpath%3E%3C%2Fmarker%3E%3C%2Fdefs%3E%3Cdefs%3E%3Cmarker%20id%3D%22sequencenumber%22%20refX%3D%2215%22%20refY%3D%2215%22%20markerWidth%3D%2260%22%20markerHeight%3D%2240%22%20orient%3D%22auto%22%3E%3Ccircle%20cx%3D%2215%22%20cy%3D%2215%22%20r%3D%226%22%3E%3C%2Fcircle%3E%3C%2Fmarker%3E%3C%2Fdefs%3E%3Ctext%20x%3D%22199%22%20y%3D%2280%22%20text-anchor%3D%22middle%22%20dominant-baseline%3D%22middle%22%20alignment-baseline%3D%22middle%22%20class%3D%22messageText%22%20dy%3D%221em%22%20style%3D%22font-family%3A%20%26quot%3Btrebuchet%20ms%26quot%3B%2C%20verdana%2C%20arial%2C%20sans-serif%3B%20font-size%3A%2016px%3B%20font-weight%3A%20400%3B%22%3EStart%20deployment%3C%2Ftext%3E%3Cline%20x1%3D%2275%22%20y1%3D%22113%22%20x2%3D%22323%22%20y2%3D%22113%22%20class%3D%22messageLine0%22%20stroke-width%3D%222%22%20stroke%3D%22none%22%20marker-end%3D%22url(%23arrowhead)%22%20marker-start%3D%22url(%23sequencenumber)%22%20style%3D%22fill%3A%20none%3B%22%3E%3C%2Fline%3E%3Ctext%20x%3D%2275%22%20y%3D%22117%22%20font-family%3D%22sans-serif%22%20font-size%3D%2212px%22%20text-anchor%3D%22middle%22%20textLength%3D%2216px%22%20class%3D%22sequenceNumber%22%3E1%3C%2Ftext%3E%3Cg%3E%3Crect%20x%3D%22318%22%20y%3D%22113%22%20fill%3D%22%23EDF2AE%22%20stroke%3D%22%23666%22%20width%3D%2210%22%20height%3D%22396%22%20rx%3D%220%22%20ry%3D%220%22%20class%3D%22activation0%22%3E%3C%2Frect%3E%3C%2Fg%3E%3Ctext%20x%3D%22431%22%20y%3D%22128%22%20text-anchor%3D%22middle%22%20dominant-baseline%3D%22middle%22%20alignment-baseline%3D%22middle%22%20class%3D%22messageText%22%20dy%3D%221em%22%20style%3D%22font-family%3A%20%26quot%3Btrebuchet%20ms%26quot%3B%2C%20verdana%2C%20arial%2C%20sans-serif%3B%20font-size%3A%2016px%3B%20font-weight%3A%20400%3B%22%3EGet%20content%3C%2Ftext%3E%3Cline%20x1%3D%22328%22%20y1%3D%22161%22%20x2%3D%22533%22%20y2%3D%22161%22%20class%3D%22messageLine0%22%20stroke-width%3D%222%22%20stroke%3D%22none%22%20marker-end%3D%22url(%23arrowhead)%22%20marker-start%3D%22url(%23sequencenumber)%22%20style%3D%22fill%3A%20none%3B%22%3E%3C%2Fline%3E%3Ctext%20x%3D%22328%22%20y%3D%22165%22%20font-family%3D%22sans-serif%22%20font-size%3D%2212px%22%20text-anchor%3D%22middle%22%20textLength%3D%2216px%22%20class%3D%22sequenceNumber%22%3E2%3C%2Ftext%3E%3Cg%3E%3Crect%20x%3D%22528%22%20y%3D%22163%22%20fill%3D%22%23EDF2AE%22%20stroke%3D%22%23666%22%20width%3D%2210%22%20height%3D%2246%22%20rx%3D%220%22%20ry%3D%220%22%20class%3D%22activation0%22%3E%3C%2Frect%3E%3C%2Fg%3E%3Ctext%20x%3D%22428%22%20y%3D%22176%22%20text-anchor%3D%22middle%22%20dominant-baseline%3D%22middle%22%20alignment-baseline%3D%22middle%22%20class%3D%22messageText%22%20dy%3D%221em%22%20style%3D%22font-family%3A%20%26quot%3Btrebuchet%20ms%26quot%3B%2C%20verdana%2C%20arial%2C%20sans-serif%3B%20font-size%3A%2016px%3B%20font-weight%3A%20400%3B%22%3EContent%3C%2Ftext%3E%3Cline%20x1%3D%22528%22%20y1%3D%22209%22%20x2%3D%22328%22%20y2%3D%22209%22%20class%3D%22messageLine1%22%20stroke-width%3D%222%22%20stroke%3D%22none%22%20marker-end%3D%22url(%23arrowhead)%22%20marker-start%3D%22url(%23sequencenumber)%22%20style%3D%22stroke-dasharray%3A%203%2C%203%3B%20fill%3A%20none%3B%22%3E%3C%2Fline%3E%3Ctext%20x%3D%22528%22%20y%3D%22213%22%20font-family%3D%22sans-serif%22%20font-size%3D%2212px%22%20text-anchor%3D%22middle%22%20textLength%3D%2216px%22%20class%3D%22sequenceNumber%22%3E3%3C%2Ftext%3E%3Ctext%20x%3D%22328%22%20y%3D%22224%22%20text-anchor%3D%22middle%22%20dominant-baseline%3D%22middle%22%20alignment-baseline%3D%22middle%22%20class%3D%22messageText%22%20dy%3D%221em%22%20style%3D%22font-family%3A%20%26quot%3Btrebuchet%20ms%26quot%3B%2C%20verdana%2C%20arial%2C%20sans-serif%3B%20font-size%3A%2016px%3B%20font-weight%3A%20400%3B%22%3EGenerate%20static%20files%3C%2Ftext%3E%3Cpath%20d%3D%22M%20328%2C257%20C%20388%2C247%20388%2C287%20328%2C277%22%20class%3D%22messageLine0%22%20stroke-width%3D%222%22%20stroke%3D%22none%22%20marker-end%3D%22url(%23arrowhead)%22%20marker-start%3D%22url(%23sequencenumber)%22%20style%3D%22fill%3A%20none%3B%22%3E%3C%2Fpath%3E%3Ctext%20x%3D%22328%22%20y%3D%22261%22%20font-family%3D%22sans-serif%22%20font-size%3D%2212px%22%20text-anchor%3D%22middle%22%20textLength%3D%2216px%22%20class%3D%22sequenceNumber%22%3E4%3C%2Ftext%3E%3Ctext%20x%3D%22328%22%20y%3D%22302%22%20text-anchor%3D%22middle%22%20dominant-baseline%3D%22middle%22%20alignment-baseline%3D%22middle%22%20class%3D%22messageText%22%20dy%3D%221em%22%20style%3D%22font-family%3A%20%26quot%3Btrebuchet%20ms%26quot%3B%2C%20verdana%2C%20arial%2C%20sans-serif%3B%20font-size%3A%2016px%3B%20font-weight%3A%20400%3B%22%3EPrepare%20static%20files%20for%20deployment%3C%2Ftext%3E%3Cpath%20d%3D%22M%20328%2C335%20C%20388%2C325%20388%2C365%20328%2C355%22%20class%3D%22messageLine0%22%20stroke-width%3D%222%22%20stroke%3D%22none%22%20marker-end%3D%22url(%23arrowhead)%22%20marker-start%3D%22url(%23sequencenumber)%22%20style%3D%22fill%3A%20none%3B%22%3E%3C%2Fpath%3E%3Ctext%20x%3D%22328%22%20y%3D%22339%22%20font-family%3D%22sans-serif%22%20font-size%3D%2212px%22%20text-anchor%3D%22middle%22%20textLength%3D%2216px%22%20class%3D%22sequenceNumber%22%3E5%3C%2Ftext%3E%3Ctext%20x%3D%22536%22%20y%3D%22380%22%20text-anchor%3D%22middle%22%20dominant-baseline%3D%22middle%22%20alignment-baseline%3D%22middle%22%20class%3D%22messageText%22%20dy%3D%221em%22%20style%3D%22font-family%3A%20%26quot%3Btrebuchet%20ms%26quot%3B%2C%20verdana%2C%20arial%2C%20sans-serif%3B%20font-size%3A%2016px%3B%20font-weight%3A%20400%3B%22%3EDeploy%20static%20files%3C%2Ftext%3E%3Cline%20x1%3D%22328%22%20y1%3D%22413%22%20x2%3D%22743%22%20y2%3D%22413%22%20class%3D%22messageLine0%22%20stroke-width%3D%222%22%20stroke%3D%22none%22%20marker-end%3D%22url(%23arrowhead)%22%20marker-start%3D%22url(%23sequencenumber)%22%20style%3D%22fill%3A%20none%3B%22%3E%3C%2Fline%3E%3Ctext%20x%3D%22328%22%20y%3D%22417%22%20font-family%3D%22sans-serif%22%20font-size%3D%2212px%22%20text-anchor%3D%22middle%22%20textLength%3D%2216px%22%20class%3D%22sequenceNumber%22%3E6%3C%2Ftext%3E%3Ctext%20x%3D%22636%22%20y%3D%22428%22%20text-anchor%3D%22middle%22%20dominant-baseline%3D%22middle%22%20alignment-baseline%3D%22middle%22%20class%3D%22messageText%22%20dy%3D%221em%22%20style%3D%22font-family%3A%20%26quot%3Btrebuchet%20ms%26quot%3B%2C%20verdana%2C%20arial%2C%20sans-serif%3B%20font-size%3A%2016px%3B%20font-weight%3A%20400%3B%22%3EPurge%20cache%3C%2Ftext%3E%3Cline%20x1%3D%22328%22%20y1%3D%22461%22%20x2%3D%22943%22%20y2%3D%22461%22%20class%3D%22messageLine0%22%20stroke-width%3D%222%22%20stroke%3D%22none%22%20marker-end%3D%22url(%23arrowhead)%22%20marker-start%3D%22url(%23sequencenumber)%22%20style%3D%22fill%3A%20none%3B%22%3E%3C%2Fline%3E%3Ctext%20x%3D%22328%22%20y%3D%22465%22%20font-family%3D%22sans-serif%22%20font-size%3D%2212px%22%20text-anchor%3D%22middle%22%20textLength%3D%2216px%22%20class%3D%22sequenceNumber%22%3E7%3C%2Ftext%3E%3Ctext%20x%3D%22197%22%20y%3D%22476%22%20text-anchor%3D%22middle%22%20dominant-baseline%3D%22middle%22%20alignment-baseline%3D%22middle%22%20class%3D%22messageText%22%20dy%3D%221em%22%20style%3D%22font-family%3A%20%26quot%3Btrebuchet%20ms%26quot%3B%2C%20verdana%2C%20arial%2C%20sans-serif%3B%20font-size%3A%2016px%3B%20font-weight%3A%20400%3B%22%3EDeployment%20complete%3C%2Ftext%3E%3Cline%20x1%3D%22318%22%20y1%3D%22509%22%20x2%3D%2275%22%20y2%3D%22509%22%20class%3D%22messageLine1%22%20stroke-width%3D%222%22%20stroke%3D%22none%22%20marker-end%3D%22url(%23arrowhead)%22%20marker-start%3D%22url(%23sequencenumber)%22%20style%3D%22stroke-dasharray%3A%203%2C%203%3B%20fill%3A%20none%3B%22%3E%3C%2Fline%3E%3Ctext%20x%3D%22318%22%20y%3D%22513%22%20font-family%3D%22sans-serif%22%20font-size%3D%2212px%22%20text-anchor%3D%22middle%22%20textLength%3D%2216px%22%20class%3D%22sequenceNumber%22%3E8%3C%2Ftext%3E%3Cg%3E%3Crect%20x%3D%220%22%20y%3D%22529%22%20fill%3D%22%23eaeaea%22%20stroke%3D%22%23666%22%20width%3D%22150%22%20height%3D%2265%22%20rx%3D%223%22%20ry%3D%223%22%20class%3D%22actor%22%3E%3C%2Frect%3E%3Ctext%20x%3D%2275%22%20y%3D%22561.5%22%20dominant-baseline%3D%22central%22%20alignment-baseline%3D%22central%22%20class%3D%22actor%22%20style%3D%22text-anchor%3A%20middle%3B%20font-size%3A%2014px%3B%20font-weight%3A%20400%3B%20font-family%3A%20Open-Sans%2C%20sans-serif%3B%22%3E%3Ctspan%20x%3D%2275%22%20dy%3D%22-7%22%3EPublishing%20process%3C%2Ftspan%3E%3C%2Ftext%3E%3Ctext%20x%3D%2275%22%20y%3D%22561.5%22%20dominant-baseline%3D%22central%22%20alignment-baseline%3D%22central%22%20class%3D%22actor%22%20style%3D%22text-anchor%3A%20middle%3B%20font-size%3A%2014px%3B%20font-weight%3A%20400%3B%20font-family%3A%20Open-Sans%2C%20sans-serif%3B%22%3E%3Ctspan%20x%3D%2275%22%20dy%3D%227%22%3E(Sitecore)%3C%2Ftspan%3E%3C%2Ftext%3E%3C%2Fg%3E%3Cg%3E%3Crect%20x%3D%22248%22%20y%3D%22529%22%20fill%3D%22%23eaeaea%22%20stroke%3D%22%23666%22%20width%3D%22150%22%20height%3D%2265%22%20rx%3D%223%22%20ry%3D%223%22%20class%3D%22actor%22%3E%3C%2Frect%3E%3Ctext%20x%3D%22323%22%20y%3D%22561.5%22%20dominant-baseline%3D%22central%22%20alignment-baseline%3D%22central%22%20class%3D%22actor%22%20style%3D%22text-anchor%3A%20middle%3B%20font-size%3A%2014px%3B%20font-weight%3A%20400%3B%20font-family%3A%20Open-Sans%2C%20sans-serif%3B%22%3E%3Ctspan%20x%3D%22323%22%20dy%3D%22-7%22%3EUniform%20service%3C%2Ftspan%3E%3C%2Ftext%3E%3Ctext%20x%3D%22323%22%20y%3D%22561.5%22%20dominant-baseline%3D%22central%22%20alignment-baseline%3D%22central%22%20class%3D%22actor%22%20style%3D%22text-anchor%3A%20middle%3B%20font-size%3A%2014px%3B%20font-weight%3A%20400%3B%20font-family%3A%20Open-Sans%2C%20sans-serif%3B%22%3E%3Ctspan%20x%3D%22323%22%20dy%3D%227%22%3E(Node.js)%3C%2Ftspan%3E%3C%2Ftext%3E%3C%2Fg%3E%3Cg%3E%3Crect%20x%3D%22448%22%20y%3D%22529%22%20fill%3D%22%23eaeaea%22%20stroke%3D%22%23666%22%20width%3D%22170%22%20height%3D%2265%22%20rx%3D%223%22%20ry%3D%223%22%20class%3D%22actor%22%3E%3C%2Frect%3E%3Ctext%20x%3D%22533%22%20y%3D%22561.5%22%20dominant-baseline%3D%22central%22%20alignment-baseline%3D%22central%22%20class%3D%22actor%22%20style%3D%22text-anchor%3A%20middle%3B%20font-size%3A%2014px%3B%20font-weight%3A%20400%3B%20font-family%3A%20Open-Sans%2C%20sans-serif%3B%22%3E%3Ctspan%20x%3D%22533%22%20dy%3D%22-7%22%3EUniform%20page%20service%3C%2Ftspan%3E%3C%2Ftext%3E%3Ctext%20x%3D%22533%22%20y%3D%22561.5%22%20dominant-baseline%3D%22central%22%20alignment-baseline%3D%22central%22%20class%3D%22actor%22%20style%3D%22text-anchor%3A%20middle%3B%20font-size%3A%2014px%3B%20font-weight%3A%20400%3B%20font-family%3A%20Open-Sans%2C%20sans-serif%3B%22%3E%3Ctspan%20x%3D%22533%22%20dy%3D%227%22%3E(Sitecore)%3C%2Ftspan%3E%3C%2Ftext%3E%3C%2Fg%3E%3Cg%3E%3Crect%20x%3D%22668%22%20y%3D%22529%22%20fill%3D%22%23eaeaea%22%20stroke%3D%22%23666%22%20width%3D%22150%22%20height%3D%2265%22%20rx%3D%223%22%20ry%3D%223%22%20class%3D%22actor%22%3E%3C%2Frect%3E%3Ctext%20x%3D%22743%22%20y%3D%22561.5%22%20dominant-baseline%3D%22central%22%20alignment-baseline%3D%22central%22%20class%3D%22actor%22%20style%3D%22text-anchor%3A%20middle%3B%20font-size%3A%2014px%3B%20font-weight%3A%20400%3B%20font-family%3A%20Open-Sans%2C%20sans-serif%3B%22%3E%3Ctspan%20x%3D%22743%22%20dy%3D%22-7%22%3EAzure%3C%2Ftspan%3E%3C%2Ftext%3E%3Ctext%20x%3D%22743%22%20y%3D%22561.5%22%20dominant-baseline%3D%22central%22%20alignment-baseline%3D%22central%22%20class%3D%22actor%22%20style%3D%22text-anchor%3A%20middle%3B%20font-size%3A%2014px%3B%20font-weight%3A%20400%3B%20font-family%3A%20Open-Sans%2C%20sans-serif%3B%22%3E%3Ctspan%20x%3D%22743%22%20dy%3D%227%22%3EBlob%20Storage%3C%2Ftspan%3E%3C%2Ftext%3E%3C%2Fg%3E%3Cg%3E%3Crect%20x%3D%22868%22%20y%3D%22529%22%20fill%3D%22%23eaeaea%22%20stroke%3D%22%23666%22%20width%3D%22150%22%20height%3D%2265%22%20rx%3D%223%22%20ry%3D%223%22%20class%3D%22actor%22%3E%3C%2Frect%3E%3Ctext%20x%3D%22943%22%20y%3D%22561.5%22%20dominant-baseline%3D%22central%22%20alignment-baseline%3D%22central%22%20class%3D%22actor%22%20style%3D%22text-anchor%3A%20middle%3B%20font-size%3A%2014px%3B%20font-weight%3A%20400%3B%20font-family%3A%20Open-Sans%2C%20sans-serif%3B%22%3E%3Ctspan%20x%3D%22943%22%20dy%3D%22-7%22%3ECloudflare%3C%2Ftspan%3E%3C%2Ftext%3E%3Ctext%20x%3D%22943%22%20y%3D%22561.5%22%20dominant-baseline%3D%22central%22%20alignment-baseline%3D%22central%22%20class%3D%22actor%22%20style%3D%22text-anchor%3A%20middle%3B%20font-size%3A%2014px%3B%20font-weight%3A%20400%3B%20font-family%3A%20Open-Sans%2C%20sans-serif%3B%22%3E%3Ctspan%20x%3D%22943%22%20dy%3D%227%22%3ECDN%3C%2Ftspan%3E%3C%2Ftext%3E%3C%2Fg%3E%3C%2Fsvg%3E "Diagram generated via mermaid")
Prerequisites#
- You have completed the Getting Started section, so your site is ready to be deployed to static storage.
- Uniform for Sitecore starter kit (for Deploy).
- Cloudflare account with the ability to create new sites.
Cloudflare's free tier is sufficient for development and test environments.
Steps#
Configure site to deploy to Azure Blob Storage#
Follow the instructions in How to deploy to Azure Blob Storage.
Add Cloudflare site#
- Log into Cloudflare.
- Select your account.
- Click Add Site.
- Enter the domain name for your site and click Add site.
- Select a pricing plan and click Continue.
- Cloudflare will display the DNS records for your domain. Click Continue.
In order to use Cloudflare as a CDN, you will need to configure DNS so routes to your site can be resolved. This is covered in a later step.
Create API token#
- In Cloudflare, select your site.
- On the righthand side of the screen, scroll to the section API.
- Click Get your API token.
- Click Create Token.
- In the row "Edit Cloudflare Workers", click Use template.
- In the section "Permissions", set the following:
- Account > Workers Scripts > Edit
- Zone > Workers Routes > Edit
- Account > Account Settings > Read
- User > User Details > Read
- Account > Workers Tail > Read
- In the section "Account Resources", set the following:
- Include >
<YOUR-ACCOUNT-ID>
- Include >
- In the section "Zone Resources", set the following:
- Include > Specific zone >
<YOUR-ZONE-ID>
- Include > Specific zone >
- Click Continue to summary.
- Click Create Token.
- The token value is displayed. Note this value.
This is the only time the token value is displayed. If you lose it you will need to create a new token.
Collect settings#
During the deployment process, Uniform installs and configures the required components on Cloudflare, but performing these tasks requires several settings from Cloudflare to be configured in Sitecore.
The section describes how to find these settings.
- The first value to determine is the route (i.e. url) you
want the worker to handle. Wildcard character (i.e. *)
are supported.
For example, if your site is
cdn.example.comand you want the worker to handle all urls on the site, you would entercdn.example.com/*. - In Cloudflare, select your site.
- On the righthand side of the screen, scroll to the section API.
- Note the value of Account ID.
- In the top navigation, click Workers.
- Click Manage Workers.
- Note the value of Your subdomain.
Create the worker#
The worker is the component response for handing the page request. It basically is just a function that runs on Cloudflare's CDN. Cloudflare handles all of the work required to make the worker available globally.
When you are only using Deploy (i.e. you are not using Optimize for Sitecore to handle personalization) the Cloudflare worker you need to deploy is very simple: it retrieves content from storage.
The following diagram illustrates the request handling process with the worker (using Azure Blob Storage):
%3Bfill%3A%23ECECFF%3B%7D%23mermaid-1755859218419%20text.actor%26gt%3Btspan%7Bfill%3Ablack%3Bstroke%3Anone%3B%7D%23mermaid-1755859218419%20.actor-line%7Bstroke%3Agrey%3B%7D%23mermaid-1755859218419%20.messageLine0%7Bstroke-width%3A1.5%3Bstroke-dasharray%3Anone%3Bstroke%3A%23333%3B%7D%23mermaid-1755859218419%20.messageLine1%7Bstroke-width%3A1.5%3Bstroke-dasharray%3A2%2C2%3Bstroke%3A%23333%3B%7D%23mermaid-1755859218419%20%23arrowhead%20path%7Bfill%3A%23333%3Bstroke%3A%23333%3B%7D%23mermaid-1755859218419%20.sequenceNumber%7Bfill%3Awhite%3B%7D%23mermaid-1755859218419%20%23sequencenumber%7Bfill%3A%23333%3B%7D%23mermaid-1755859218419%20%23crosshead%20path%7Bfill%3A%23333%3Bstroke%3A%23333%3B%7D%23mermaid-1755859218419%20.messageText%7Bfill%3A%23333%3Bstroke%3A%23333%3B%7D%23mermaid-1755859218419%20.labelBox%7Bstroke%3Ahsl(259.6261682243%2C%2059.7765363128%25%2C%2087.9019607843%25)%3Bfill%3A%23ECECFF%3B%7D%23mermaid-1755859218419%20.labelText%2C%23mermaid-1755859218419%20.labelText%26gt%3Btspan%7Bfill%3Ablack%3Bstroke%3Anone%3B%7D%23mermaid-1755859218419%20.loopText%2C%23mermaid-1755859218419%20.loopText%26gt%3Btspan%7Bfill%3Ablack%3Bstroke%3Anone%3B%7D%23mermaid-1755859218419%20.loopLine%7Bstroke-width%3A2px%3Bstroke-dasharray%3A2%2C2%3Bstroke%3Ahsl(259.6261682243%2C%2059.7765363128%25%2C%2087.9019607843%25)%3Bfill%3Ahsl(259.6261682243%2C%2059.7765363128%25%2C%2087.9019607843%25)%3B%7D%23mermaid-1755859218419%20.note%7Bstroke%3A%23aaaa33%3Bfill%3A%23fff5ad%3B%7D%23mermaid-1755859218419%20.noteText%2C%23mermaid-1755859218419%20.noteText%26gt%3Btspan%7Bfill%3Ablack%3Bstroke%3Anone%3B%7D%23mermaid-1755859218419%20.activation0%7Bfill%3A%23f4f4f4%3Bstroke%3A%23666%3B%7D%23mermaid-1755859218419%20.activation1%7Bfill%3A%23f4f4f4%3Bstroke%3A%23666%3B%7D%23mermaid-1755859218419%20.activation2%7Bfill%3A%23f4f4f4%3Bstroke%3A%23666%3B%7D%23mermaid-1755859218419%20%3Aroot%7B--mermaid-font-family%3A%22trebuchet%20ms%22%2Cverdana%2Carial%2Csans-serif%3B%7D%3C%2Fstyle%3E%3Cg%3E%3C%2Fg%3E%3Cg%3E%3Cline%20id%3D%22actor0%22%20x1%3D%2275%22%20y1%3D%225%22%20x2%3D%2275%22%20y2%3D%22438%22%20class%3D%22actor-line%22%20stroke-width%3D%220.5px%22%20stroke%3D%22%23999%22%3E%3C%2Fline%3E%3Crect%20x%3D%220%22%20y%3D%220%22%20fill%3D%22%23eaeaea%22%20stroke%3D%22%23666%22%20width%3D%22150%22%20height%3D%2265%22%20rx%3D%223%22%20ry%3D%223%22%20class%3D%22actor%22%3E%3C%2Frect%3E%3Ctext%20x%3D%2275%22%20y%3D%2232.5%22%20dominant-baseline%3D%22central%22%20alignment-baseline%3D%22central%22%20class%3D%22actor%22%20style%3D%22text-anchor%3A%20middle%3B%20font-size%3A%2014px%3B%20font-weight%3A%20400%3B%20font-family%3A%20Open-Sans%2C%20sans-serif%3B%22%3E%3Ctspan%20x%3D%2275%22%20dy%3D%220%22%3EBrowser%3C%2Ftspan%3E%3C%2Ftext%3E%3C%2Fg%3E%3Cg%3E%3Cline%20id%3D%22actor1%22%20x1%3D%22275%22%20y1%3D%225%22%20x2%3D%22275%22%20y2%3D%22438%22%20class%3D%22actor-line%22%20stroke-width%3D%220.5px%22%20stroke%3D%22%23999%22%3E%3C%2Fline%3E%3Crect%20x%3D%22200%22%20y%3D%220%22%20fill%3D%22%23eaeaea%22%20stroke%3D%22%23666%22%20width%3D%22150%22%20height%3D%2265%22%20rx%3D%223%22%20ry%3D%223%22%20class%3D%22actor%22%3E%3C%2Frect%3E%3Ctext%20x%3D%22275%22%20y%3D%2232.5%22%20dominant-baseline%3D%22central%22%20alignment-baseline%3D%22central%22%20class%3D%22actor%22%20style%3D%22text-anchor%3A%20middle%3B%20font-size%3A%2014px%3B%20font-weight%3A%20400%3B%20font-family%3A%20Open-Sans%2C%20sans-serif%3B%22%3E%3Ctspan%20x%3D%22275%22%20dy%3D%22-7%22%3ECDN%3C%2Ftspan%3E%3C%2Ftext%3E%3Ctext%20x%3D%22275%22%20y%3D%2232.5%22%20dominant-baseline%3D%22central%22%20alignment-baseline%3D%22central%22%20class%3D%22actor%22%20style%3D%22text-anchor%3A%20middle%3B%20font-size%3A%2014px%3B%20font-weight%3A%20400%3B%20font-family%3A%20Open-Sans%2C%20sans-serif%3B%22%3E%3Ctspan%20x%3D%22275%22%20dy%3D%227%22%3E(Cloudflare)%3C%2Ftspan%3E%3C%2Ftext%3E%3C%2Fg%3E%3Cg%3E%3Cline%20id%3D%22actor2%22%20x1%3D%22475%22%20y1%3D%225%22%20x2%3D%22475%22%20y2%3D%22438%22%20class%3D%22actor-line%22%20stroke-width%3D%220.5px%22%20stroke%3D%22%23999%22%3E%3C%2Fline%3E%3Crect%20x%3D%22400%22%20y%3D%220%22%20fill%3D%22%23eaeaea%22%20stroke%3D%22%23666%22%20width%3D%22150%22%20height%3D%2265%22%20rx%3D%223%22%20ry%3D%223%22%20class%3D%22actor%22%3E%3C%2Frect%3E%3Ctext%20x%3D%22475%22%20y%3D%2232.5%22%20dominant-baseline%3D%22central%22%20alignment-baseline%3D%22central%22%20class%3D%22actor%22%20style%3D%22text-anchor%3A%20middle%3B%20font-size%3A%2014px%3B%20font-weight%3A%20400%3B%20font-family%3A%20Open-Sans%2C%20sans-serif%3B%22%3E%3Ctspan%20x%3D%22475%22%20dy%3D%22-7%22%3EWorker%3C%2Ftspan%3E%3C%2Ftext%3E%3Ctext%20x%3D%22475%22%20y%3D%2232.5%22%20dominant-baseline%3D%22central%22%20alignment-baseline%3D%22central%22%20class%3D%22actor%22%20style%3D%22text-anchor%3A%20middle%3B%20font-size%3A%2014px%3B%20font-weight%3A%20400%3B%20font-family%3A%20Open-Sans%2C%20sans-serif%3B%22%3E%3Ctspan%20x%3D%22475%22%20dy%3D%227%22%3E(Cloudflare)%3C%2Ftspan%3E%3C%2Ftext%3E%3C%2Fg%3E%3Cg%3E%3Cline%20id%3D%22actor3%22%20x1%3D%22675%22%20y1%3D%225%22%20x2%3D%22675%22%20y2%3D%22438%22%20class%3D%22actor-line%22%20stroke-width%3D%220.5px%22%20stroke%3D%22%23999%22%3E%3C%2Fline%3E%3Crect%20x%3D%22600%22%20y%3D%220%22%20fill%3D%22%23eaeaea%22%20stroke%3D%22%23666%22%20width%3D%22150%22%20height%3D%2265%22%20rx%3D%223%22%20ry%3D%223%22%20class%3D%22actor%22%3E%3C%2Frect%3E%3Ctext%20x%3D%22675%22%20y%3D%2232.5%22%20dominant-baseline%3D%22central%22%20alignment-baseline%3D%22central%22%20class%3D%22actor%22%20style%3D%22text-anchor%3A%20middle%3B%20font-size%3A%2014px%3B%20font-weight%3A%20400%3B%20font-family%3A%20Open-Sans%2C%20sans-serif%3B%22%3E%3Ctspan%20x%3D%22675%22%20dy%3D%22-7%22%3EAzure%3C%2Ftspan%3E%3C%2Ftext%3E%3Ctext%20x%3D%22675%22%20y%3D%2232.5%22%20dominant-baseline%3D%22central%22%20alignment-baseline%3D%22central%22%20class%3D%22actor%22%20style%3D%22text-anchor%3A%20middle%3B%20font-size%3A%2014px%3B%20font-weight%3A%20400%3B%20font-family%3A%20Open-Sans%2C%20sans-serif%3B%22%3E%3Ctspan%20x%3D%22675%22%20dy%3D%227%22%3EBlob%20Storage%3C%2Ftspan%3E%3C%2Ftext%3E%3C%2Fg%3E%3Cdefs%3E%3Cmarker%20id%3D%22arrowhead%22%20refX%3D%229%22%20refY%3D%225%22%20markerUnits%3D%22userSpaceOnUse%22%20markerWidth%3D%2212%22%20markerHeight%3D%2212%22%20orient%3D%22auto%22%3E%3Cpath%20d%3D%22M%200%200%20L%2010%205%20L%200%2010%20z%22%3E%3C%2Fpath%3E%3C%2Fmarker%3E%3C%2Fdefs%3E%3Cdefs%3E%3Cmarker%20id%3D%22crosshead%22%20markerWidth%3D%2215%22%20markerHeight%3D%228%22%20orient%3D%22auto%22%20refX%3D%2216%22%20refY%3D%224%22%3E%3Cpath%20fill%3D%22black%22%20stroke%3D%22%23000000%22%20stroke-width%3D%221px%22%20d%3D%22M%209%2C2%20V%206%20L16%2C4%20Z%22%20style%3D%22stroke-dasharray%3A%200%2C%200%3B%22%3E%3C%2Fpath%3E%3Cpath%20fill%3D%22none%22%20stroke%3D%22%23000000%22%20stroke-width%3D%221px%22%20d%3D%22M%200%2C1%20L%206%2C7%20M%206%2C1%20L%200%2C7%22%20style%3D%22stroke-dasharray%3A%200%2C%200%3B%22%3E%3C%2Fpath%3E%3C%2Fmarker%3E%3C%2Fdefs%3E%3Cdefs%3E%3Cmarker%20id%3D%22filled-head%22%20refX%3D%2218%22%20refY%3D%227%22%20markerWidth%3D%2220%22%20markerHeight%3D%2228%22%20orient%3D%22auto%22%3E%3Cpath%20d%3D%22M%2018%2C7%20L9%2C13%20L14%2C7%20L9%2C1%20Z%22%3E%3C%2Fpath%3E%3C%2Fmarker%3E%3C%2Fdefs%3E%3Cdefs%3E%3Cmarker%20id%3D%22sequencenumber%22%20refX%3D%2215%22%20refY%3D%2215%22%20markerWidth%3D%2260%22%20markerHeight%3D%2240%22%20orient%3D%22auto%22%3E%3Ccircle%20cx%3D%2215%22%20cy%3D%2215%22%20r%3D%226%22%3E%3C%2Fcircle%3E%3C%2Fmarker%3E%3C%2Fdefs%3E%3Ctext%20x%3D%22175%22%20y%3D%2280%22%20text-anchor%3D%22middle%22%20dominant-baseline%3D%22middle%22%20alignment-baseline%3D%22middle%22%20class%3D%22messageText%22%20dy%3D%221em%22%20style%3D%22font-family%3A%20%26quot%3Btrebuchet%20ms%26quot%3B%2C%20verdana%2C%20arial%2C%20sans-serif%3B%20font-size%3A%2016px%3B%20font-weight%3A%20400%3B%22%3ERequest%20page%3C%2Ftext%3E%3Cline%20x1%3D%2275%22%20y1%3D%22113%22%20x2%3D%22275%22%20y2%3D%22113%22%20class%3D%22messageLine0%22%20stroke-width%3D%222%22%20stroke%3D%22none%22%20marker-end%3D%22url(%23arrowhead)%22%20marker-start%3D%22url(%23sequencenumber)%22%20style%3D%22fill%3A%20none%3B%22%3E%3C%2Fline%3E%3Ctext%20x%3D%2275%22%20y%3D%22117%22%20font-family%3D%22sans-serif%22%20font-size%3D%2212px%22%20text-anchor%3D%22middle%22%20textLength%3D%2216px%22%20class%3D%22sequenceNumber%22%3E1%3C%2Ftext%3E%3Cg%3E%3Crect%20x%3D%22270%22%20y%3D%22113%22%20fill%3D%22%23EDF2AE%22%20stroke%3D%22%23666%22%20width%3D%2210%22%20height%3D%22240%22%20rx%3D%220%22%20ry%3D%220%22%20class%3D%22activation0%22%3E%3C%2Frect%3E%3C%2Fg%3E%3Ctext%20x%3D%22378%22%20y%3D%22128%22%20text-anchor%3D%22middle%22%20dominant-baseline%3D%22middle%22%20alignment-baseline%3D%22middle%22%20class%3D%22messageText%22%20dy%3D%221em%22%20style%3D%22font-family%3A%20%26quot%3Btrebuchet%20ms%26quot%3B%2C%20verdana%2C%20arial%2C%20sans-serif%3B%20font-size%3A%2016px%3B%20font-weight%3A%20400%3B%22%3ETrigger%3C%2Ftext%3E%3Cline%20x1%3D%22280%22%20y1%3D%22161%22%20x2%3D%22475%22%20y2%3D%22161%22%20class%3D%22messageLine0%22%20stroke-width%3D%222%22%20stroke%3D%22none%22%20marker-end%3D%22url(%23arrowhead)%22%20marker-start%3D%22url(%23sequencenumber)%22%20style%3D%22fill%3A%20none%3B%22%3E%3C%2Fline%3E%3Ctext%20x%3D%22280%22%20y%3D%22165%22%20font-family%3D%22sans-serif%22%20font-size%3D%2212px%22%20text-anchor%3D%22middle%22%20textLength%3D%2216px%22%20class%3D%22sequenceNumber%22%3E2%3C%2Ftext%3E%3Cg%3E%3Crect%20x%3D%22470%22%20y%3D%22163%22%20fill%3D%22%23EDF2AE%22%20stroke%3D%22%23666%22%20width%3D%2210%22%20height%3D%22142%22%20rx%3D%220%22%20ry%3D%220%22%20class%3D%22activation0%22%3E%3C%2Frect%3E%3C%2Fg%3E%3Ctext%20x%3D%22578%22%20y%3D%22176%22%20text-anchor%3D%22middle%22%20dominant-baseline%3D%22middle%22%20alignment-baseline%3D%22middle%22%20class%3D%22messageText%22%20dy%3D%221em%22%20style%3D%22font-family%3A%20%26quot%3Btrebuchet%20ms%26quot%3B%2C%20verdana%2C%20arial%2C%20sans-serif%3B%20font-size%3A%2016px%3B%20font-weight%3A%20400%3B%22%3EGet%20content%3C%2Ftext%3E%3Cline%20x1%3D%22480%22%20y1%3D%22209%22%20x2%3D%22675%22%20y2%3D%22209%22%20class%3D%22messageLine0%22%20stroke-width%3D%222%22%20stroke%3D%22none%22%20marker-end%3D%22url(%23arrowhead)%22%20marker-start%3D%22url(%23sequencenumber)%22%20style%3D%22fill%3A%20none%3B%22%3E%3C%2Fline%3E%3Ctext%20x%3D%22480%22%20y%3D%22213%22%20font-family%3D%22sans-serif%22%20font-size%3D%2212px%22%20text-anchor%3D%22middle%22%20textLength%3D%2216px%22%20class%3D%22sequenceNumber%22%3E3%3C%2Ftext%3E%3Cg%3E%3Crect%20x%3D%22670%22%20y%3D%22211%22%20fill%3D%22%23EDF2AE%22%20stroke%3D%22%23666%22%20width%3D%2210%22%20height%3D%2246%22%20rx%3D%220%22%20ry%3D%220%22%20class%3D%22activation0%22%3E%3C%2Frect%3E%3C%2Fg%3E%3Ctext%20x%3D%22575%22%20y%3D%22224%22%20text-anchor%3D%22middle%22%20dominant-baseline%3D%22middle%22%20alignment-baseline%3D%22middle%22%20class%3D%22messageText%22%20dy%3D%221em%22%20style%3D%22font-family%3A%20%26quot%3Btrebuchet%20ms%26quot%3B%2C%20verdana%2C%20arial%2C%20sans-serif%3B%20font-size%3A%2016px%3B%20font-weight%3A%20400%3B%22%3EContent%3C%2Ftext%3E%3Cline%20x1%3D%22670%22%20y1%3D%22257%22%20x2%3D%22480%22%20y2%3D%22257%22%20class%3D%22messageLine1%22%20stroke-width%3D%222%22%20stroke%3D%22none%22%20marker-end%3D%22url(%23arrowhead)%22%20marker-start%3D%22url(%23sequencenumber)%22%20style%3D%22stroke-dasharray%3A%203%2C%203%3B%20fill%3A%20none%3B%22%3E%3C%2Fline%3E%3Ctext%20x%3D%22670%22%20y%3D%22261%22%20font-family%3D%22sans-serif%22%20font-size%3D%2212px%22%20text-anchor%3D%22middle%22%20textLength%3D%2216px%22%20class%3D%22sequenceNumber%22%3E4%3C%2Ftext%3E%3Ctext%20x%3D%22375%22%20y%3D%22272%22%20text-anchor%3D%22middle%22%20dominant-baseline%3D%22middle%22%20alignment-baseline%3D%22middle%22%20class%3D%22messageText%22%20dy%3D%221em%22%20style%3D%22font-family%3A%20%26quot%3Btrebuchet%20ms%26quot%3B%2C%20verdana%2C%20arial%2C%20sans-serif%3B%20font-size%3A%2016px%3B%20font-weight%3A%20400%3B%22%3EResponse%3C%2Ftext%3E%3Cline%20x1%3D%22470%22%20y1%3D%22305%22%20x2%3D%22280%22%20y2%3D%22305%22%20class%3D%22messageLine1%22%20stroke-width%3D%222%22%20stroke%3D%22none%22%20marker-end%3D%22url(%23arrowhead)%22%20marker-start%3D%22url(%23sequencenumber)%22%20style%3D%22stroke-dasharray%3A%203%2C%203%3B%20fill%3A%20none%3B%22%3E%3C%2Fline%3E%3Ctext%20x%3D%22470%22%20y%3D%22309%22%20font-family%3D%22sans-serif%22%20font-size%3D%2212px%22%20text-anchor%3D%22middle%22%20textLength%3D%2216px%22%20class%3D%22sequenceNumber%22%3E5%3C%2Ftext%3E%3Ctext%20x%3D%22173%22%20y%3D%22320%22%20text-anchor%3D%22middle%22%20dominant-baseline%3D%22middle%22%20alignment-baseline%3D%22middle%22%20class%3D%22messageText%22%20dy%3D%221em%22%20style%3D%22font-family%3A%20%26quot%3Btrebuchet%20ms%26quot%3B%2C%20verdana%2C%20arial%2C%20sans-serif%3B%20font-size%3A%2016px%3B%20font-weight%3A%20400%3B%22%3EResponse%3C%2Ftext%3E%3Cline%20x1%3D%22270%22%20y1%3D%22353%22%20x2%3D%2275%22%20y2%3D%22353%22%20class%3D%22messageLine1%22%20stroke-width%3D%222%22%20stroke%3D%22none%22%20marker-end%3D%22url(%23arrowhead)%22%20marker-start%3D%22url(%23sequencenumber)%22%20style%3D%22stroke-dasharray%3A%203%2C%203%3B%20fill%3A%20none%3B%22%3E%3C%2Fline%3E%3Ctext%20x%3D%22270%22%20y%3D%22357%22%20font-family%3D%22sans-serif%22%20font-size%3D%2212px%22%20text-anchor%3D%22middle%22%20textLength%3D%2216px%22%20class%3D%22sequenceNumber%22%3E6%3C%2Ftext%3E%3Cg%3E%3Crect%20x%3D%220%22%20y%3D%22373%22%20fill%3D%22%23eaeaea%22%20stroke%3D%22%23666%22%20width%3D%22150%22%20height%3D%2265%22%20rx%3D%223%22%20ry%3D%223%22%20class%3D%22actor%22%3E%3C%2Frect%3E%3Ctext%20x%3D%2275%22%20y%3D%22405.5%22%20dominant-baseline%3D%22central%22%20alignment-baseline%3D%22central%22%20class%3D%22actor%22%20style%3D%22text-anchor%3A%20middle%3B%20font-size%3A%2014px%3B%20font-weight%3A%20400%3B%20font-family%3A%20Open-Sans%2C%20sans-serif%3B%22%3E%3Ctspan%20x%3D%2275%22%20dy%3D%220%22%3EBrowser%3C%2Ftspan%3E%3C%2Ftext%3E%3C%2Fg%3E%3Cg%3E%3Crect%20x%3D%22200%22%20y%3D%22373%22%20fill%3D%22%23eaeaea%22%20stroke%3D%22%23666%22%20width%3D%22150%22%20height%3D%2265%22%20rx%3D%223%22%20ry%3D%223%22%20class%3D%22actor%22%3E%3C%2Frect%3E%3Ctext%20x%3D%22275%22%20y%3D%22405.5%22%20dominant-baseline%3D%22central%22%20alignment-baseline%3D%22central%22%20class%3D%22actor%22%20style%3D%22text-anchor%3A%20middle%3B%20font-size%3A%2014px%3B%20font-weight%3A%20400%3B%20font-family%3A%20Open-Sans%2C%20sans-serif%3B%22%3E%3Ctspan%20x%3D%22275%22%20dy%3D%22-7%22%3ECDN%3C%2Ftspan%3E%3C%2Ftext%3E%3Ctext%20x%3D%22275%22%20y%3D%22405.5%22%20dominant-baseline%3D%22central%22%20alignment-baseline%3D%22central%22%20class%3D%22actor%22%20style%3D%22text-anchor%3A%20middle%3B%20font-size%3A%2014px%3B%20font-weight%3A%20400%3B%20font-family%3A%20Open-Sans%2C%20sans-serif%3B%22%3E%3Ctspan%20x%3D%22275%22%20dy%3D%227%22%3E(Cloudflare)%3C%2Ftspan%3E%3C%2Ftext%3E%3C%2Fg%3E%3Cg%3E%3Crect%20x%3D%22400%22%20y%3D%22373%22%20fill%3D%22%23eaeaea%22%20stroke%3D%22%23666%22%20width%3D%22150%22%20height%3D%2265%22%20rx%3D%223%22%20ry%3D%223%22%20class%3D%22actor%22%3E%3C%2Frect%3E%3Ctext%20x%3D%22475%22%20y%3D%22405.5%22%20dominant-baseline%3D%22central%22%20alignment-baseline%3D%22central%22%20class%3D%22actor%22%20style%3D%22text-anchor%3A%20middle%3B%20font-size%3A%2014px%3B%20font-weight%3A%20400%3B%20font-family%3A%20Open-Sans%2C%20sans-serif%3B%22%3E%3Ctspan%20x%3D%22475%22%20dy%3D%22-7%22%3EWorker%3C%2Ftspan%3E%3C%2Ftext%3E%3Ctext%20x%3D%22475%22%20y%3D%22405.5%22%20dominant-baseline%3D%22central%22%20alignment-baseline%3D%22central%22%20class%3D%22actor%22%20style%3D%22text-anchor%3A%20middle%3B%20font-size%3A%2014px%3B%20font-weight%3A%20400%3B%20font-family%3A%20Open-Sans%2C%20sans-serif%3B%22%3E%3Ctspan%20x%3D%22475%22%20dy%3D%227%22%3E(Cloudflare)%3C%2Ftspan%3E%3C%2Ftext%3E%3C%2Fg%3E%3Cg%3E%3Crect%20x%3D%22600%22%20y%3D%22373%22%20fill%3D%22%23eaeaea%22%20stroke%3D%22%23666%22%20width%3D%22150%22%20height%3D%2265%22%20rx%3D%223%22%20ry%3D%223%22%20class%3D%22actor%22%3E%3C%2Frect%3E%3Ctext%20x%3D%22675%22%20y%3D%22405.5%22%20dominant-baseline%3D%22central%22%20alignment-baseline%3D%22central%22%20class%3D%22actor%22%20style%3D%22text-anchor%3A%20middle%3B%20font-size%3A%2014px%3B%20font-weight%3A%20400%3B%20font-family%3A%20Open-Sans%2C%20sans-serif%3B%22%3E%3Ctspan%20x%3D%22675%22%20dy%3D%22-7%22%3EAzure%3C%2Ftspan%3E%3C%2Ftext%3E%3Ctext%20x%3D%22675%22%20y%3D%22405.5%22%20dominant-baseline%3D%22central%22%20alignment-baseline%3D%22central%22%20class%3D%22actor%22%20style%3D%22text-anchor%3A%20middle%3B%20font-size%3A%2014px%3B%20font-weight%3A%20400%3B%20font-family%3A%20Open-Sans%2C%20sans-serif%3B%22%3E%3Ctspan%20x%3D%22675%22%20dy%3D%227%22%3EBlob%20Storage%3C%2Ftspan%3E%3C%2Ftext%3E%3C%2Fg%3E%3C%2Fsvg%3E "Diagram generated via mermaid")
For a production environment, you are responsible for deploying
the worker. While Uniform does not put any restrictions on the
worker itself (i.e. you can implement any logic you want),
there are some conventions that must be followed (especially
in the wrangler.toml file) in order for the Uniform service
to be able to deploy the worker properly.
The Uniform starter kit provides the files you need. You should consider these files a starting point. You can add whatever logic you need to the worker.
- Copy the worker files from the Uniform starter kit to a folder
cloudflare-workerunder the root folder of your Uniform service.package.jsonpackage-lock.jsonindex.jswrangler.tomlwrangler-webpack.config.js
- In the file
wrangler.toml, set the following values:- account_id =
<YOUR-ACCOUNT-ID> - zone_id =
<YOUR-ZONE-ID> - api_token =
<YOUR-API-TOKEN> - name =
<YOUR-WORKER-NAME> - route =
<YOUR-WORKER-ROUTE>
- account_id =
- Enter the following command:
wrangler publish
Start Uniform service#
- In the terminal window, navigate to the root folder of your Uniform service.
- Enter the following command:
npm run start
Trigger deployment#
- In Sitecore, republish of any page-level item under the
/sitecore/content/<YOUR-SITECORE-SITE-NAME>item. - The console for your Uniform service will show something like the following:
07/05-10:44:34 info: Received deploy status request, ticket: 0, message: Uploading HTML site files07/05-10:44:35 info: Successfully deployed C:\sitecore-jss-nextjs-starterkit\.temp\0 folder07/05-10:44:35 info: Deleting temp dir: C:\sitecore-jss-nextjs-starterkit\.temp\007/05-10:44:36 info: Temp dir was deleted: C:\sitecore-jss-nextjs-starterkit\.temp\007/05-10:44:36 info: Received deploy status request, ticket: 0, message: Deployment is complete - Open your site on Cloudflare using the url
https://<YOUR-WORKER-NAME>.<YOUR-ACCOUNT-NAME>.workers.dev. - The site should render normally.
It is possible the site will not render correctly because you are not accessing the site through the expected domain. The section below on configuring DNS will guide you through the steps needed to fix this.
Configure DNS#
You should talk with your network administrator before making any changes to DNS. The instructions below may not be appropriate for your environment.
- In Cloudflare, navigate to your site.
- In the top menu, click DNS.
- In your domain registrar, set the nameservers assigned to your domain to the nameservers listed in Cloudflare.
- Click Add record.
- Enter the following values:
- Type:
A - Name:
<YOUR-SUBDOMAIN>(e.g. cdn) - IPv4 address:
192.0.2.1The IP address entered here is not used, but DNS requires a value be entered. Cloudflare will use the worker with a route that matches this record.
- Type:
- Click Save.
- Open your site on Cloudflare using the url
https://<YOUR-SUBDOMAIN>.<YOUR-DOMAIN>.
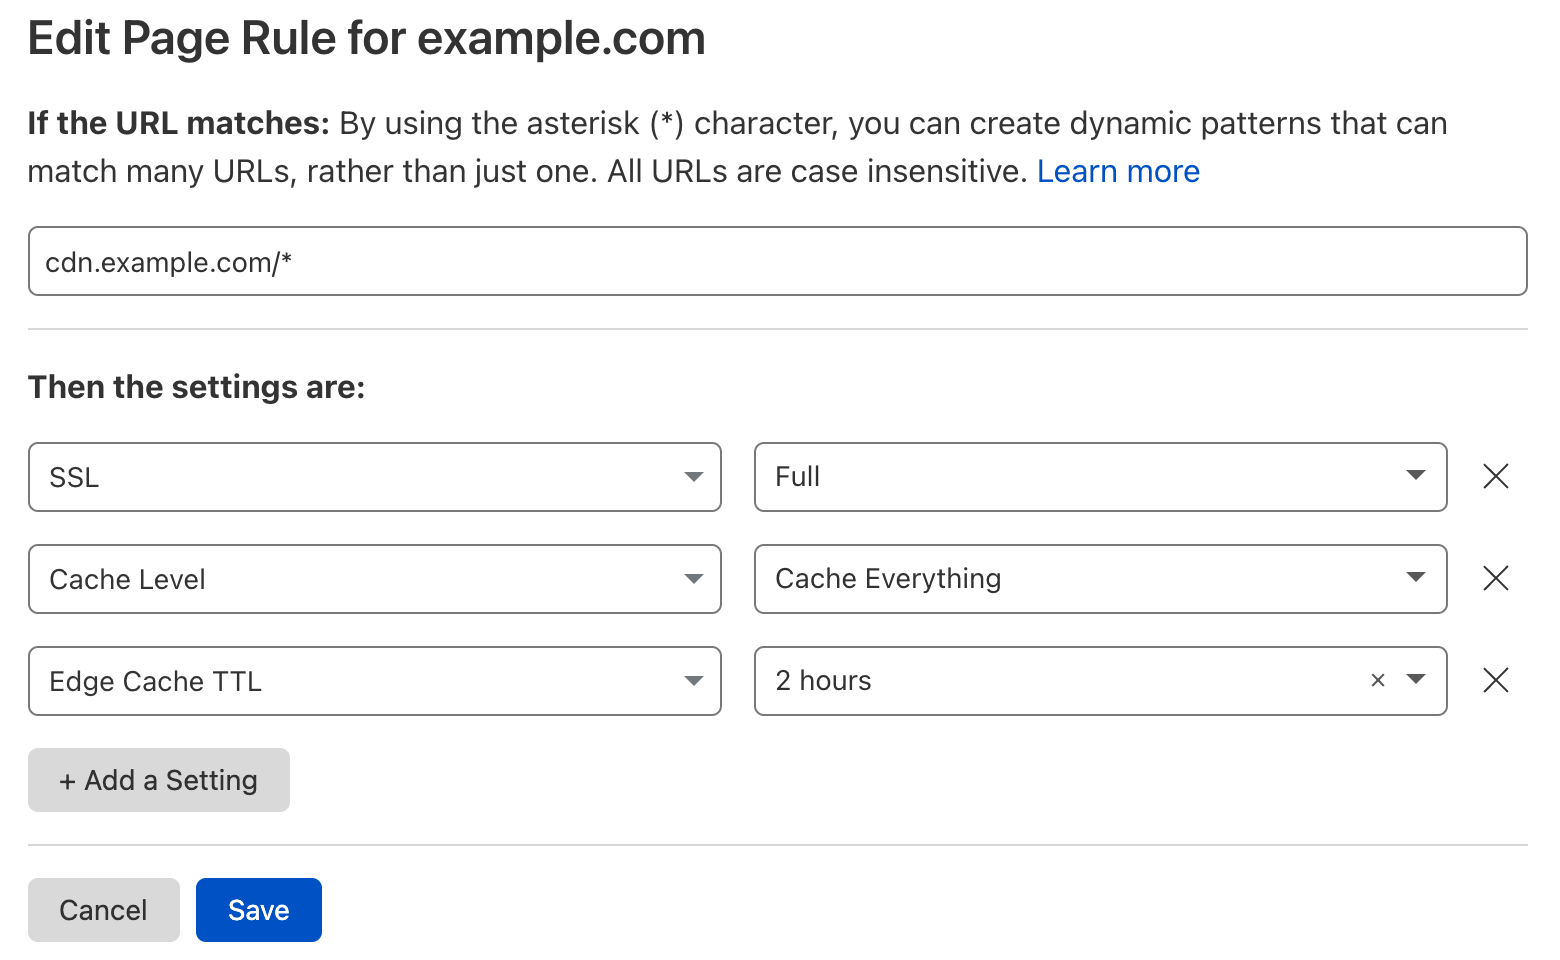
Configure caching#
Cloudflare does not automatically enable caching on worker routes. You must enable this.
- In Cloudflare, navigate to your site.
- In the top menu, click Rules.
- Click Create Page Rule.
- In the first text box enter your route (e.g.
cdn.example.com/*). - In the dropdown select SSL > Full.
- In the dropdown select Cache Level > Cache Everything.
- In the dropdown select Edge Cache TTL > 2 hours.
- Click Save and Deploy.
note
Normally you would want to configure a purge service on the Uniform deployment service in order to ensure that the cache is purged when new content is published. The way Uniform deploys files to Cloudflare, Cloudflare automatically purges the cache. No purge service is required.