How to configure Preview on Netlify
Introduction#
Doing Jamstack doesn't mean you your business users need to compromise on real-time preview functionality. This guide will show you how to setup a Netlify Site to serve Sitecore Preview content on demand through server-side render. The approach is relying on the Next on Netlify plugin that allows to run your NextJs app rendering via a Serverless function therefore enabling the real-time Preview Mode.
Prerequisites#
There are a few things you need to have setup in Netlify before implementing these updates.
- NextJs version 10.0.6+
- Netlify NextJs plugin added and working. You will need version 3.0.3 or greater. See Netlify documentation for how this can be added to your site.
- Netlify is only running the NextJs build command as part of the build. For Uniform starter kits, this means removing the NextJs export command from the
npm run exportscript.
Configuration steps#
There are two ways in which you can setup your Sitecore preview site. They each have their pros and cons so here is an overview of what they are and why you would want to chose one over the other.
Option 1: Add the Preview mode to your Next.js app#
caution
This option works on earlier versions of NextJs (prior v12).
Here we will use Preview mode of NextJs to toggle between preview content and the last deployed static content.
The main benefit of choosing this approach is that it gives you a simpler deployment workflow.
- You only need to deploy a single site for any environment which needs a preview mode.
- The main drawback of choosing this approach is that content can be different for the same url, depending on whether preview mode has been switched on. This can potentially be confusing.
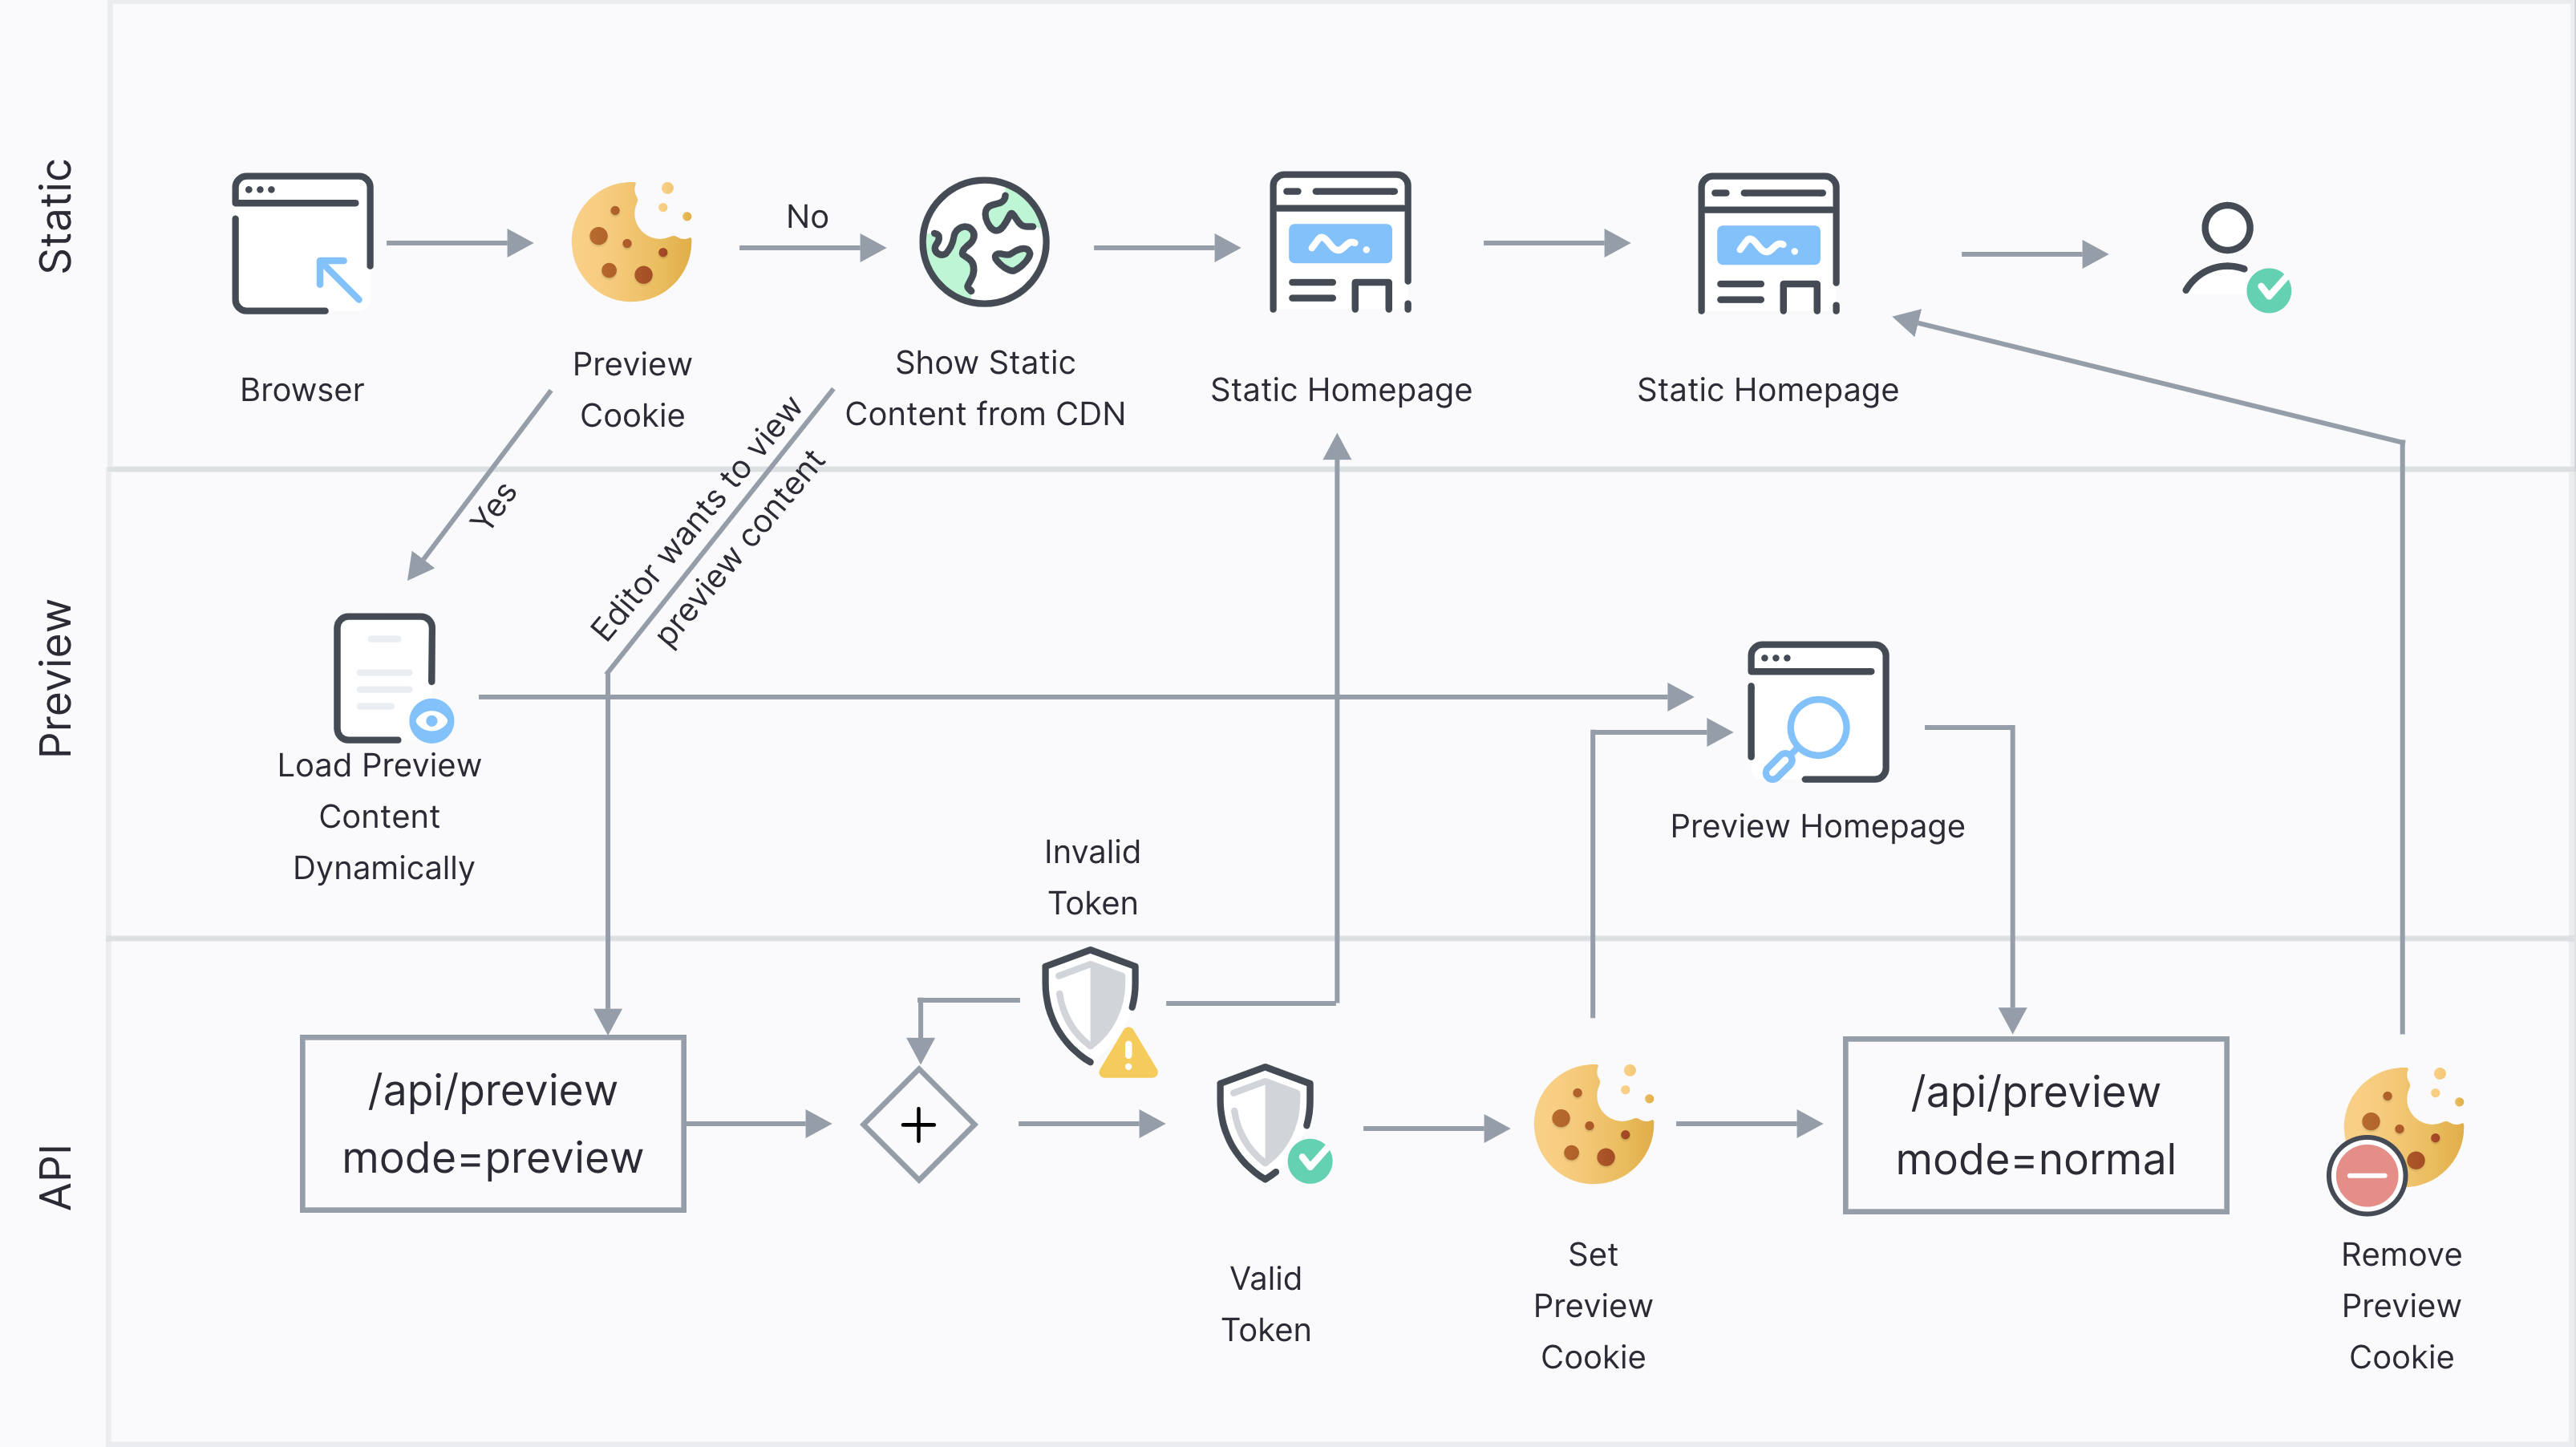
The following steps will allow you to configure your Netlify site to toggle NextJs preview mode on and off. Whilst the preview mode is on, each page will be dynamically built by a serverless function based on content at Sitecore url specified by UNIFORM_PREVIEW_API_URL.
- You can turn it on my navigating to:
https://yoursite.netlify.app/api/preview?token={UNIFORM_API_TOKEN}&mode=preview. This will turn on preview mode and redirect you to the homepage - You can turn it off by navigating to
https://yoursite.netlify.app/api/preview?mode=normal. This will turn off preview mode and redirect you to the homepage.
Step 1: Add a new environment variable#
Add the environment variable UNIFORM_PREVIEW_API_URL to the Netlify build environment variables.
Step 2: Update the slug page#
Within the /pages/[[...slug]].tsx page, you will need to update the getStaticProps functionality so that it changes the uniform api url based on whether we are in preview mode.
export async function getStaticProps({ params }) { const asPath = "/" + (params?.slug?.join("/") || ""); //const props = await getNextPageProps({ asPath }); let config = getNextConfig(); if (preview && process.env.UNIFORM_PREVIEW_API_URL) { config = { ...config, UNIFORM_API_URL: process.env.UNIFORM_PREVIEW_API_URL, }; } const props: any = await getPageProps( fetch, asPath, config, createConsoleLogger() ); return { props };}
Step 3: Add the preview API endpoint#
Add the following /pages/api/preview.ts file. It will add a serverless function to your site which can be used to turn preview mode on and off. This also checks that the token querystring matches the UNIFORM_API_TOKEN.
import { NextApiRequest, NextApiResponse } from 'next';
export default async function preview(  req: NextApiRequest,  res: NextApiResponse) {  const mode = req.query.mode as string;  switch (mode) {    case 'preview':      // Check the secret and next parameters      // This secret should only be known to this API route and the CMS      if (req.query.token !== process.env.UNIFORM_API_TOKEN) {        return res.status(401).json({ message: 'Invalid token' });      }
      // Enable Preview Mode by setting the cookies      res.setPreviewData({});      break;    case 'normal':      // Clear Preview Mode      res.clearPreviewData();      break;    default:      return res.status(400).json({        message: 'Invalid `mode` querystring. Should be `preview` or `normal`',      });  }
// Redirect to the path from the fetched post // We don't redirect to req.query.slug as that might lead to open redirect vulnerabilities res.redirect('/');}Option 2: Setup a dedicated Preview NextJs app#
caution
This option works on earlier versions of NextJs (prior v12).
With this option, we will deploy a separate instance of NextJs app with no static files and point it at your preview Sitecore instance to fetch content from Uniform APIs.
Chose this approach if you want a dedicated preview website which always shows the same content.
- Dedicated preview site
- Control access to the Sitecore server and it's preview content at a Netlify level.
- You will need to configure and deploy multiple sites for each environment that needs a preview mode.
These are the settings you will need for setting up a dedicated preview site. This site will deploy with no static files and will configure a serverless function to dynamically render each page on demand.
Step 1: Set the environment variables to point to preview#
UNIFORM_API_URL=https://preview.mysitecore.comStep 2: Use the SSR build mode#
Set UNIFORM_BUILD_MODE="ssr" in your netlify.toml file:
[build]  command="npm run build"
[build.environment]  UNIFORM_BUILD_MODE="ssr"
[[plugins]] package = "@netlify/plugin-nextjs"Option 3: Setup a dedicated NextJs application in SSR mode#
Step 1: Switch to useServerSideProps#
In [[slug]].tsx comment out useStaticProps and add useServerSideProps:
export async function getServerSideProps({ params }) { const { tryFindItemId, tryGetTimestamp } = await import('@uniformdev/common-server'); const asPath = "/" + (params?.slug?.join("/") || ""); const itemId = await tryFindItemId(asPath); const timestamp = await tryGetTimestamp(asPath); const props = await getNextPageProps({ asPath, itemId, timestamp }); return { props: props };}Step 2: Configure a preview site in Sitecore#
Create a separate preview site on Sitecore side to use it in the preview NextJs application.
As alternative option, you can use UNIFORM_OPTIONS_PREVIEW=true env variable to get data from the master database.