How to deploy to Akamai NetStorage
Introduction#
The following diagram illustrates the components involved with deploying a Sitecore site to Akamai NetStorage.
%3Bfill%3A%23ECECFF%3B%7D%23mermaid-1755859226763%20text.actor%26gt%3Btspan%7Bfill%3Ablack%3Bstroke%3Anone%3B%7D%23mermaid-1755859226763%20.actor-line%7Bstroke%3Agrey%3B%7D%23mermaid-1755859226763%20.messageLine0%7Bstroke-width%3A1.5%3Bstroke-dasharray%3Anone%3Bstroke%3A%23333%3B%7D%23mermaid-1755859226763%20.messageLine1%7Bstroke-width%3A1.5%3Bstroke-dasharray%3A2%2C2%3Bstroke%3A%23333%3B%7D%23mermaid-1755859226763%20%23arrowhead%20path%7Bfill%3A%23333%3Bstroke%3A%23333%3B%7D%23mermaid-1755859226763%20.sequenceNumber%7Bfill%3Awhite%3B%7D%23mermaid-1755859226763%20%23sequencenumber%7Bfill%3A%23333%3B%7D%23mermaid-1755859226763%20%23crosshead%20path%7Bfill%3A%23333%3Bstroke%3A%23333%3B%7D%23mermaid-1755859226763%20.messageText%7Bfill%3A%23333%3Bstroke%3A%23333%3B%7D%23mermaid-1755859226763%20.labelBox%7Bstroke%3Ahsl(259.6261682243%2C%2059.7765363128%25%2C%2087.9019607843%25)%3Bfill%3A%23ECECFF%3B%7D%23mermaid-1755859226763%20.labelText%2C%23mermaid-1755859226763%20.labelText%26gt%3Btspan%7Bfill%3Ablack%3Bstroke%3Anone%3B%7D%23mermaid-1755859226763%20.loopText%2C%23mermaid-1755859226763%20.loopText%26gt%3Btspan%7Bfill%3Ablack%3Bstroke%3Anone%3B%7D%23mermaid-1755859226763%20.loopLine%7Bstroke-width%3A2px%3Bstroke-dasharray%3A2%2C2%3Bstroke%3Ahsl(259.6261682243%2C%2059.7765363128%25%2C%2087.9019607843%25)%3Bfill%3Ahsl(259.6261682243%2C%2059.7765363128%25%2C%2087.9019607843%25)%3B%7D%23mermaid-1755859226763%20.note%7Bstroke%3A%23aaaa33%3Bfill%3A%23fff5ad%3B%7D%23mermaid-1755859226763%20.noteText%2C%23mermaid-1755859226763%20.noteText%26gt%3Btspan%7Bfill%3Ablack%3Bstroke%3Anone%3B%7D%23mermaid-1755859226763%20.activation0%7Bfill%3A%23f4f4f4%3Bstroke%3A%23666%3B%7D%23mermaid-1755859226763%20.activation1%7Bfill%3A%23f4f4f4%3Bstroke%3A%23666%3B%7D%23mermaid-1755859226763%20.activation2%7Bfill%3A%23f4f4f4%3Bstroke%3A%23666%3B%7D%23mermaid-1755859226763%20%3Aroot%7B--mermaid-font-family%3A%22trebuchet%20ms%22%2Cverdana%2Carial%2Csans-serif%3B%7D%3C%2Fstyle%3E%3Cg%3E%3C%2Fg%3E%3Cg%3E%3Cline%20id%3D%22actor0%22%20x1%3D%2275%22%20y1%3D%225%22%20x2%3D%2275%22%20y2%3D%22594%22%20class%3D%22actor-line%22%20stroke-width%3D%220.5px%22%20stroke%3D%22%23999%22%3E%3C%2Fline%3E%3Crect%20x%3D%220%22%20y%3D%220%22%20fill%3D%22%23eaeaea%22%20stroke%3D%22%23666%22%20width%3D%22150%22%20height%3D%2265%22%20rx%3D%223%22%20ry%3D%223%22%20class%3D%22actor%22%3E%3C%2Frect%3E%3Ctext%20x%3D%2275%22%20y%3D%2232.5%22%20dominant-baseline%3D%22central%22%20alignment-baseline%3D%22central%22%20class%3D%22actor%22%20style%3D%22text-anchor%3A%20middle%3B%20font-size%3A%2014px%3B%20font-weight%3A%20400%3B%20font-family%3A%20Open-Sans%2C%20sans-serif%3B%22%3E%3Ctspan%20x%3D%2275%22%20dy%3D%22-7%22%3EPublishing%20process%3C%2Ftspan%3E%3C%2Ftext%3E%3Ctext%20x%3D%2275%22%20y%3D%2232.5%22%20dominant-baseline%3D%22central%22%20alignment-baseline%3D%22central%22%20class%3D%22actor%22%20style%3D%22text-anchor%3A%20middle%3B%20font-size%3A%2014px%3B%20font-weight%3A%20400%3B%20font-family%3A%20Open-Sans%2C%20sans-serif%3B%22%3E%3Ctspan%20x%3D%2275%22%20dy%3D%227%22%3E(Sitecore)%3C%2Ftspan%3E%3C%2Ftext%3E%3C%2Fg%3E%3Cg%3E%3Cline%20id%3D%22actor1%22%20x1%3D%22323%22%20y1%3D%225%22%20x2%3D%22323%22%20y2%3D%22594%22%20class%3D%22actor-line%22%20stroke-width%3D%220.5px%22%20stroke%3D%22%23999%22%3E%3C%2Fline%3E%3Crect%20x%3D%22248%22%20y%3D%220%22%20fill%3D%22%23eaeaea%22%20stroke%3D%22%23666%22%20width%3D%22150%22%20height%3D%2265%22%20rx%3D%223%22%20ry%3D%223%22%20class%3D%22actor%22%3E%3C%2Frect%3E%3Ctext%20x%3D%22323%22%20y%3D%2232.5%22%20dominant-baseline%3D%22central%22%20alignment-baseline%3D%22central%22%20class%3D%22actor%22%20style%3D%22text-anchor%3A%20middle%3B%20font-size%3A%2014px%3B%20font-weight%3A%20400%3B%20font-family%3A%20Open-Sans%2C%20sans-serif%3B%22%3E%3Ctspan%20x%3D%22323%22%20dy%3D%22-7%22%3EUniform%20service%3C%2Ftspan%3E%3C%2Ftext%3E%3Ctext%20x%3D%22323%22%20y%3D%2232.5%22%20dominant-baseline%3D%22central%22%20alignment-baseline%3D%22central%22%20class%3D%22actor%22%20style%3D%22text-anchor%3A%20middle%3B%20font-size%3A%2014px%3B%20font-weight%3A%20400%3B%20font-family%3A%20Open-Sans%2C%20sans-serif%3B%22%3E%3Ctspan%20x%3D%22323%22%20dy%3D%227%22%3E(Node.js)%3C%2Ftspan%3E%3C%2Ftext%3E%3C%2Fg%3E%3Cg%3E%3Cline%20id%3D%22actor2%22%20x1%3D%22533%22%20y1%3D%225%22%20x2%3D%22533%22%20y2%3D%22594%22%20class%3D%22actor-line%22%20stroke-width%3D%220.5px%22%20stroke%3D%22%23999%22%3E%3C%2Fline%3E%3Crect%20x%3D%22448%22%20y%3D%220%22%20fill%3D%22%23eaeaea%22%20stroke%3D%22%23666%22%20width%3D%22170%22%20height%3D%2265%22%20rx%3D%223%22%20ry%3D%223%22%20class%3D%22actor%22%3E%3C%2Frect%3E%3Ctext%20x%3D%22533%22%20y%3D%2232.5%22%20dominant-baseline%3D%22central%22%20alignment-baseline%3D%22central%22%20class%3D%22actor%22%20style%3D%22text-anchor%3A%20middle%3B%20font-size%3A%2014px%3B%20font-weight%3A%20400%3B%20font-family%3A%20Open-Sans%2C%20sans-serif%3B%22%3E%3Ctspan%20x%3D%22533%22%20dy%3D%22-7%22%3EUniform%20page%20service%3C%2Ftspan%3E%3C%2Ftext%3E%3Ctext%20x%3D%22533%22%20y%3D%2232.5%22%20dominant-baseline%3D%22central%22%20alignment-baseline%3D%22central%22%20class%3D%22actor%22%20style%3D%22text-anchor%3A%20middle%3B%20font-size%3A%2014px%3B%20font-weight%3A%20400%3B%20font-family%3A%20Open-Sans%2C%20sans-serif%3B%22%3E%3Ctspan%20x%3D%22533%22%20dy%3D%227%22%3E(Sitecore)%3C%2Ftspan%3E%3C%2Ftext%3E%3C%2Fg%3E%3Cg%3E%3Cline%20id%3D%22actor3%22%20x1%3D%22743%22%20y1%3D%225%22%20x2%3D%22743%22%20y2%3D%22594%22%20class%3D%22actor-line%22%20stroke-width%3D%220.5px%22%20stroke%3D%22%23999%22%3E%3C%2Fline%3E%3Crect%20x%3D%22668%22%20y%3D%220%22%20fill%3D%22%23eaeaea%22%20stroke%3D%22%23666%22%20width%3D%22150%22%20height%3D%2265%22%20rx%3D%223%22%20ry%3D%223%22%20class%3D%22actor%22%3E%3C%2Frect%3E%3Ctext%20x%3D%22743%22%20y%3D%2232.5%22%20dominant-baseline%3D%22central%22%20alignment-baseline%3D%22central%22%20class%3D%22actor%22%20style%3D%22text-anchor%3A%20middle%3B%20font-size%3A%2014px%3B%20font-weight%3A%20400%3B%20font-family%3A%20Open-Sans%2C%20sans-serif%3B%22%3E%3Ctspan%20x%3D%22743%22%20dy%3D%220%22%3EAkamai%3C%2Ftspan%3E%3C%2Ftext%3E%3C%2Fg%3E%3Cdefs%3E%3Cmarker%20id%3D%22arrowhead%22%20refX%3D%229%22%20refY%3D%225%22%20markerUnits%3D%22userSpaceOnUse%22%20markerWidth%3D%2212%22%20markerHeight%3D%2212%22%20orient%3D%22auto%22%3E%3Cpath%20d%3D%22M%200%200%20L%2010%205%20L%200%2010%20z%22%3E%3C%2Fpath%3E%3C%2Fmarker%3E%3C%2Fdefs%3E%3Cdefs%3E%3Cmarker%20id%3D%22crosshead%22%20markerWidth%3D%2215%22%20markerHeight%3D%228%22%20orient%3D%22auto%22%20refX%3D%2216%22%20refY%3D%224%22%3E%3Cpath%20fill%3D%22black%22%20stroke%3D%22%23000000%22%20stroke-width%3D%221px%22%20d%3D%22M%209%2C2%20V%206%20L16%2C4%20Z%22%20style%3D%22stroke-dasharray%3A%200%2C%200%3B%22%3E%3C%2Fpath%3E%3Cpath%20fill%3D%22none%22%20stroke%3D%22%23000000%22%20stroke-width%3D%221px%22%20d%3D%22M%200%2C1%20L%206%2C7%20M%206%2C1%20L%200%2C7%22%20style%3D%22stroke-dasharray%3A%200%2C%200%3B%22%3E%3C%2Fpath%3E%3C%2Fmarker%3E%3C%2Fdefs%3E%3Cdefs%3E%3Cmarker%20id%3D%22filled-head%22%20refX%3D%2218%22%20refY%3D%227%22%20markerWidth%3D%2220%22%20markerHeight%3D%2228%22%20orient%3D%22auto%22%3E%3Cpath%20d%3D%22M%2018%2C7%20L9%2C13%20L14%2C7%20L9%2C1%20Z%22%3E%3C%2Fpath%3E%3C%2Fmarker%3E%3C%2Fdefs%3E%3Cdefs%3E%3Cmarker%20id%3D%22sequencenumber%22%20refX%3D%2215%22%20refY%3D%2215%22%20markerWidth%3D%2260%22%20markerHeight%3D%2240%22%20orient%3D%22auto%22%3E%3Ccircle%20cx%3D%2215%22%20cy%3D%2215%22%20r%3D%226%22%3E%3C%2Fcircle%3E%3C%2Fmarker%3E%3C%2Fdefs%3E%3Ctext%20x%3D%22199%22%20y%3D%2280%22%20text-anchor%3D%22middle%22%20dominant-baseline%3D%22middle%22%20alignment-baseline%3D%22middle%22%20class%3D%22messageText%22%20dy%3D%221em%22%20style%3D%22font-family%3A%20%26quot%3Btrebuchet%20ms%26quot%3B%2C%20verdana%2C%20arial%2C%20sans-serif%3B%20font-size%3A%2016px%3B%20font-weight%3A%20400%3B%22%3EStart%20deployment%3C%2Ftext%3E%3Cline%20x1%3D%2275%22%20y1%3D%22113%22%20x2%3D%22323%22%20y2%3D%22113%22%20class%3D%22messageLine0%22%20stroke-width%3D%222%22%20stroke%3D%22none%22%20marker-end%3D%22url(%23arrowhead)%22%20marker-start%3D%22url(%23sequencenumber)%22%20style%3D%22fill%3A%20none%3B%22%3E%3C%2Fline%3E%3Ctext%20x%3D%2275%22%20y%3D%22117%22%20font-family%3D%22sans-serif%22%20font-size%3D%2212px%22%20text-anchor%3D%22middle%22%20textLength%3D%2216px%22%20class%3D%22sequenceNumber%22%3E1%3C%2Ftext%3E%3Cg%3E%3Crect%20x%3D%22318%22%20y%3D%22113%22%20fill%3D%22%23EDF2AE%22%20stroke%3D%22%23666%22%20width%3D%2210%22%20height%3D%22396%22%20rx%3D%220%22%20ry%3D%220%22%20class%3D%22activation0%22%3E%3C%2Frect%3E%3C%2Fg%3E%3Ctext%20x%3D%22431%22%20y%3D%22128%22%20text-anchor%3D%22middle%22%20dominant-baseline%3D%22middle%22%20alignment-baseline%3D%22middle%22%20class%3D%22messageText%22%20dy%3D%221em%22%20style%3D%22font-family%3A%20%26quot%3Btrebuchet%20ms%26quot%3B%2C%20verdana%2C%20arial%2C%20sans-serif%3B%20font-size%3A%2016px%3B%20font-weight%3A%20400%3B%22%3EGet%20content%3C%2Ftext%3E%3Cline%20x1%3D%22328%22%20y1%3D%22161%22%20x2%3D%22533%22%20y2%3D%22161%22%20class%3D%22messageLine0%22%20stroke-width%3D%222%22%20stroke%3D%22none%22%20marker-end%3D%22url(%23arrowhead)%22%20marker-start%3D%22url(%23sequencenumber)%22%20style%3D%22fill%3A%20none%3B%22%3E%3C%2Fline%3E%3Ctext%20x%3D%22328%22%20y%3D%22165%22%20font-family%3D%22sans-serif%22%20font-size%3D%2212px%22%20text-anchor%3D%22middle%22%20textLength%3D%2216px%22%20class%3D%22sequenceNumber%22%3E2%3C%2Ftext%3E%3Cg%3E%3Crect%20x%3D%22528%22%20y%3D%22163%22%20fill%3D%22%23EDF2AE%22%20stroke%3D%22%23666%22%20width%3D%2210%22%20height%3D%2246%22%20rx%3D%220%22%20ry%3D%220%22%20class%3D%22activation0%22%3E%3C%2Frect%3E%3C%2Fg%3E%3Ctext%20x%3D%22428%22%20y%3D%22176%22%20text-anchor%3D%22middle%22%20dominant-baseline%3D%22middle%22%20alignment-baseline%3D%22middle%22%20class%3D%22messageText%22%20dy%3D%221em%22%20style%3D%22font-family%3A%20%26quot%3Btrebuchet%20ms%26quot%3B%2C%20verdana%2C%20arial%2C%20sans-serif%3B%20font-size%3A%2016px%3B%20font-weight%3A%20400%3B%22%3EContent%3C%2Ftext%3E%3Cline%20x1%3D%22528%22%20y1%3D%22209%22%20x2%3D%22328%22%20y2%3D%22209%22%20class%3D%22messageLine1%22%20stroke-width%3D%222%22%20stroke%3D%22none%22%20marker-end%3D%22url(%23arrowhead)%22%20marker-start%3D%22url(%23sequencenumber)%22%20style%3D%22stroke-dasharray%3A%203%2C%203%3B%20fill%3A%20none%3B%22%3E%3C%2Fline%3E%3Ctext%20x%3D%22528%22%20y%3D%22213%22%20font-family%3D%22sans-serif%22%20font-size%3D%2212px%22%20text-anchor%3D%22middle%22%20textLength%3D%2216px%22%20class%3D%22sequenceNumber%22%3E3%3C%2Ftext%3E%3Ctext%20x%3D%22328%22%20y%3D%22224%22%20text-anchor%3D%22middle%22%20dominant-baseline%3D%22middle%22%20alignment-baseline%3D%22middle%22%20class%3D%22messageText%22%20dy%3D%221em%22%20style%3D%22font-family%3A%20%26quot%3Btrebuchet%20ms%26quot%3B%2C%20verdana%2C%20arial%2C%20sans-serif%3B%20font-size%3A%2016px%3B%20font-weight%3A%20400%3B%22%3EGenerate%20static%20files%3C%2Ftext%3E%3Cpath%20d%3D%22M%20328%2C257%20C%20388%2C247%20388%2C287%20328%2C277%22%20class%3D%22messageLine0%22%20stroke-width%3D%222%22%20stroke%3D%22none%22%20marker-end%3D%22url(%23arrowhead)%22%20marker-start%3D%22url(%23sequencenumber)%22%20style%3D%22fill%3A%20none%3B%22%3E%3C%2Fpath%3E%3Ctext%20x%3D%22328%22%20y%3D%22261%22%20font-family%3D%22sans-serif%22%20font-size%3D%2212px%22%20text-anchor%3D%22middle%22%20textLength%3D%2216px%22%20class%3D%22sequenceNumber%22%3E4%3C%2Ftext%3E%3Ctext%20x%3D%22328%22%20y%3D%22302%22%20text-anchor%3D%22middle%22%20dominant-baseline%3D%22middle%22%20alignment-baseline%3D%22middle%22%20class%3D%22messageText%22%20dy%3D%221em%22%20style%3D%22font-family%3A%20%26quot%3Btrebuchet%20ms%26quot%3B%2C%20verdana%2C%20arial%2C%20sans-serif%3B%20font-size%3A%2016px%3B%20font-weight%3A%20400%3B%22%3EPrepare%20static%20files%20for%20deployment%3C%2Ftext%3E%3Cpath%20d%3D%22M%20328%2C335%20C%20388%2C325%20388%2C365%20328%2C355%22%20class%3D%22messageLine0%22%20stroke-width%3D%222%22%20stroke%3D%22none%22%20marker-end%3D%22url(%23arrowhead)%22%20marker-start%3D%22url(%23sequencenumber)%22%20style%3D%22fill%3A%20none%3B%22%3E%3C%2Fpath%3E%3Ctext%20x%3D%22328%22%20y%3D%22339%22%20font-family%3D%22sans-serif%22%20font-size%3D%2212px%22%20text-anchor%3D%22middle%22%20textLength%3D%2216px%22%20class%3D%22sequenceNumber%22%3E5%3C%2Ftext%3E%3Ctext%20x%3D%22536%22%20y%3D%22380%22%20text-anchor%3D%22middle%22%20dominant-baseline%3D%22middle%22%20alignment-baseline%3D%22middle%22%20class%3D%22messageText%22%20dy%3D%221em%22%20style%3D%22font-family%3A%20%26quot%3Btrebuchet%20ms%26quot%3B%2C%20verdana%2C%20arial%2C%20sans-serif%3B%20font-size%3A%2016px%3B%20font-weight%3A%20400%3B%22%3EDeploy%20static%20files%3C%2Ftext%3E%3Cline%20x1%3D%22328%22%20y1%3D%22413%22%20x2%3D%22743%22%20y2%3D%22413%22%20class%3D%22messageLine0%22%20stroke-width%3D%222%22%20stroke%3D%22none%22%20marker-end%3D%22url(%23arrowhead)%22%20marker-start%3D%22url(%23sequencenumber)%22%20style%3D%22fill%3A%20none%3B%22%3E%3C%2Fline%3E%3Ctext%20x%3D%22328%22%20y%3D%22417%22%20font-family%3D%22sans-serif%22%20font-size%3D%2212px%22%20text-anchor%3D%22middle%22%20textLength%3D%2216px%22%20class%3D%22sequenceNumber%22%3E6%3C%2Ftext%3E%3Ctext%20x%3D%22536%22%20y%3D%22428%22%20text-anchor%3D%22middle%22%20dominant-baseline%3D%22middle%22%20alignment-baseline%3D%22middle%22%20class%3D%22messageText%22%20dy%3D%221em%22%20style%3D%22font-family%3A%20%26quot%3Btrebuchet%20ms%26quot%3B%2C%20verdana%2C%20arial%2C%20sans-serif%3B%20font-size%3A%2016px%3B%20font-weight%3A%20400%3B%22%3EPurge%20cache%3C%2Ftext%3E%3Cline%20x1%3D%22328%22%20y1%3D%22461%22%20x2%3D%22743%22%20y2%3D%22461%22%20class%3D%22messageLine0%22%20stroke-width%3D%222%22%20stroke%3D%22none%22%20marker-end%3D%22url(%23arrowhead)%22%20marker-start%3D%22url(%23sequencenumber)%22%20style%3D%22fill%3A%20none%3B%22%3E%3C%2Fline%3E%3Ctext%20x%3D%22328%22%20y%3D%22465%22%20font-family%3D%22sans-serif%22%20font-size%3D%2212px%22%20text-anchor%3D%22middle%22%20textLength%3D%2216px%22%20class%3D%22sequenceNumber%22%3E7%3C%2Ftext%3E%3Ctext%20x%3D%22197%22%20y%3D%22476%22%20text-anchor%3D%22middle%22%20dominant-baseline%3D%22middle%22%20alignment-baseline%3D%22middle%22%20class%3D%22messageText%22%20dy%3D%221em%22%20style%3D%22font-family%3A%20%26quot%3Btrebuchet%20ms%26quot%3B%2C%20verdana%2C%20arial%2C%20sans-serif%3B%20font-size%3A%2016px%3B%20font-weight%3A%20400%3B%22%3EDeployment%20complete%3C%2Ftext%3E%3Cline%20x1%3D%22318%22%20y1%3D%22509%22%20x2%3D%2275%22%20y2%3D%22509%22%20class%3D%22messageLine1%22%20stroke-width%3D%222%22%20stroke%3D%22none%22%20marker-end%3D%22url(%23arrowhead)%22%20marker-start%3D%22url(%23sequencenumber)%22%20style%3D%22stroke-dasharray%3A%203%2C%203%3B%20fill%3A%20none%3B%22%3E%3C%2Fline%3E%3Ctext%20x%3D%22318%22%20y%3D%22513%22%20font-family%3D%22sans-serif%22%20font-size%3D%2212px%22%20text-anchor%3D%22middle%22%20textLength%3D%2216px%22%20class%3D%22sequenceNumber%22%3E8%3C%2Ftext%3E%3Cg%3E%3Crect%20x%3D%220%22%20y%3D%22529%22%20fill%3D%22%23eaeaea%22%20stroke%3D%22%23666%22%20width%3D%22150%22%20height%3D%2265%22%20rx%3D%223%22%20ry%3D%223%22%20class%3D%22actor%22%3E%3C%2Frect%3E%3Ctext%20x%3D%2275%22%20y%3D%22561.5%22%20dominant-baseline%3D%22central%22%20alignment-baseline%3D%22central%22%20class%3D%22actor%22%20style%3D%22text-anchor%3A%20middle%3B%20font-size%3A%2014px%3B%20font-weight%3A%20400%3B%20font-family%3A%20Open-Sans%2C%20sans-serif%3B%22%3E%3Ctspan%20x%3D%2275%22%20dy%3D%22-7%22%3EPublishing%20process%3C%2Ftspan%3E%3C%2Ftext%3E%3Ctext%20x%3D%2275%22%20y%3D%22561.5%22%20dominant-baseline%3D%22central%22%20alignment-baseline%3D%22central%22%20class%3D%22actor%22%20style%3D%22text-anchor%3A%20middle%3B%20font-size%3A%2014px%3B%20font-weight%3A%20400%3B%20font-family%3A%20Open-Sans%2C%20sans-serif%3B%22%3E%3Ctspan%20x%3D%2275%22%20dy%3D%227%22%3E(Sitecore)%3C%2Ftspan%3E%3C%2Ftext%3E%3C%2Fg%3E%3Cg%3E%3Crect%20x%3D%22248%22%20y%3D%22529%22%20fill%3D%22%23eaeaea%22%20stroke%3D%22%23666%22%20width%3D%22150%22%20height%3D%2265%22%20rx%3D%223%22%20ry%3D%223%22%20class%3D%22actor%22%3E%3C%2Frect%3E%3Ctext%20x%3D%22323%22%20y%3D%22561.5%22%20dominant-baseline%3D%22central%22%20alignment-baseline%3D%22central%22%20class%3D%22actor%22%20style%3D%22text-anchor%3A%20middle%3B%20font-size%3A%2014px%3B%20font-weight%3A%20400%3B%20font-family%3A%20Open-Sans%2C%20sans-serif%3B%22%3E%3Ctspan%20x%3D%22323%22%20dy%3D%22-7%22%3EUniform%20service%3C%2Ftspan%3E%3C%2Ftext%3E%3Ctext%20x%3D%22323%22%20y%3D%22561.5%22%20dominant-baseline%3D%22central%22%20alignment-baseline%3D%22central%22%20class%3D%22actor%22%20style%3D%22text-anchor%3A%20middle%3B%20font-size%3A%2014px%3B%20font-weight%3A%20400%3B%20font-family%3A%20Open-Sans%2C%20sans-serif%3B%22%3E%3Ctspan%20x%3D%22323%22%20dy%3D%227%22%3E(Node.js)%3C%2Ftspan%3E%3C%2Ftext%3E%3C%2Fg%3E%3Cg%3E%3Crect%20x%3D%22448%22%20y%3D%22529%22%20fill%3D%22%23eaeaea%22%20stroke%3D%22%23666%22%20width%3D%22170%22%20height%3D%2265%22%20rx%3D%223%22%20ry%3D%223%22%20class%3D%22actor%22%3E%3C%2Frect%3E%3Ctext%20x%3D%22533%22%20y%3D%22561.5%22%20dominant-baseline%3D%22central%22%20alignment-baseline%3D%22central%22%20class%3D%22actor%22%20style%3D%22text-anchor%3A%20middle%3B%20font-size%3A%2014px%3B%20font-weight%3A%20400%3B%20font-family%3A%20Open-Sans%2C%20sans-serif%3B%22%3E%3Ctspan%20x%3D%22533%22%20dy%3D%22-7%22%3EUniform%20page%20service%3C%2Ftspan%3E%3C%2Ftext%3E%3Ctext%20x%3D%22533%22%20y%3D%22561.5%22%20dominant-baseline%3D%22central%22%20alignment-baseline%3D%22central%22%20class%3D%22actor%22%20style%3D%22text-anchor%3A%20middle%3B%20font-size%3A%2014px%3B%20font-weight%3A%20400%3B%20font-family%3A%20Open-Sans%2C%20sans-serif%3B%22%3E%3Ctspan%20x%3D%22533%22%20dy%3D%227%22%3E(Sitecore)%3C%2Ftspan%3E%3C%2Ftext%3E%3C%2Fg%3E%3Cg%3E%3Crect%20x%3D%22668%22%20y%3D%22529%22%20fill%3D%22%23eaeaea%22%20stroke%3D%22%23666%22%20width%3D%22150%22%20height%3D%2265%22%20rx%3D%223%22%20ry%3D%223%22%20class%3D%22actor%22%3E%3C%2Frect%3E%3Ctext%20x%3D%22743%22%20y%3D%22561.5%22%20dominant-baseline%3D%22central%22%20alignment-baseline%3D%22central%22%20class%3D%22actor%22%20style%3D%22text-anchor%3A%20middle%3B%20font-size%3A%2014px%3B%20font-weight%3A%20400%3B%20font-family%3A%20Open-Sans%2C%20sans-serif%3B%22%3E%3Ctspan%20x%3D%22743%22%20dy%3D%220%22%3EAkamai%3C%2Ftspan%3E%3C%2Ftext%3E%3C%2Fg%3E%3C%2Fsvg%3E "Diagram generated via mermaid")
Prerequisites#
- You have completed the Getting Started section, so your site is ready to be deployed to static storage.
- Uniform for Sitecore starter kit (for Deploy).
- Akamai account with NetStorage enabled.
- Uniform Upload Tool for Akamai NetStorage (optional).
Media Sync#
A future version of Uniform will support media sync to Akamai NetStorage. Currently you must either host media files on your Sitecore CD instance or use media sync to a supported system (e.g. Azure Blob Storage).
Steps#
Add storage group#
Log into Akamai.
In the left menu, navigate to ORIGIN SERVICES > NetStorage.
In the left menu, click Storage Groups.
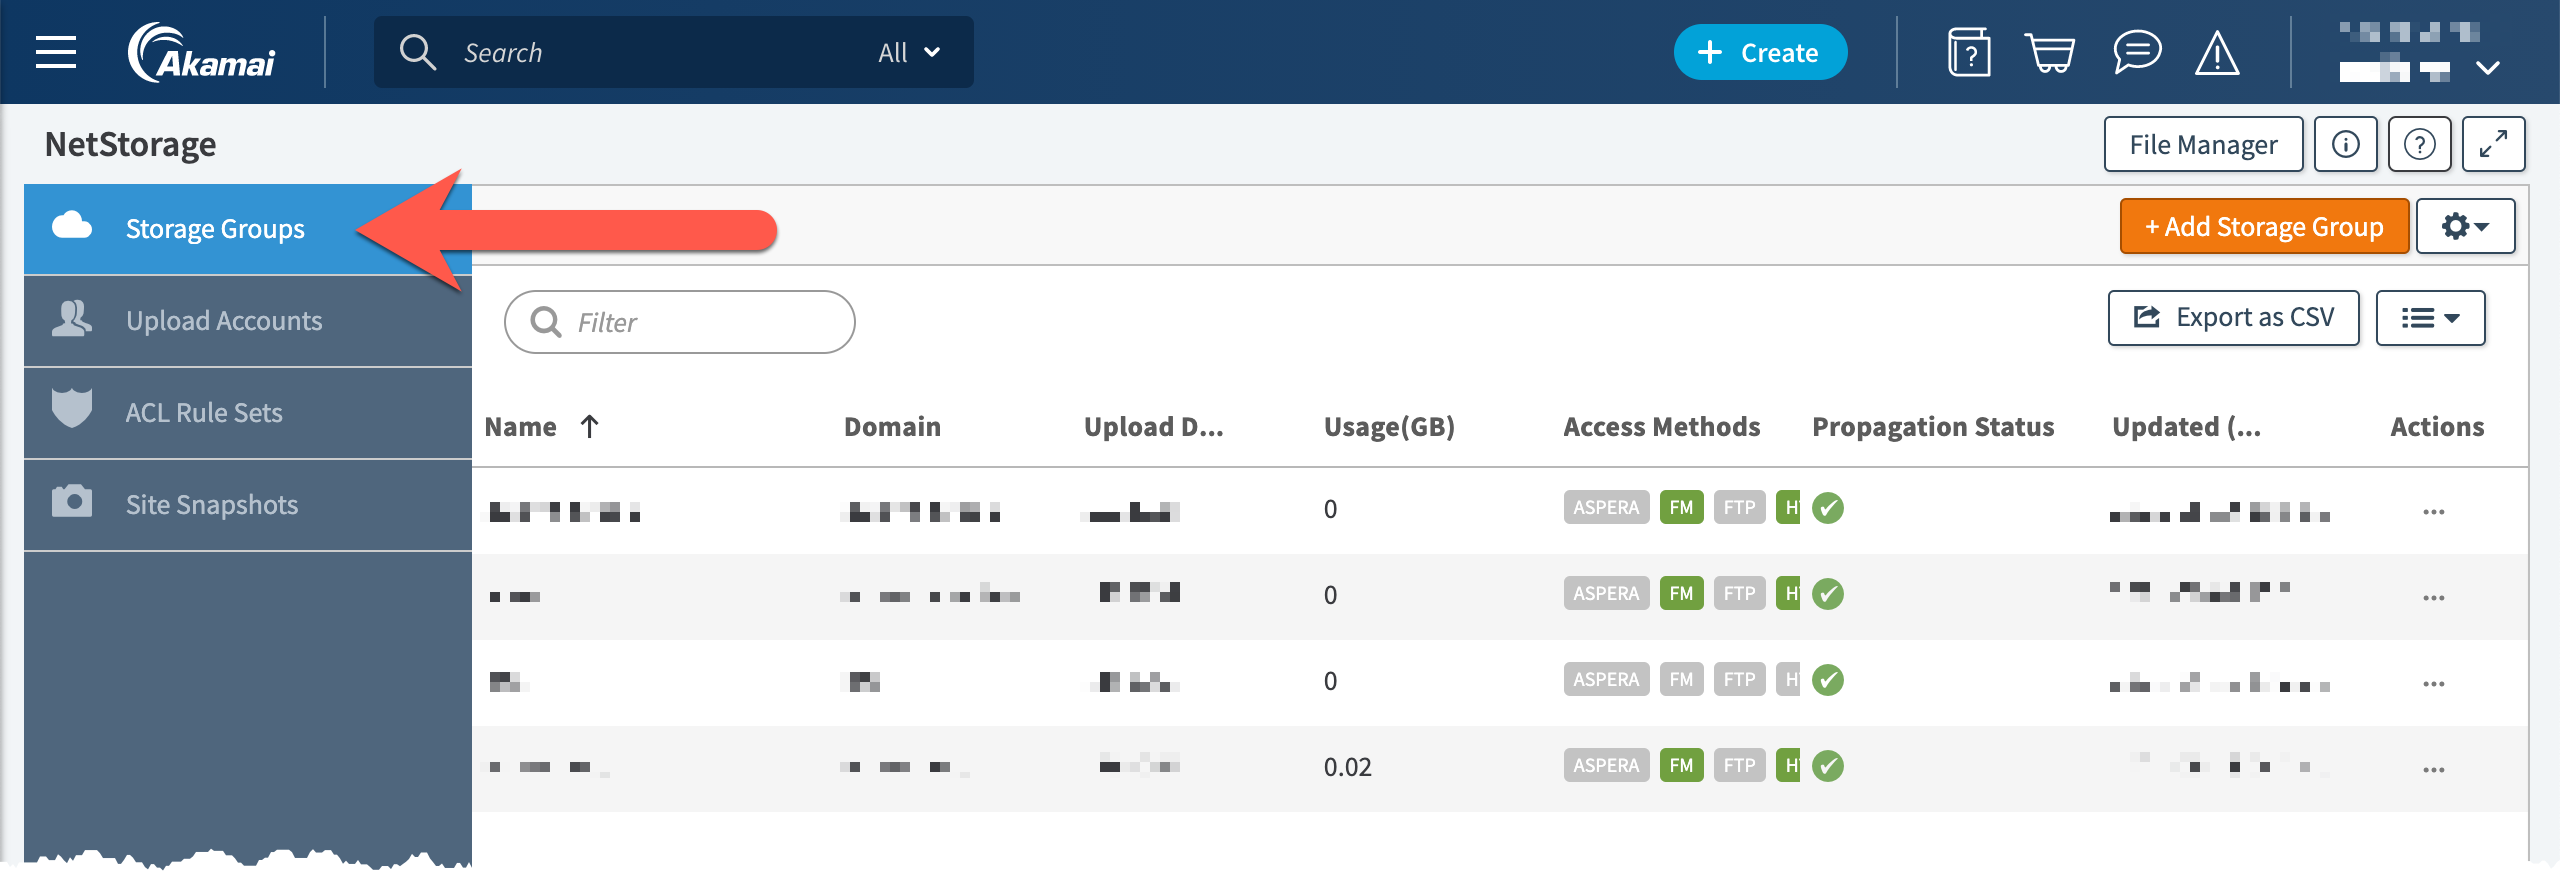
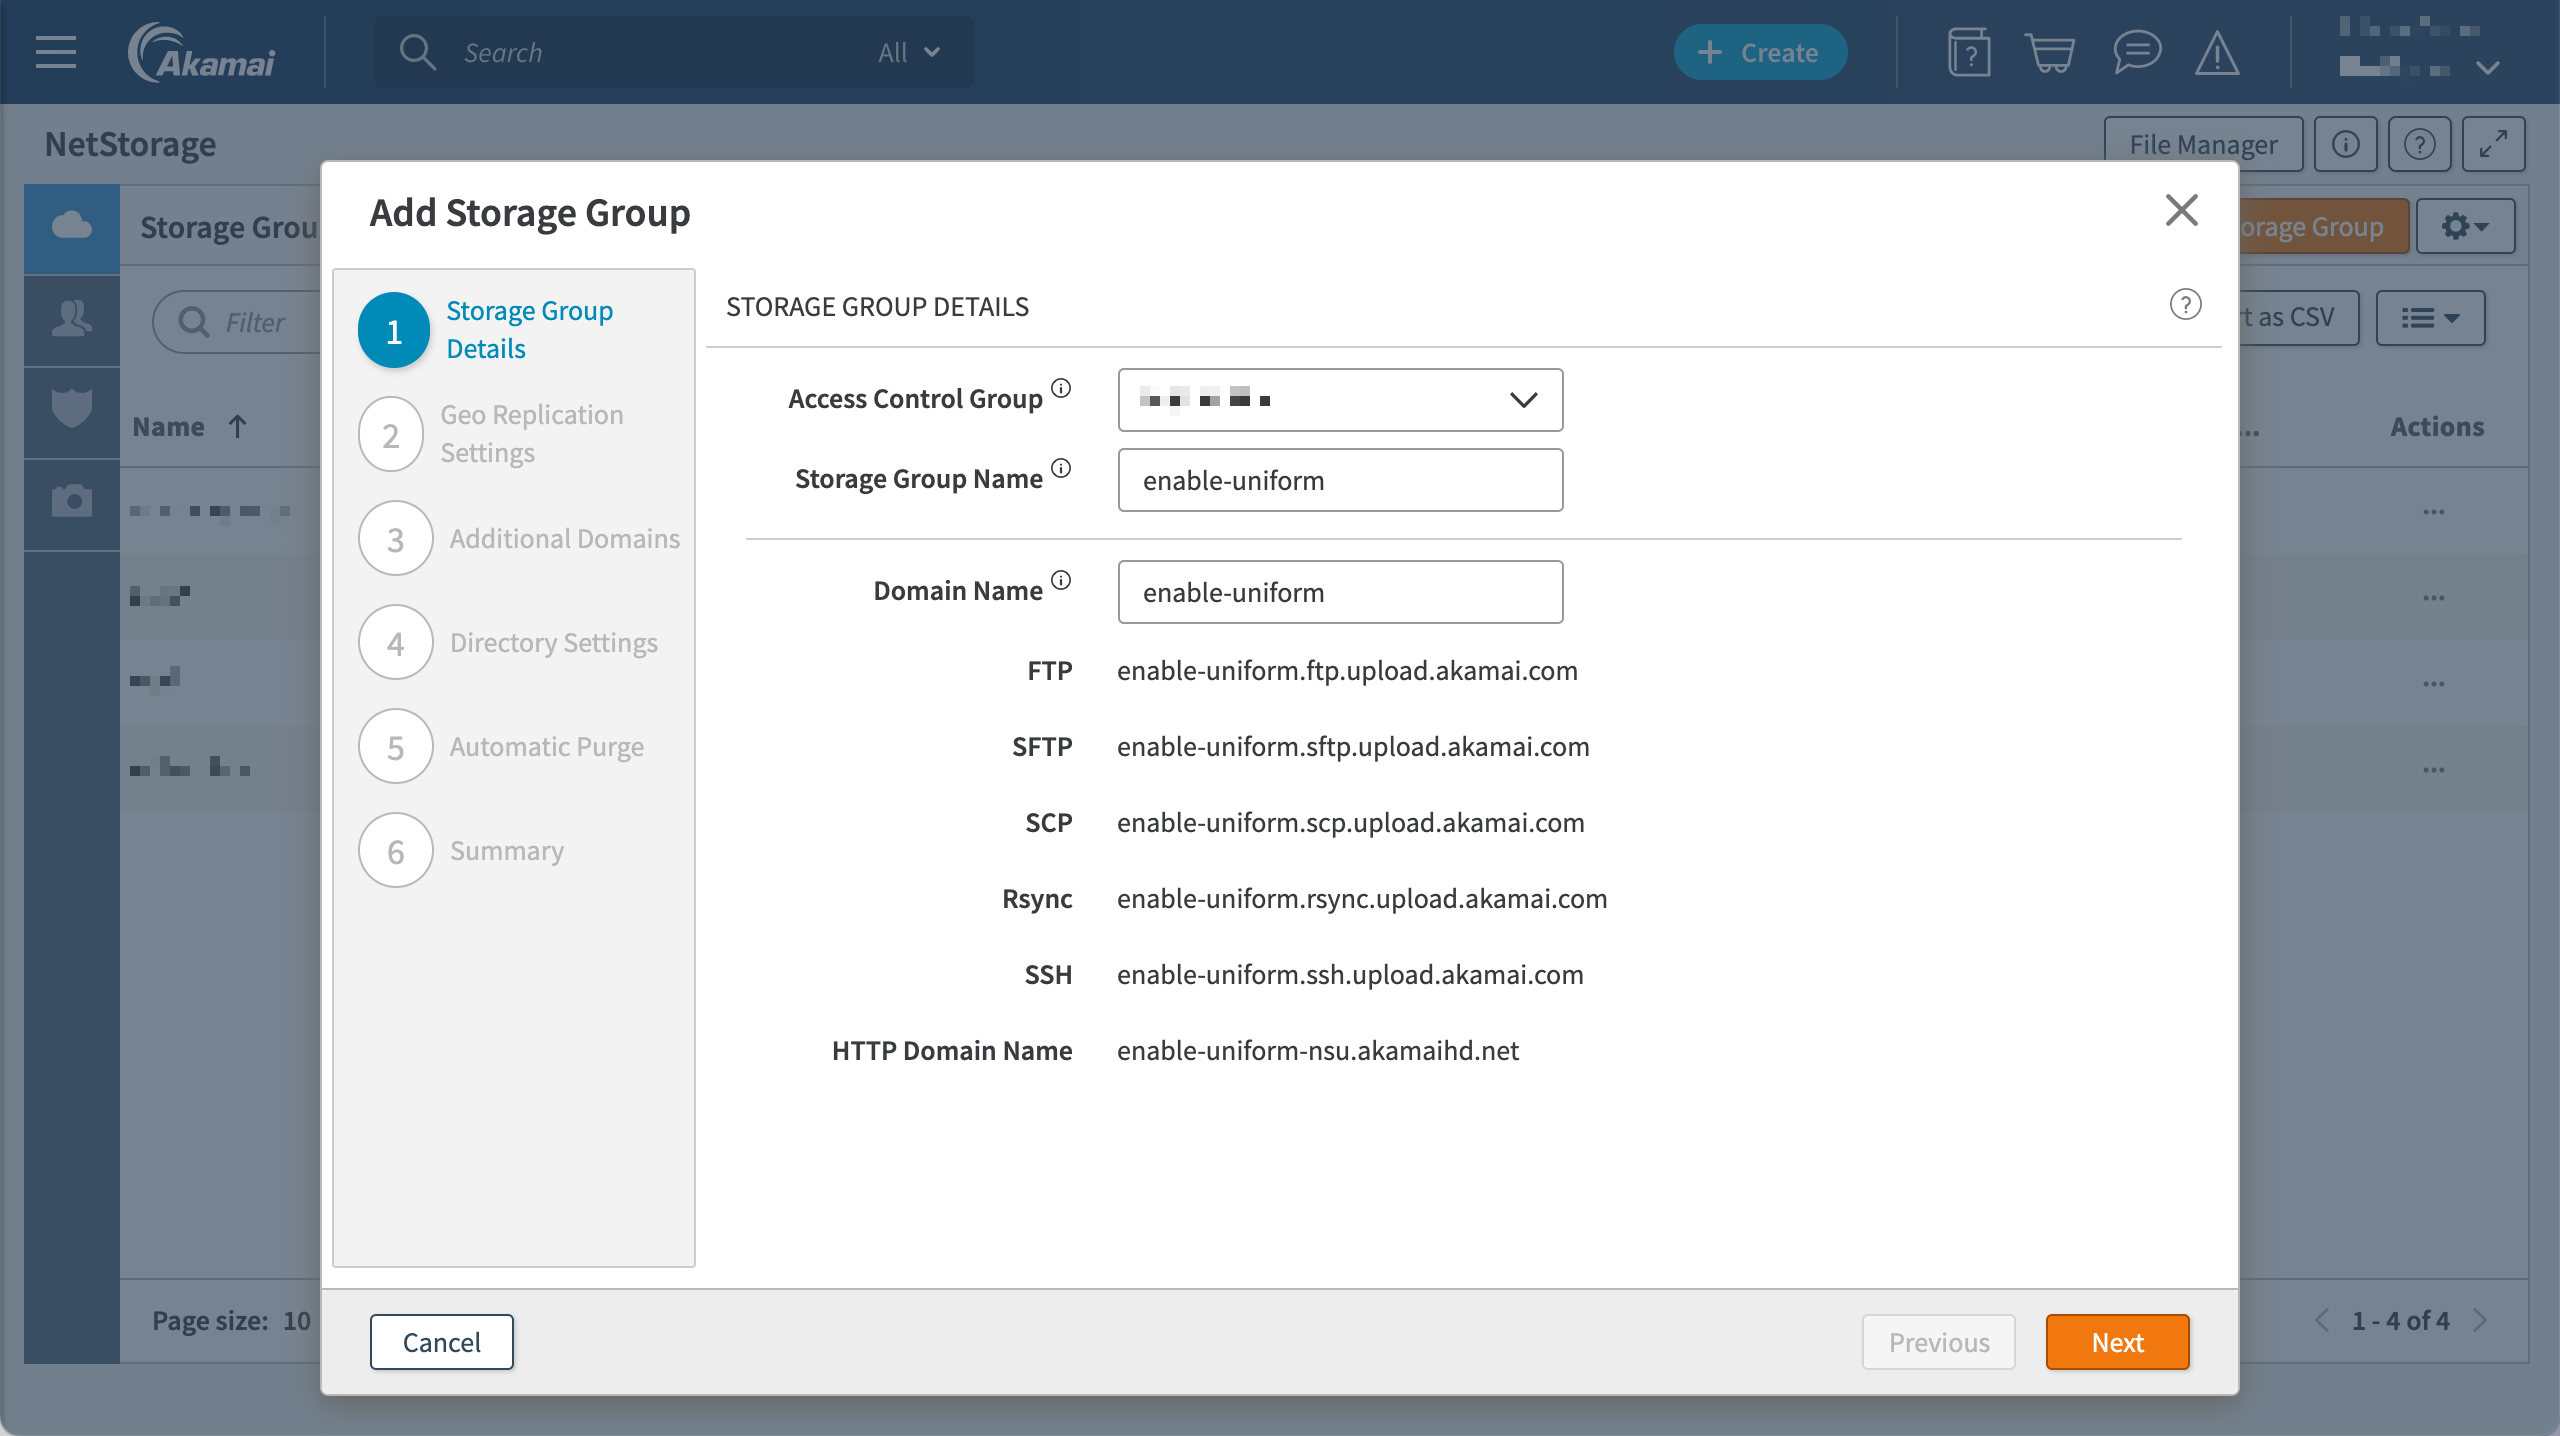
Click + Add Storage Group.

Enter values for the fields and click Next.
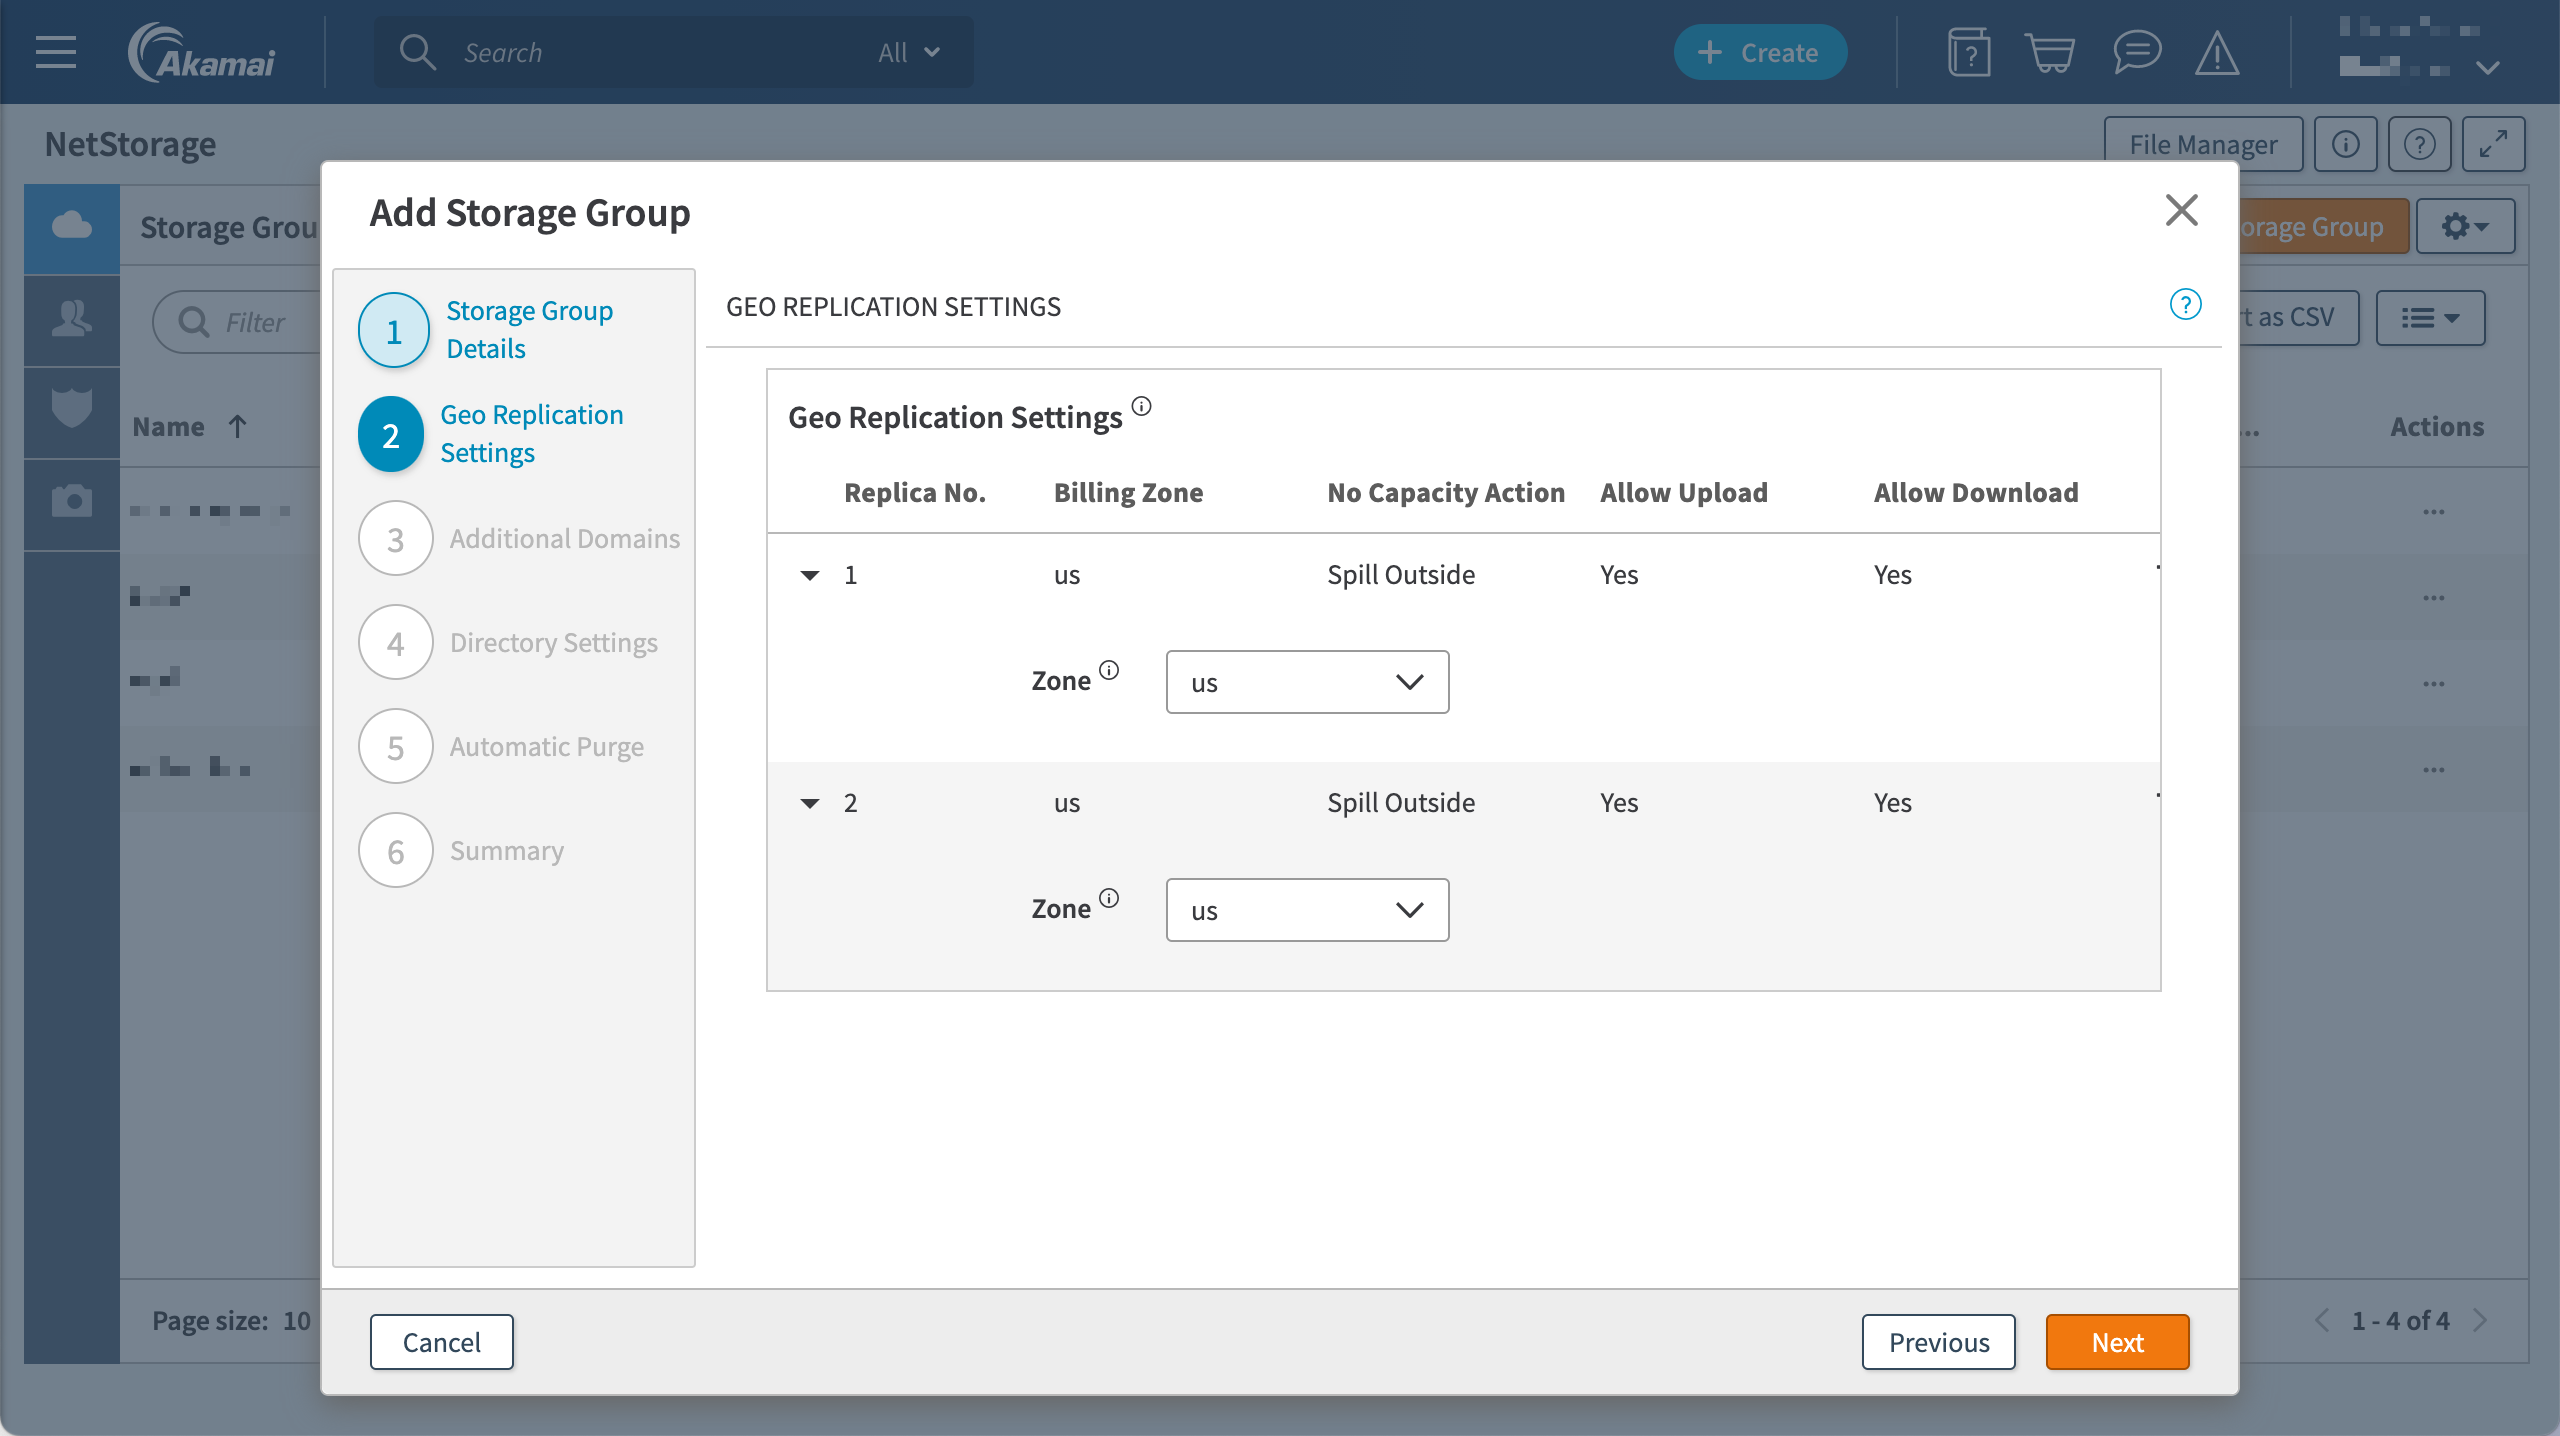
Select the zones you want to use and click Next.
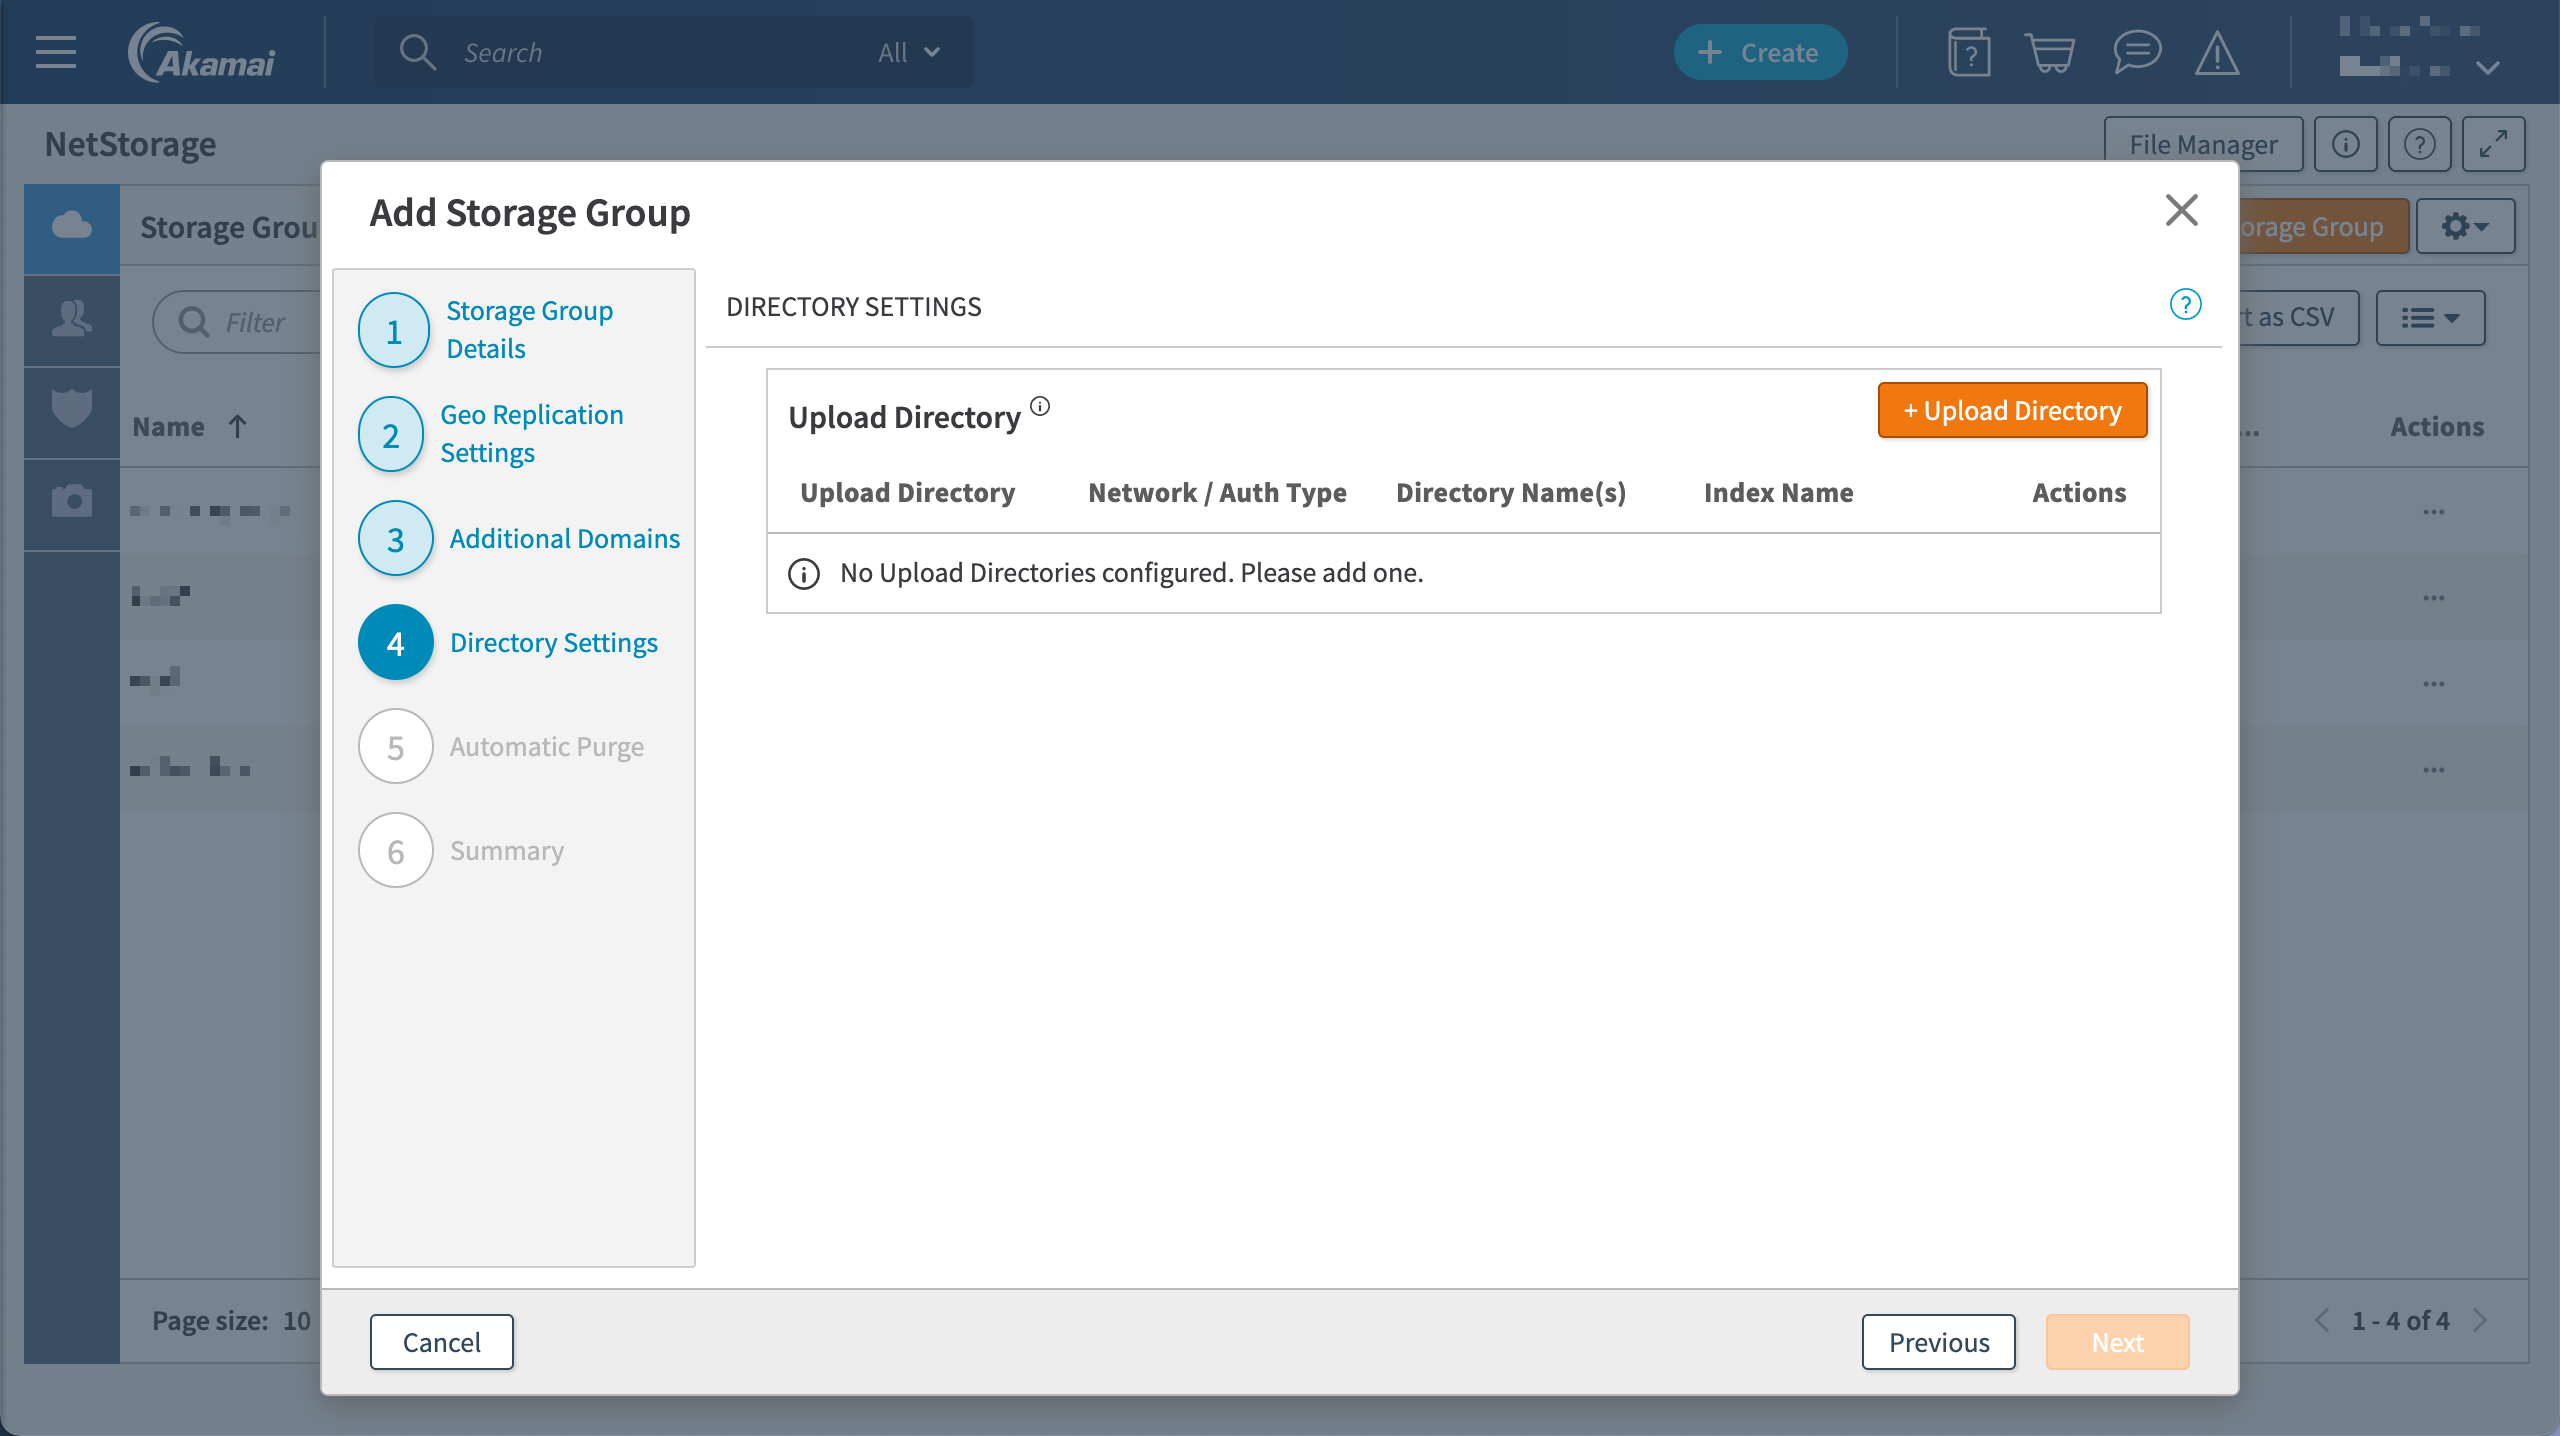
Click Next.
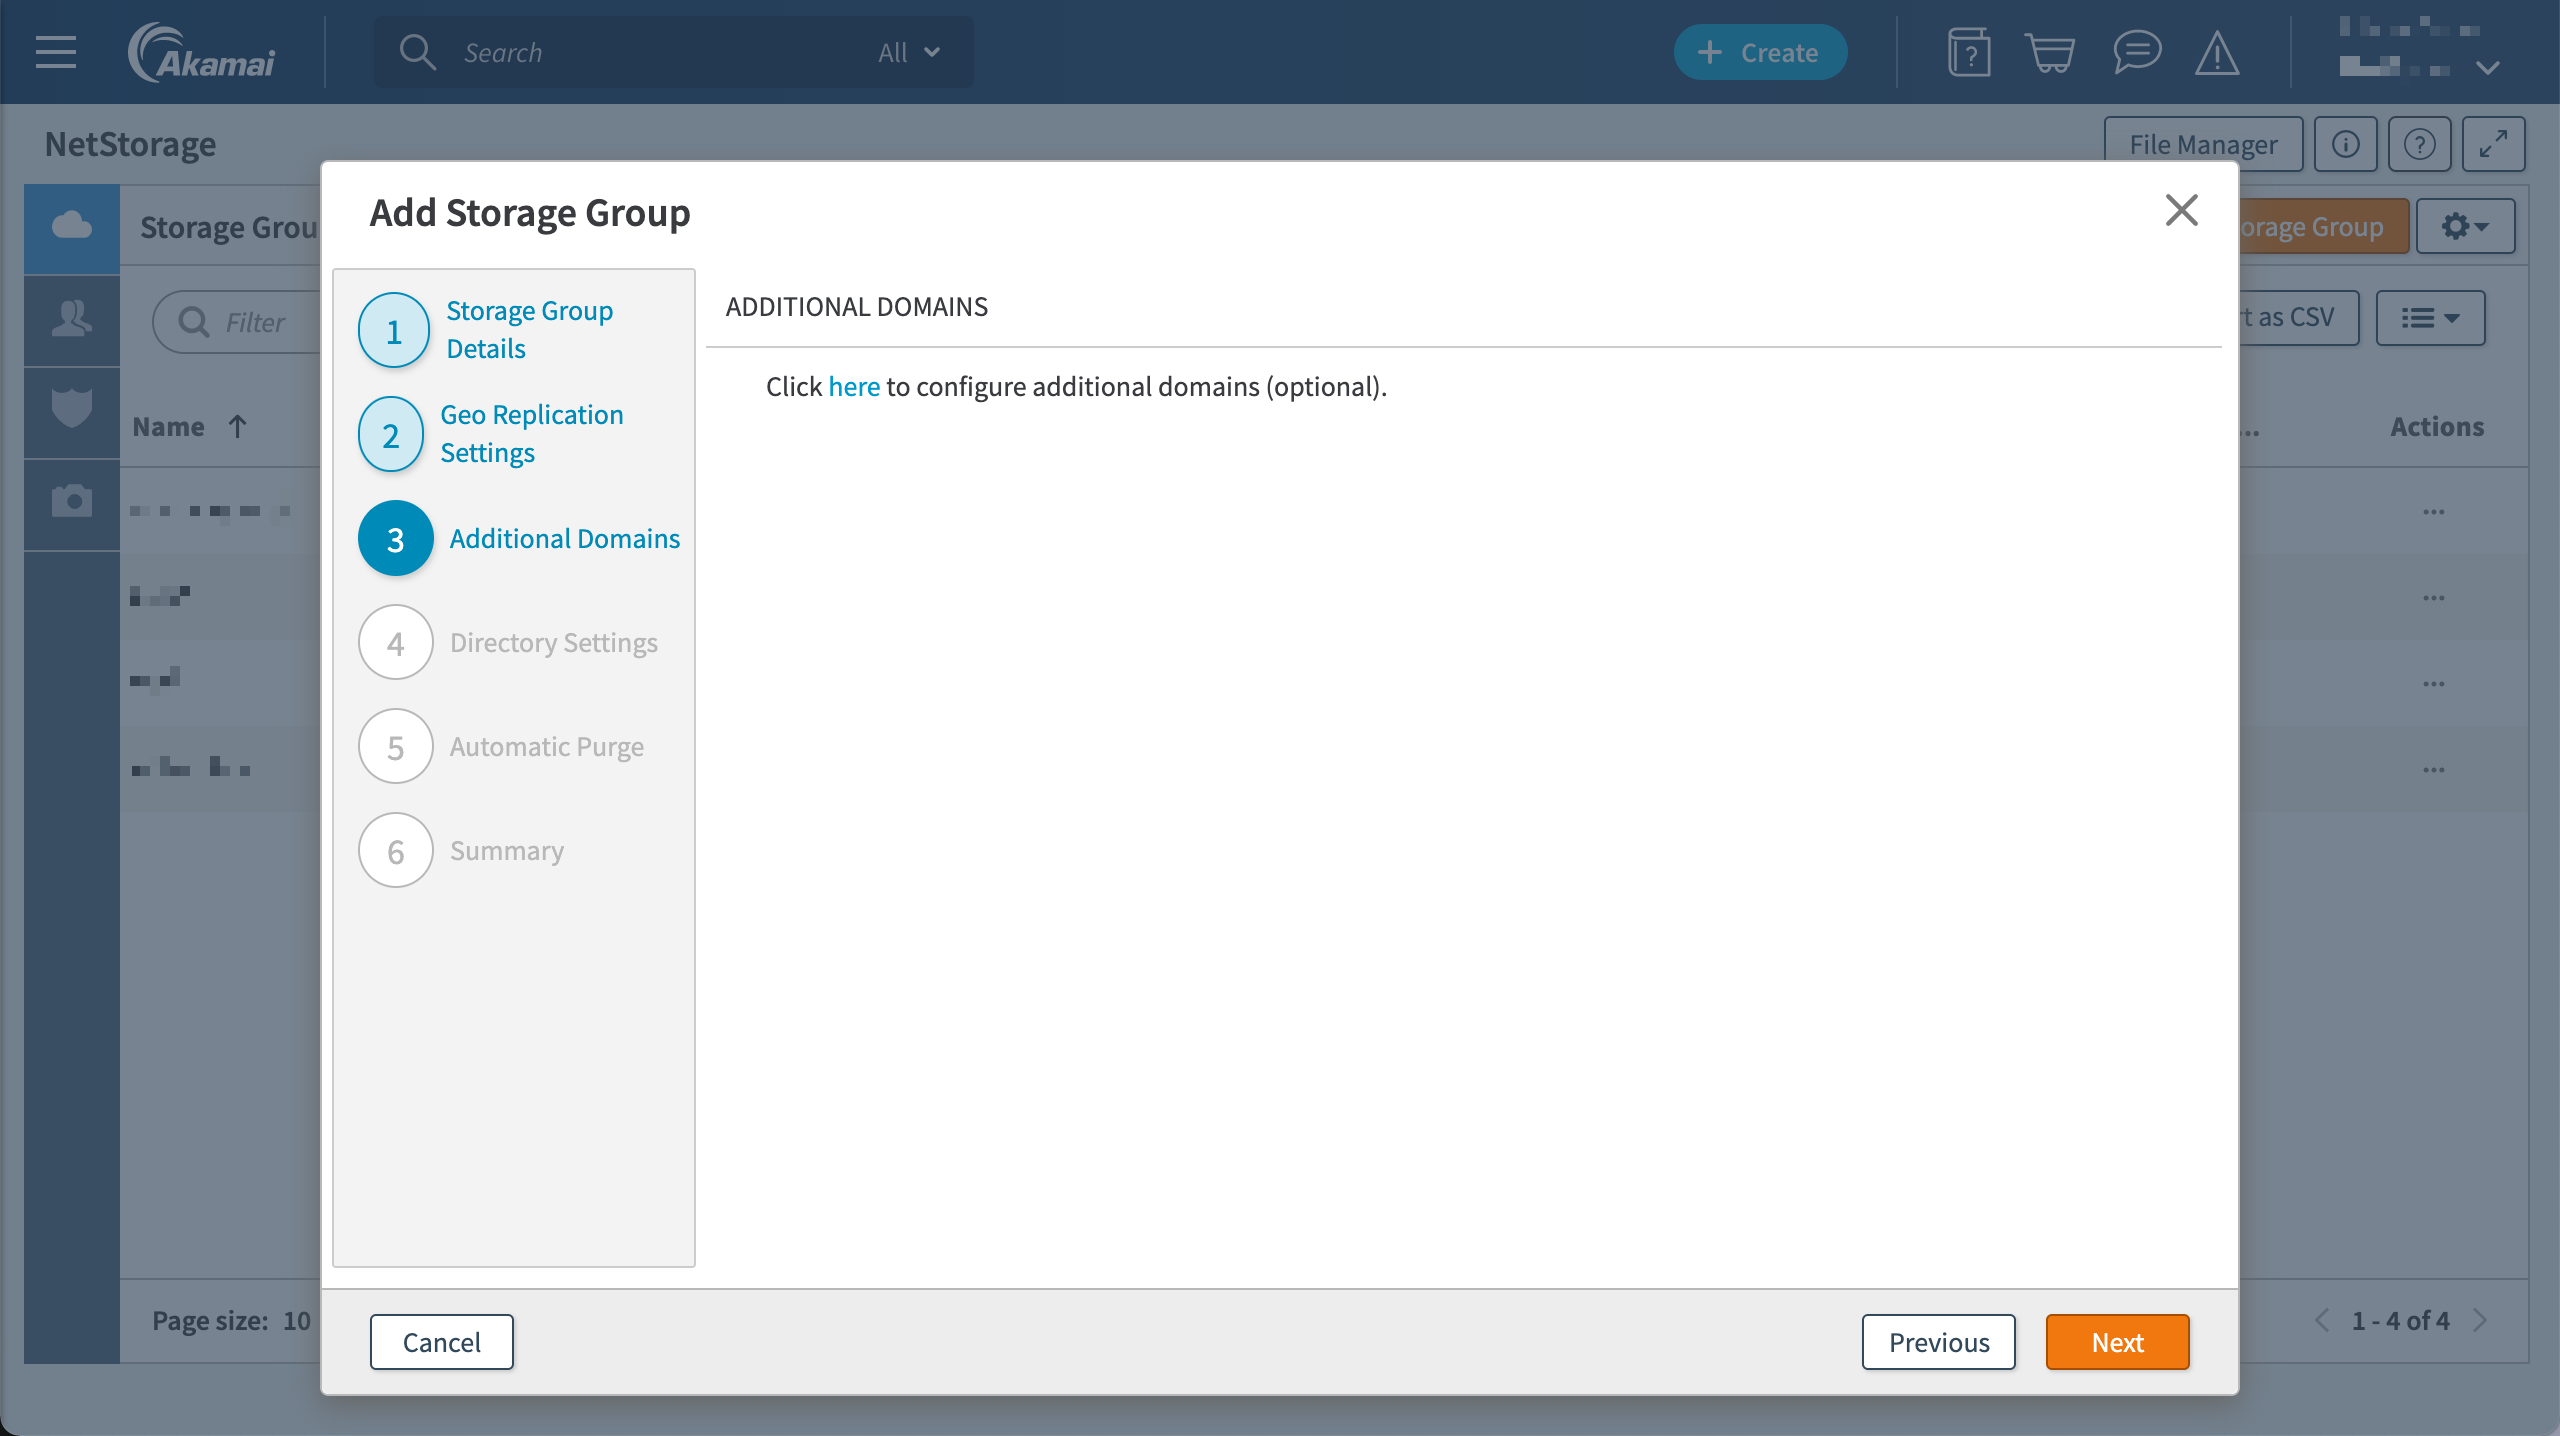
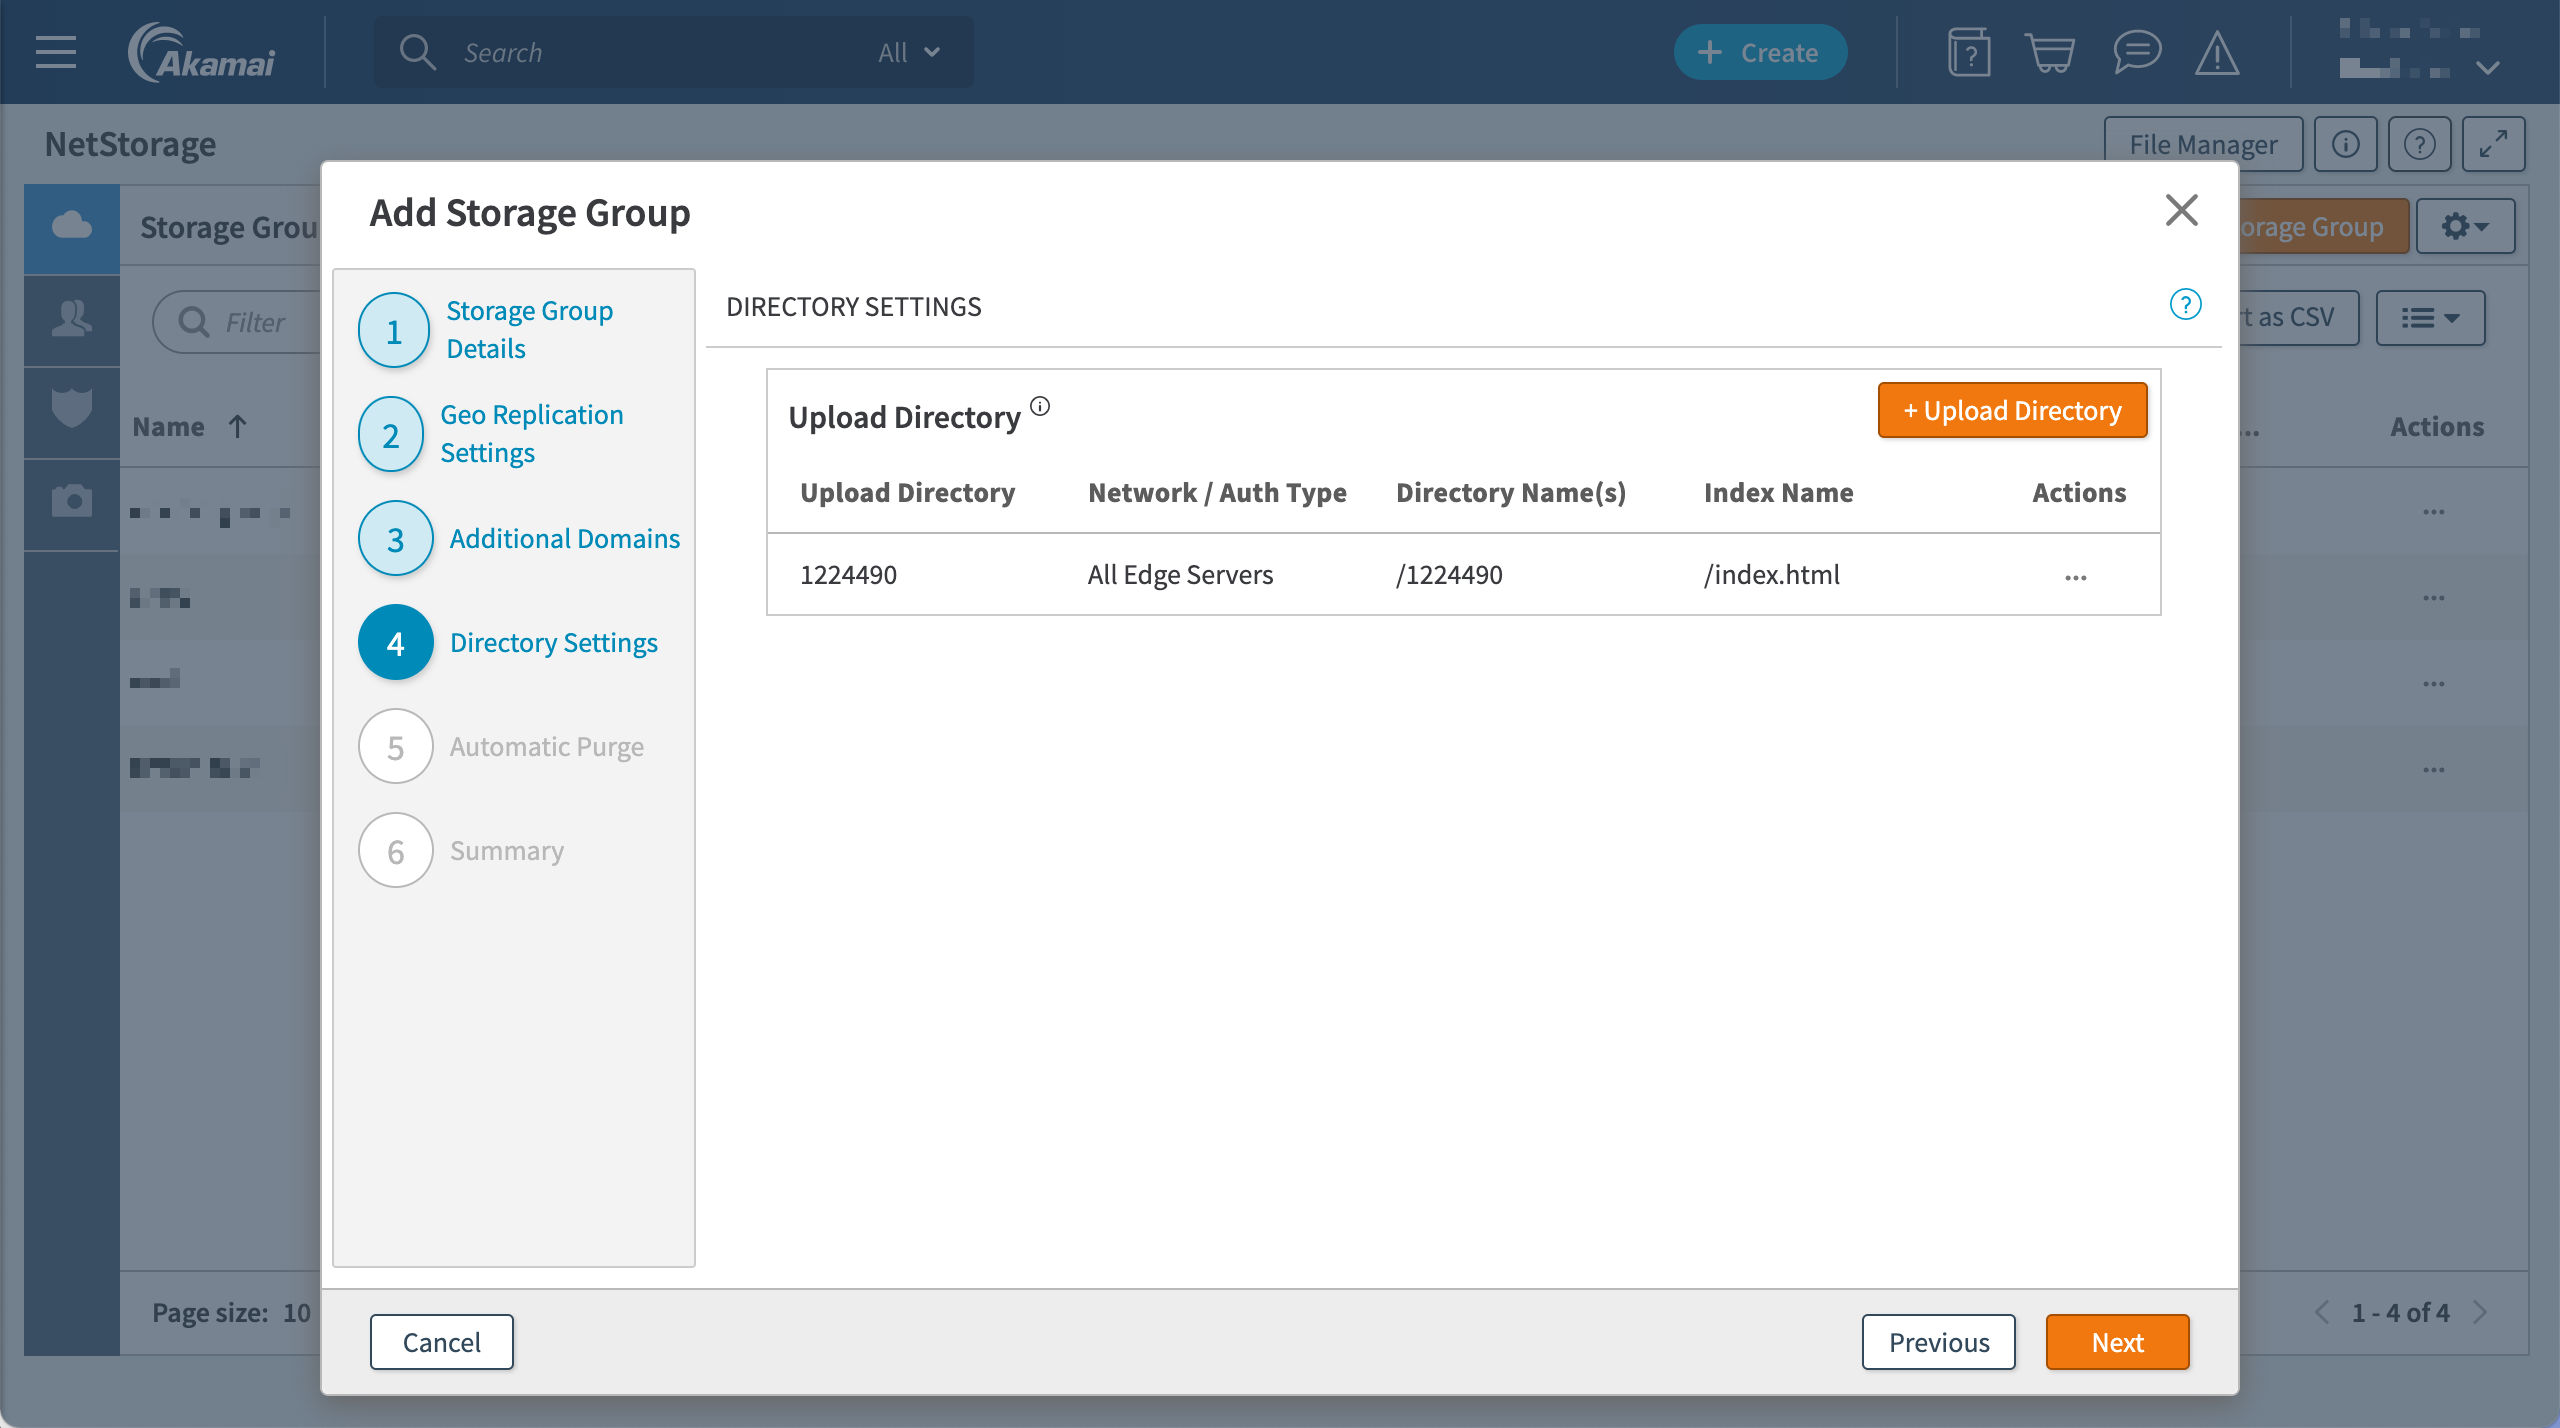
Click + Upload Directory.
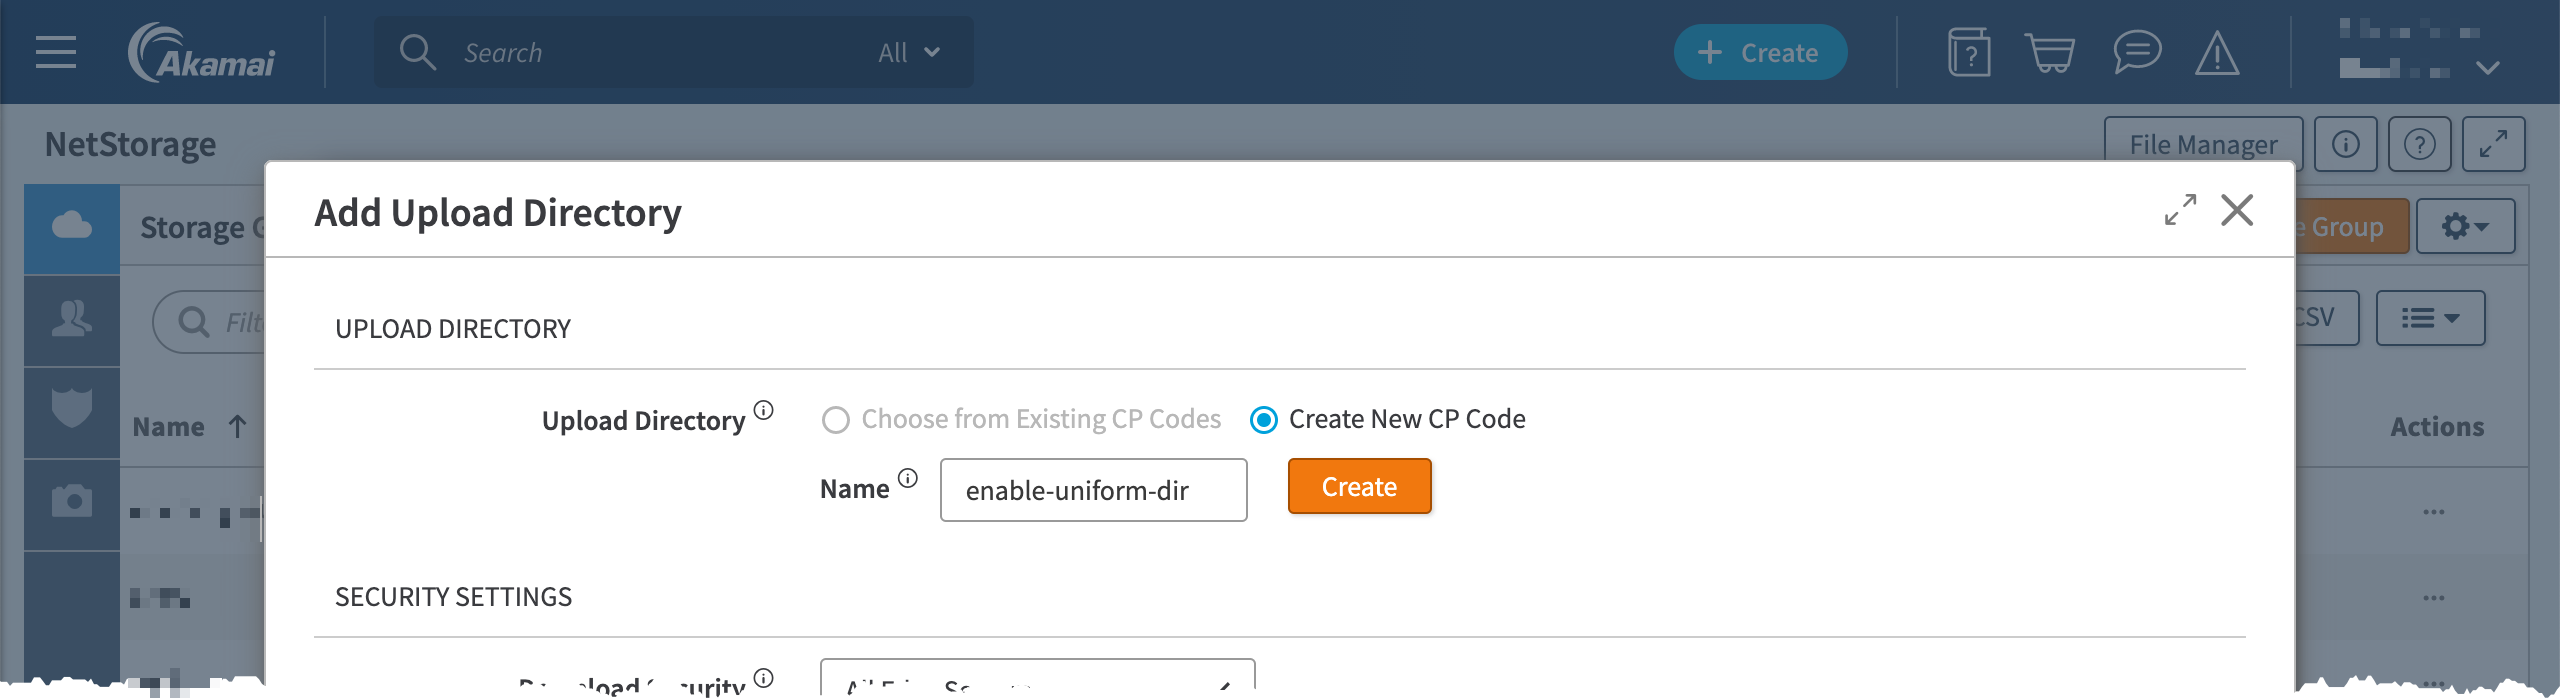
Enter a value in the Name field and click Create.
Enter the following values and click Save:
- Quick Delete -
enabled - Index Name -
/index.html
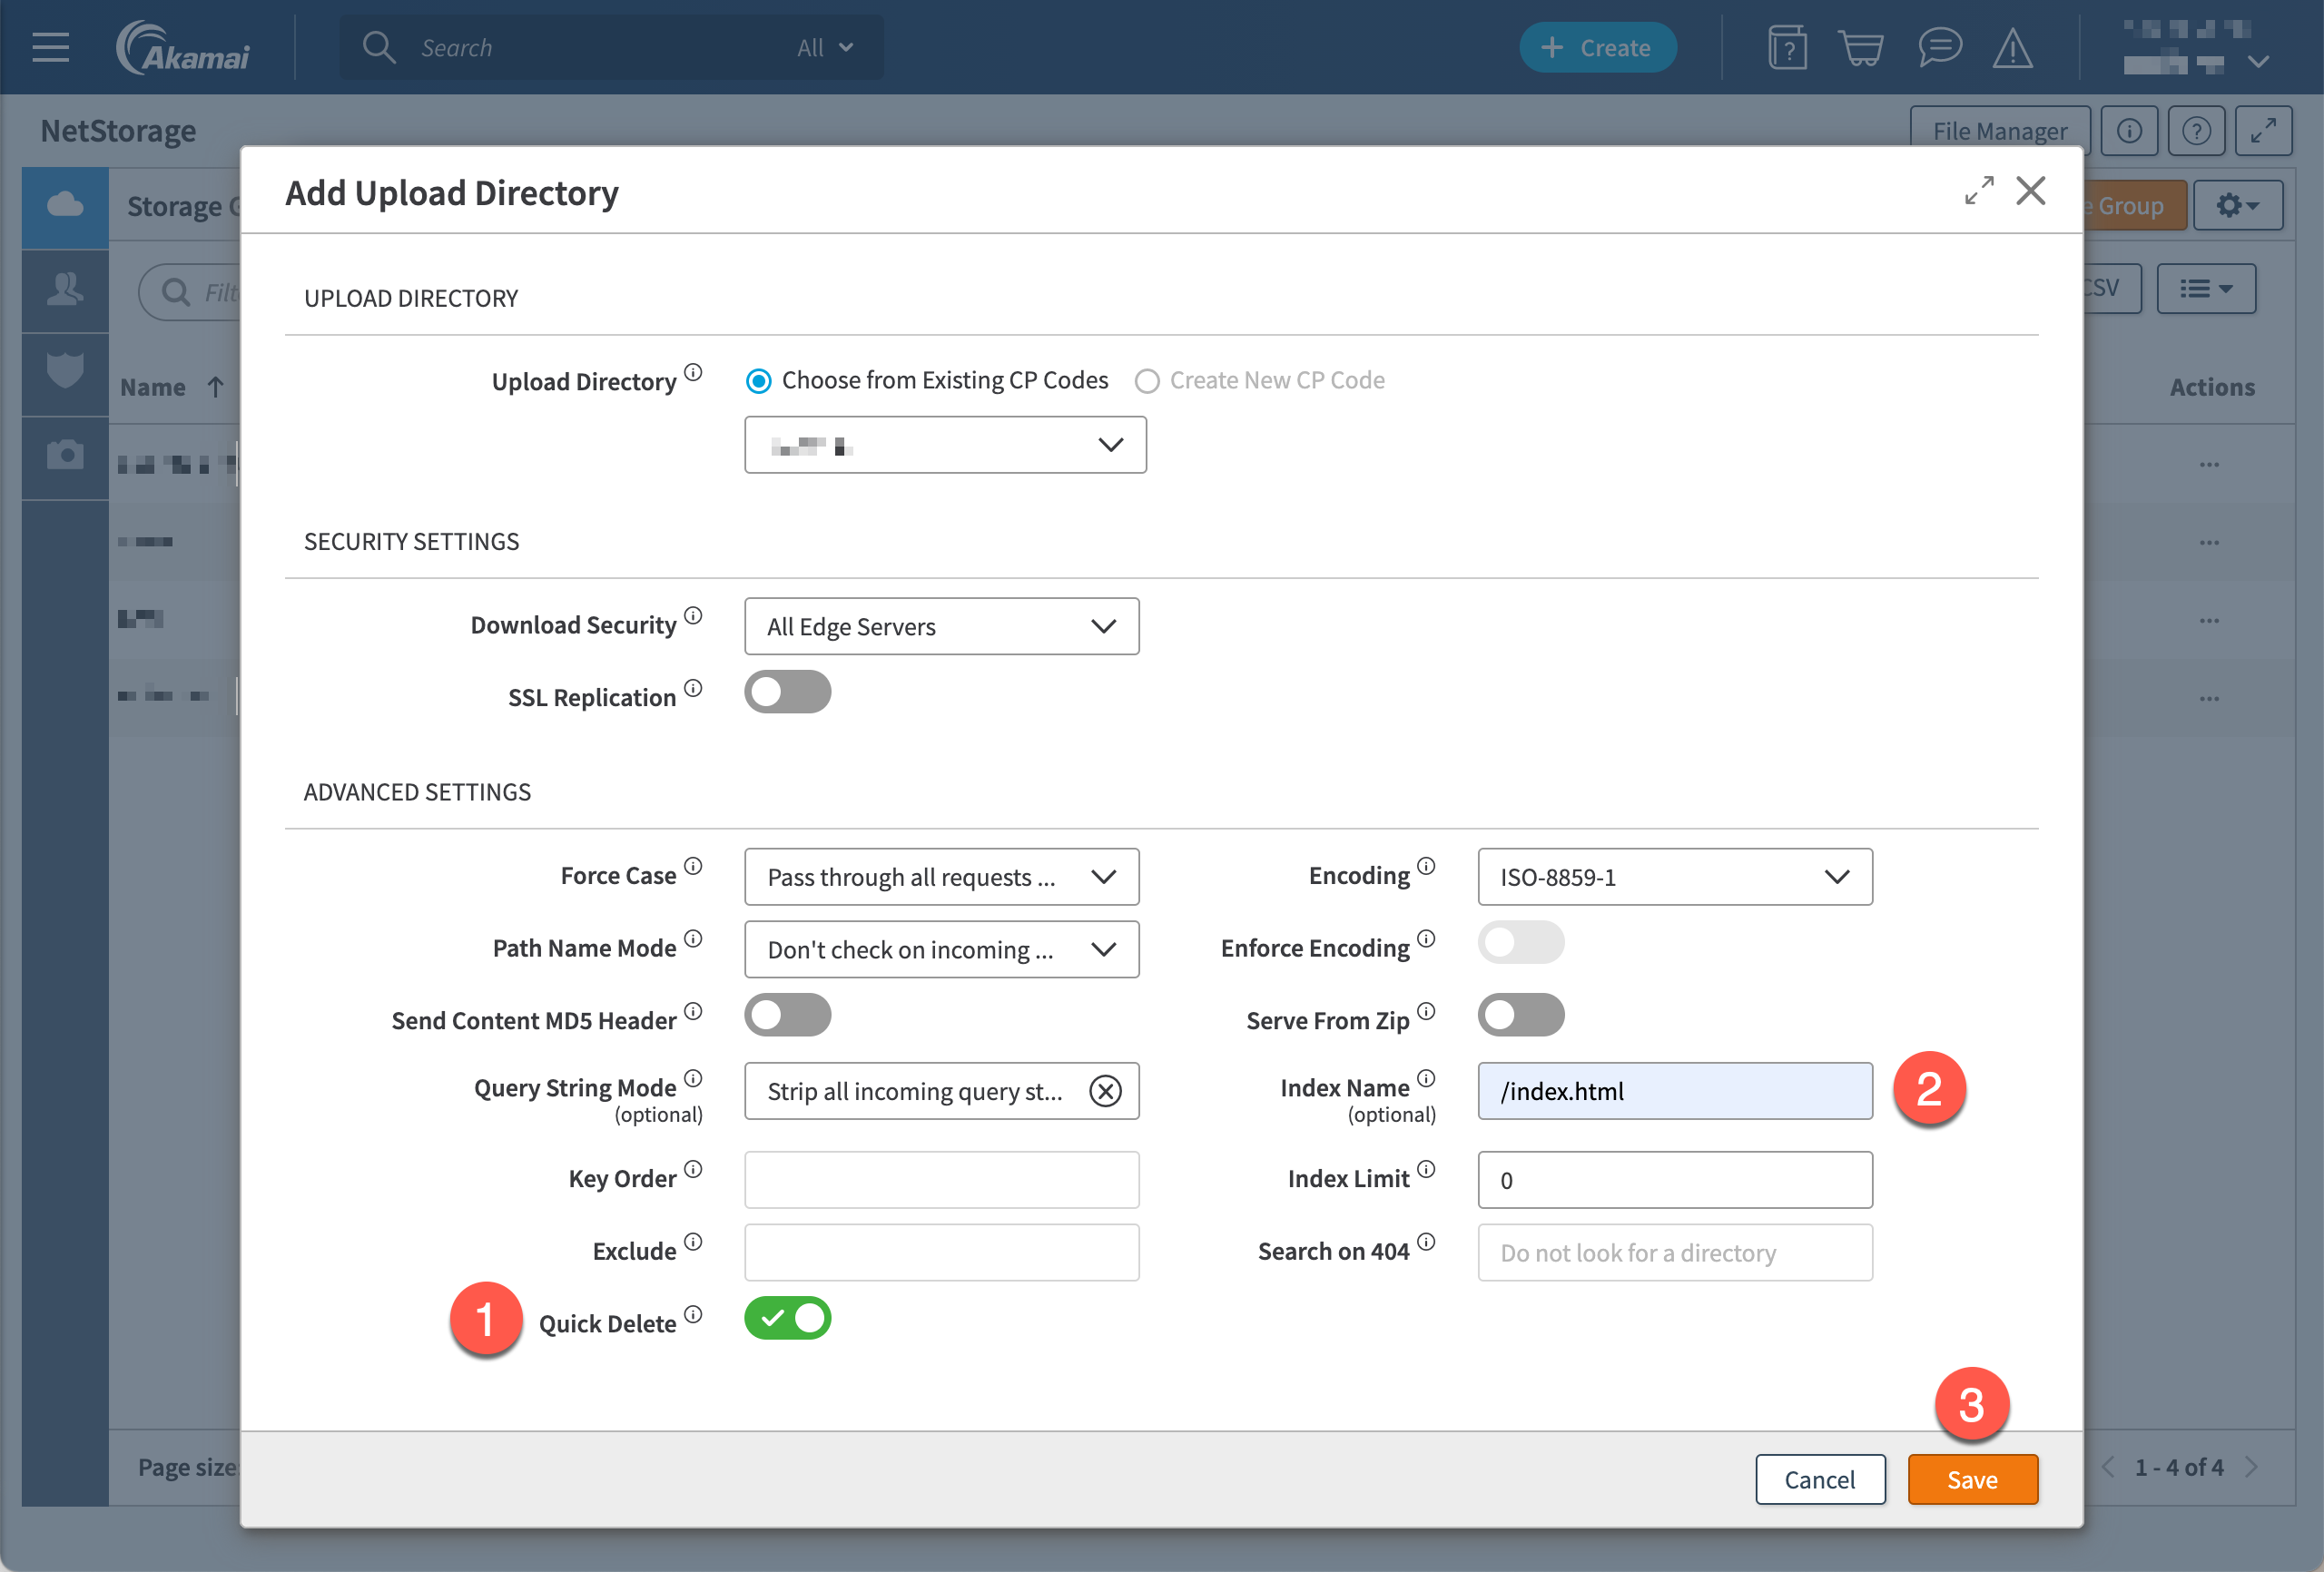
- Quick Delete -
Click Next.
Click Next.
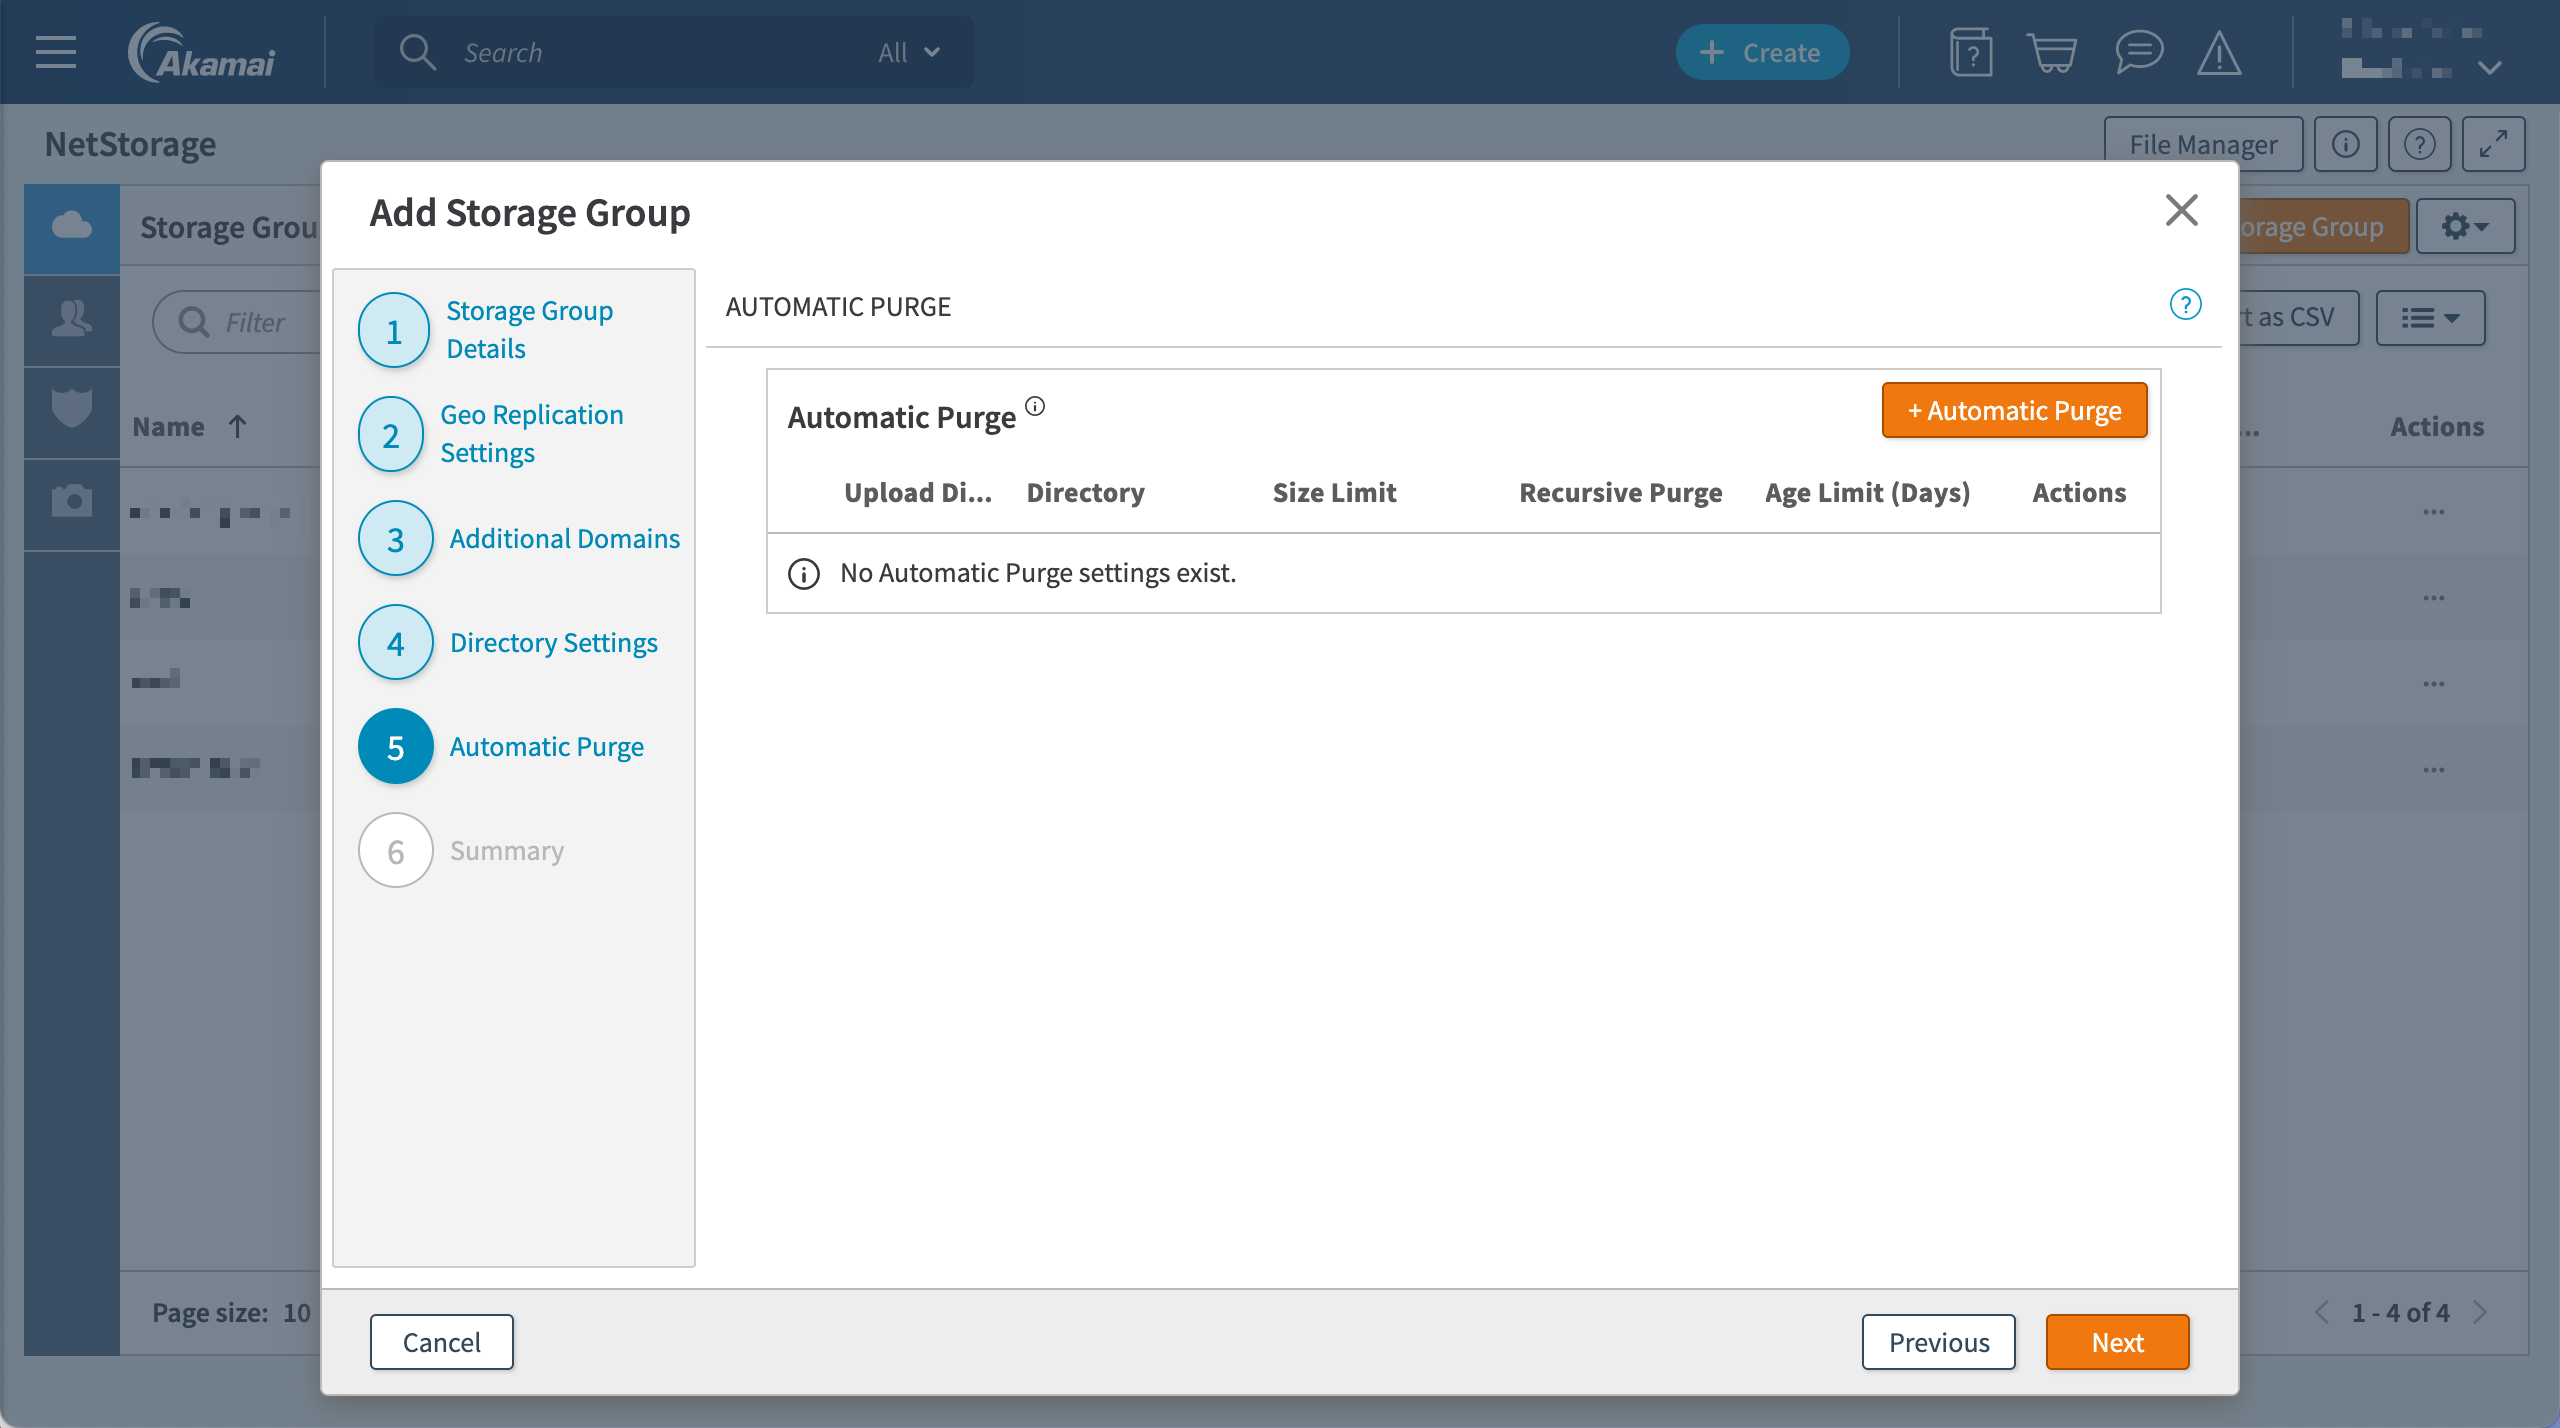
Click Create.
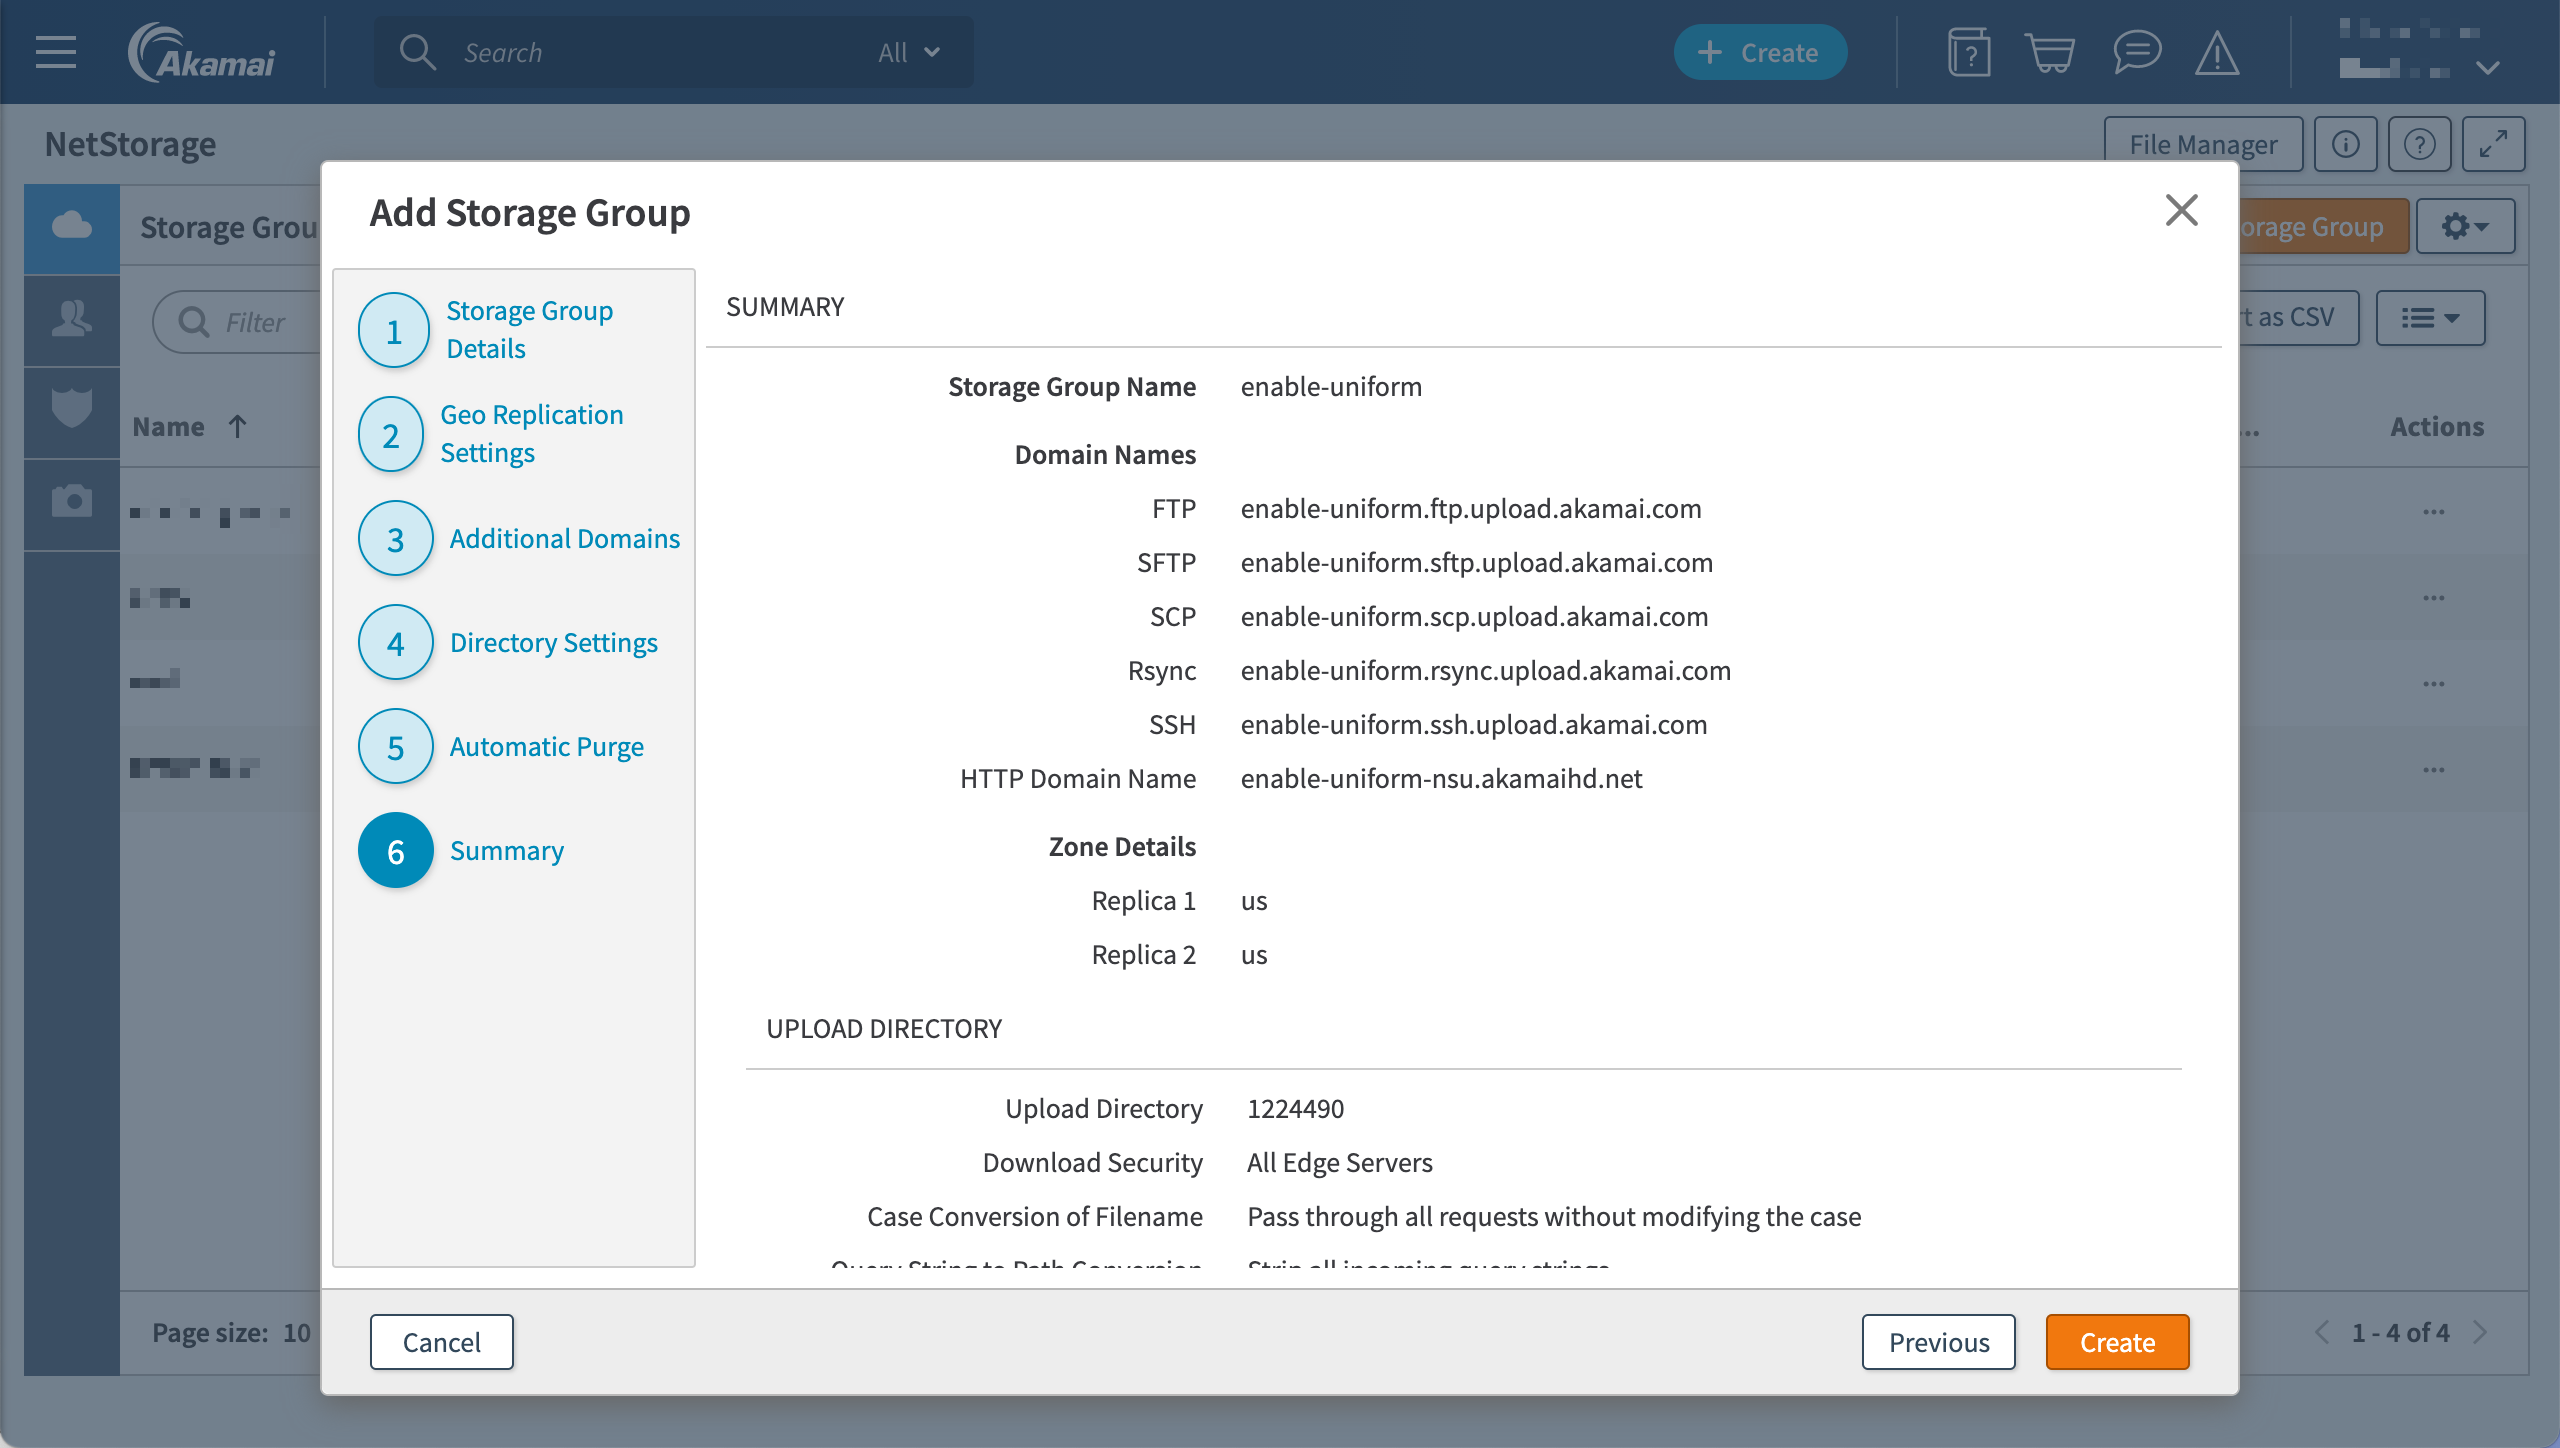
You should see your storage group in the list.
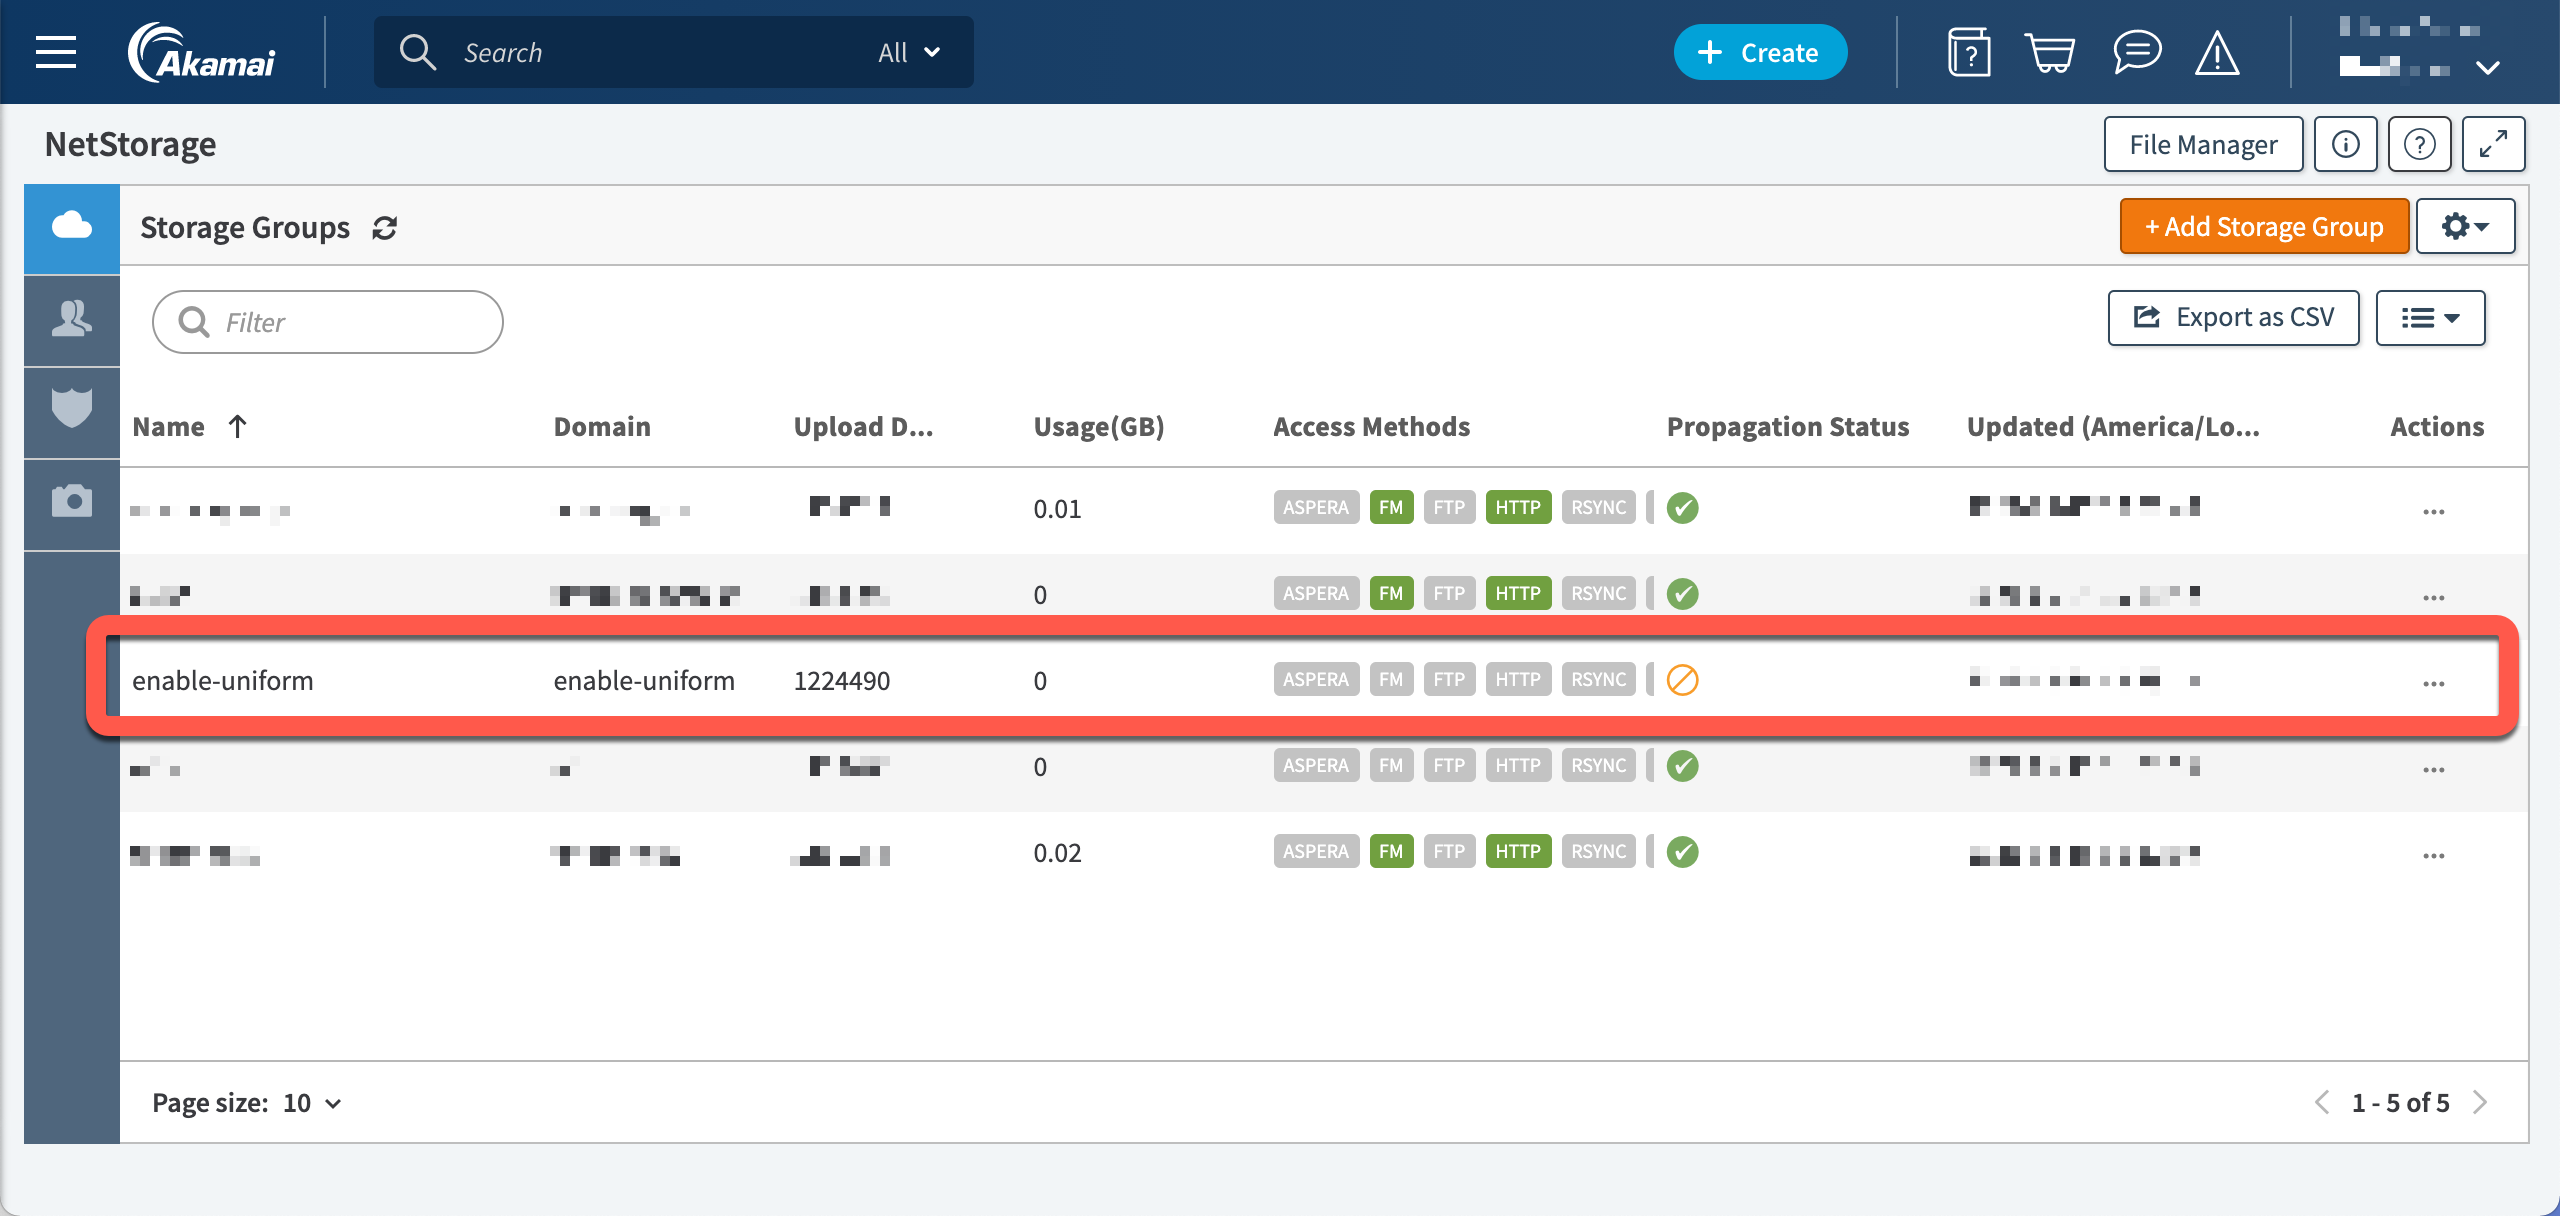
note
It takes from 1-2 hours for the storage group to be propagated to the NetStorage network. You can continue to configure Akamai during this time.
Add upload account#
- In Akamai, in the left menu navigate to ORIGIN SERVICES > NetStorage.
- In the left menu, click Upload Accounts.
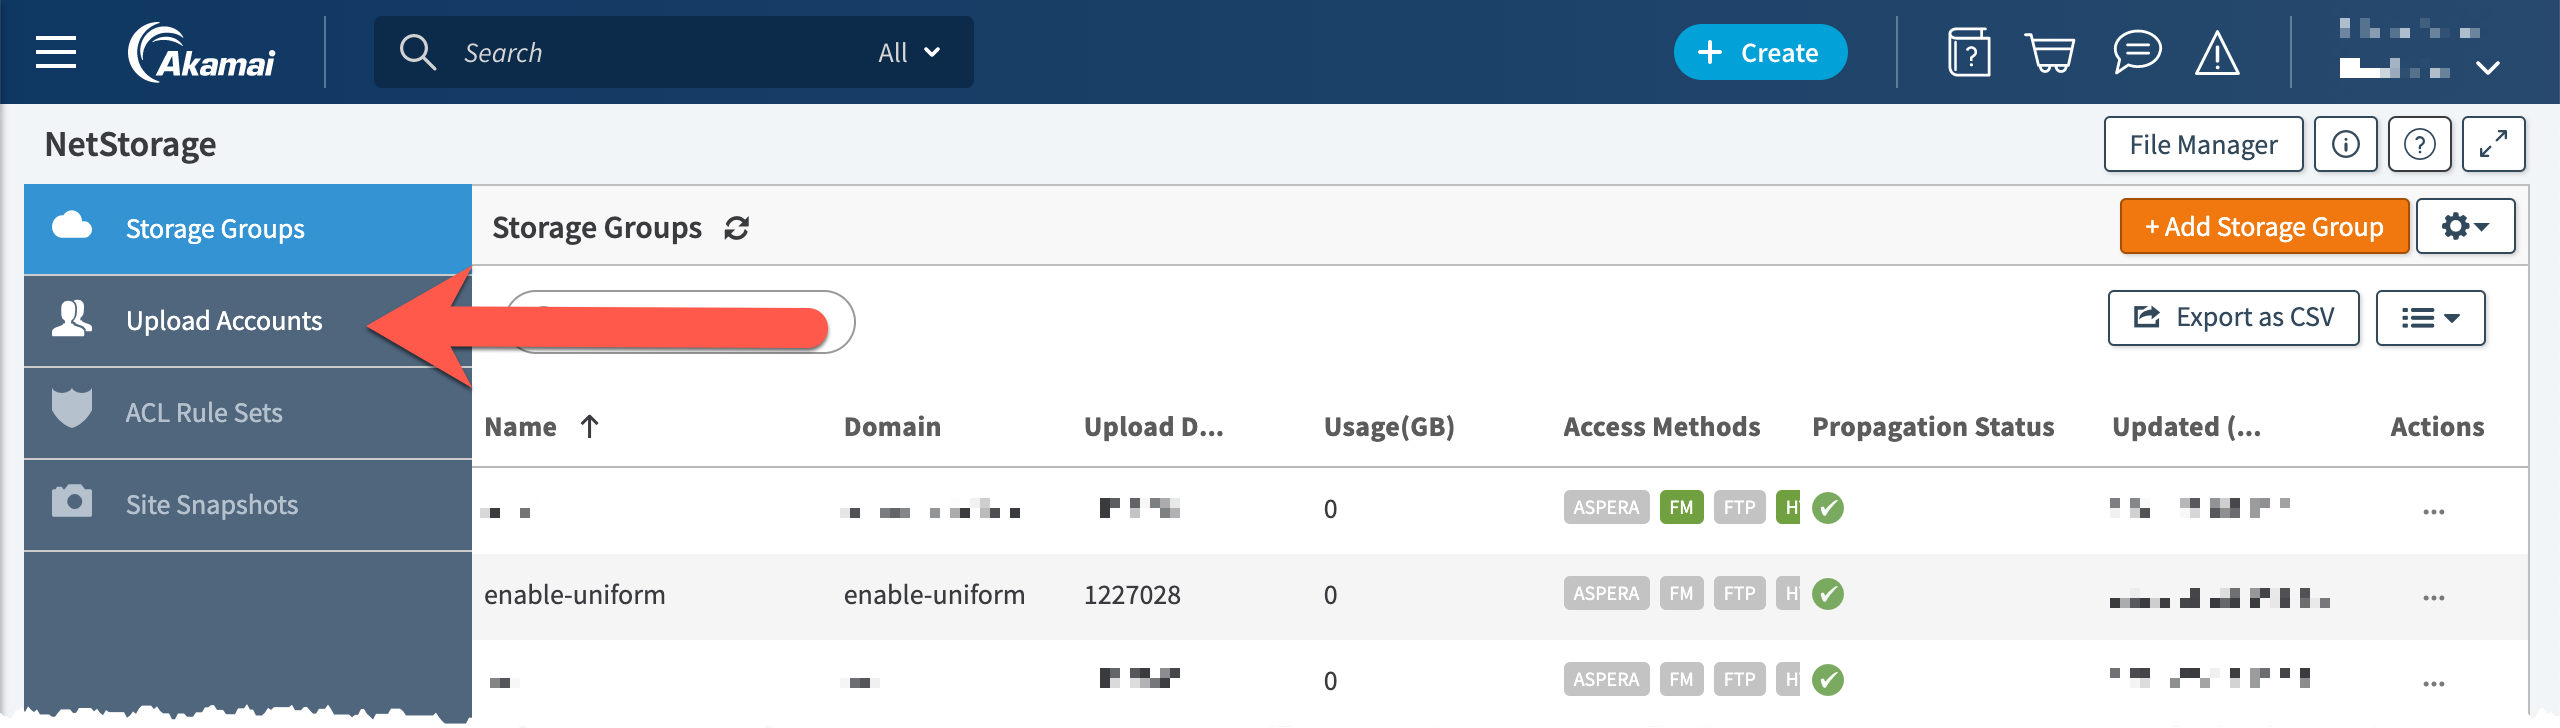
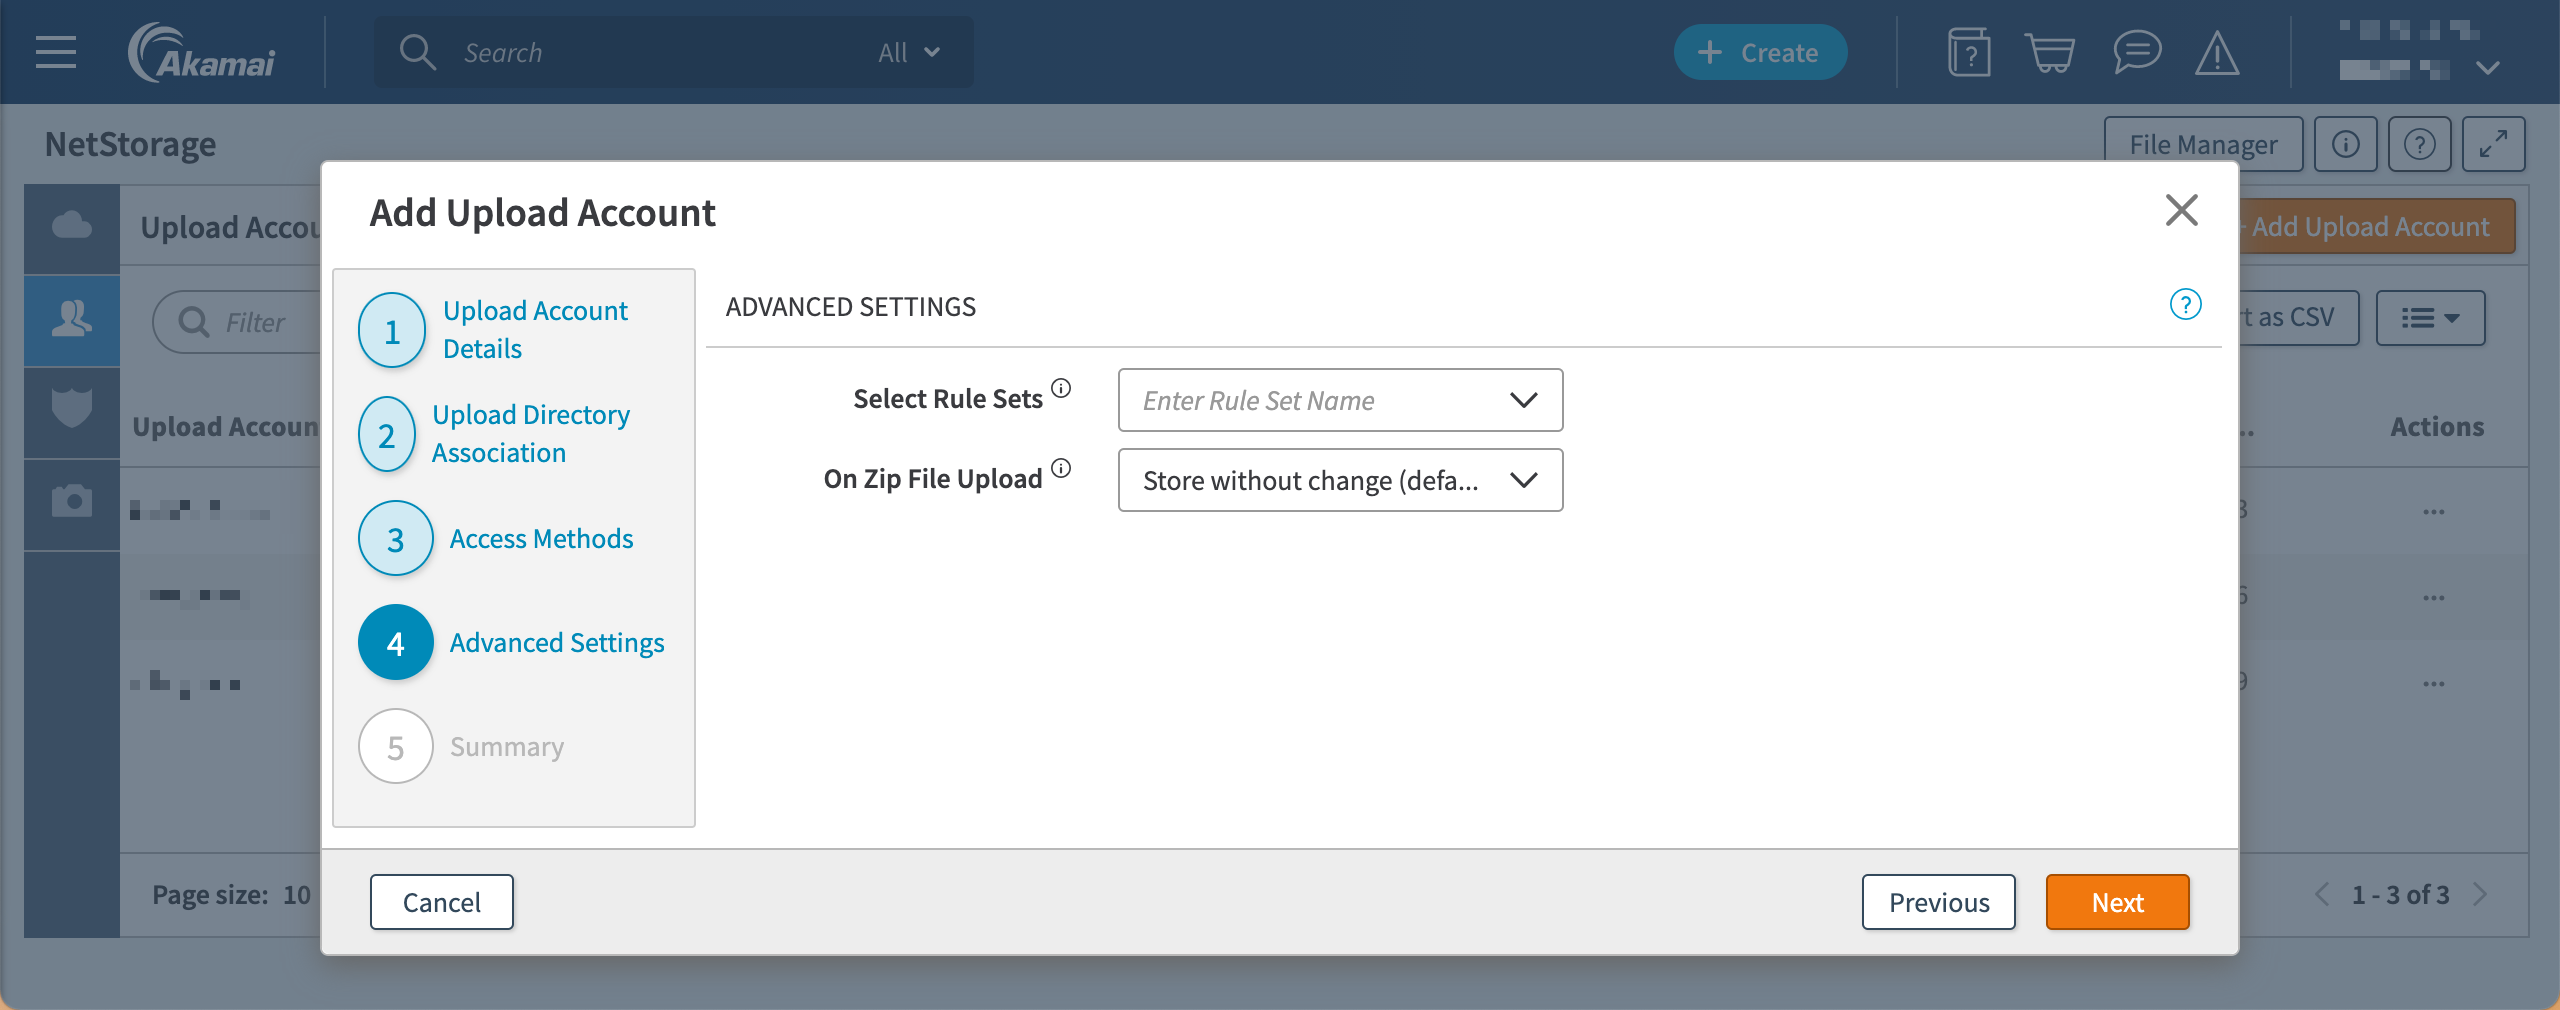
- Click + Add Upload Account.

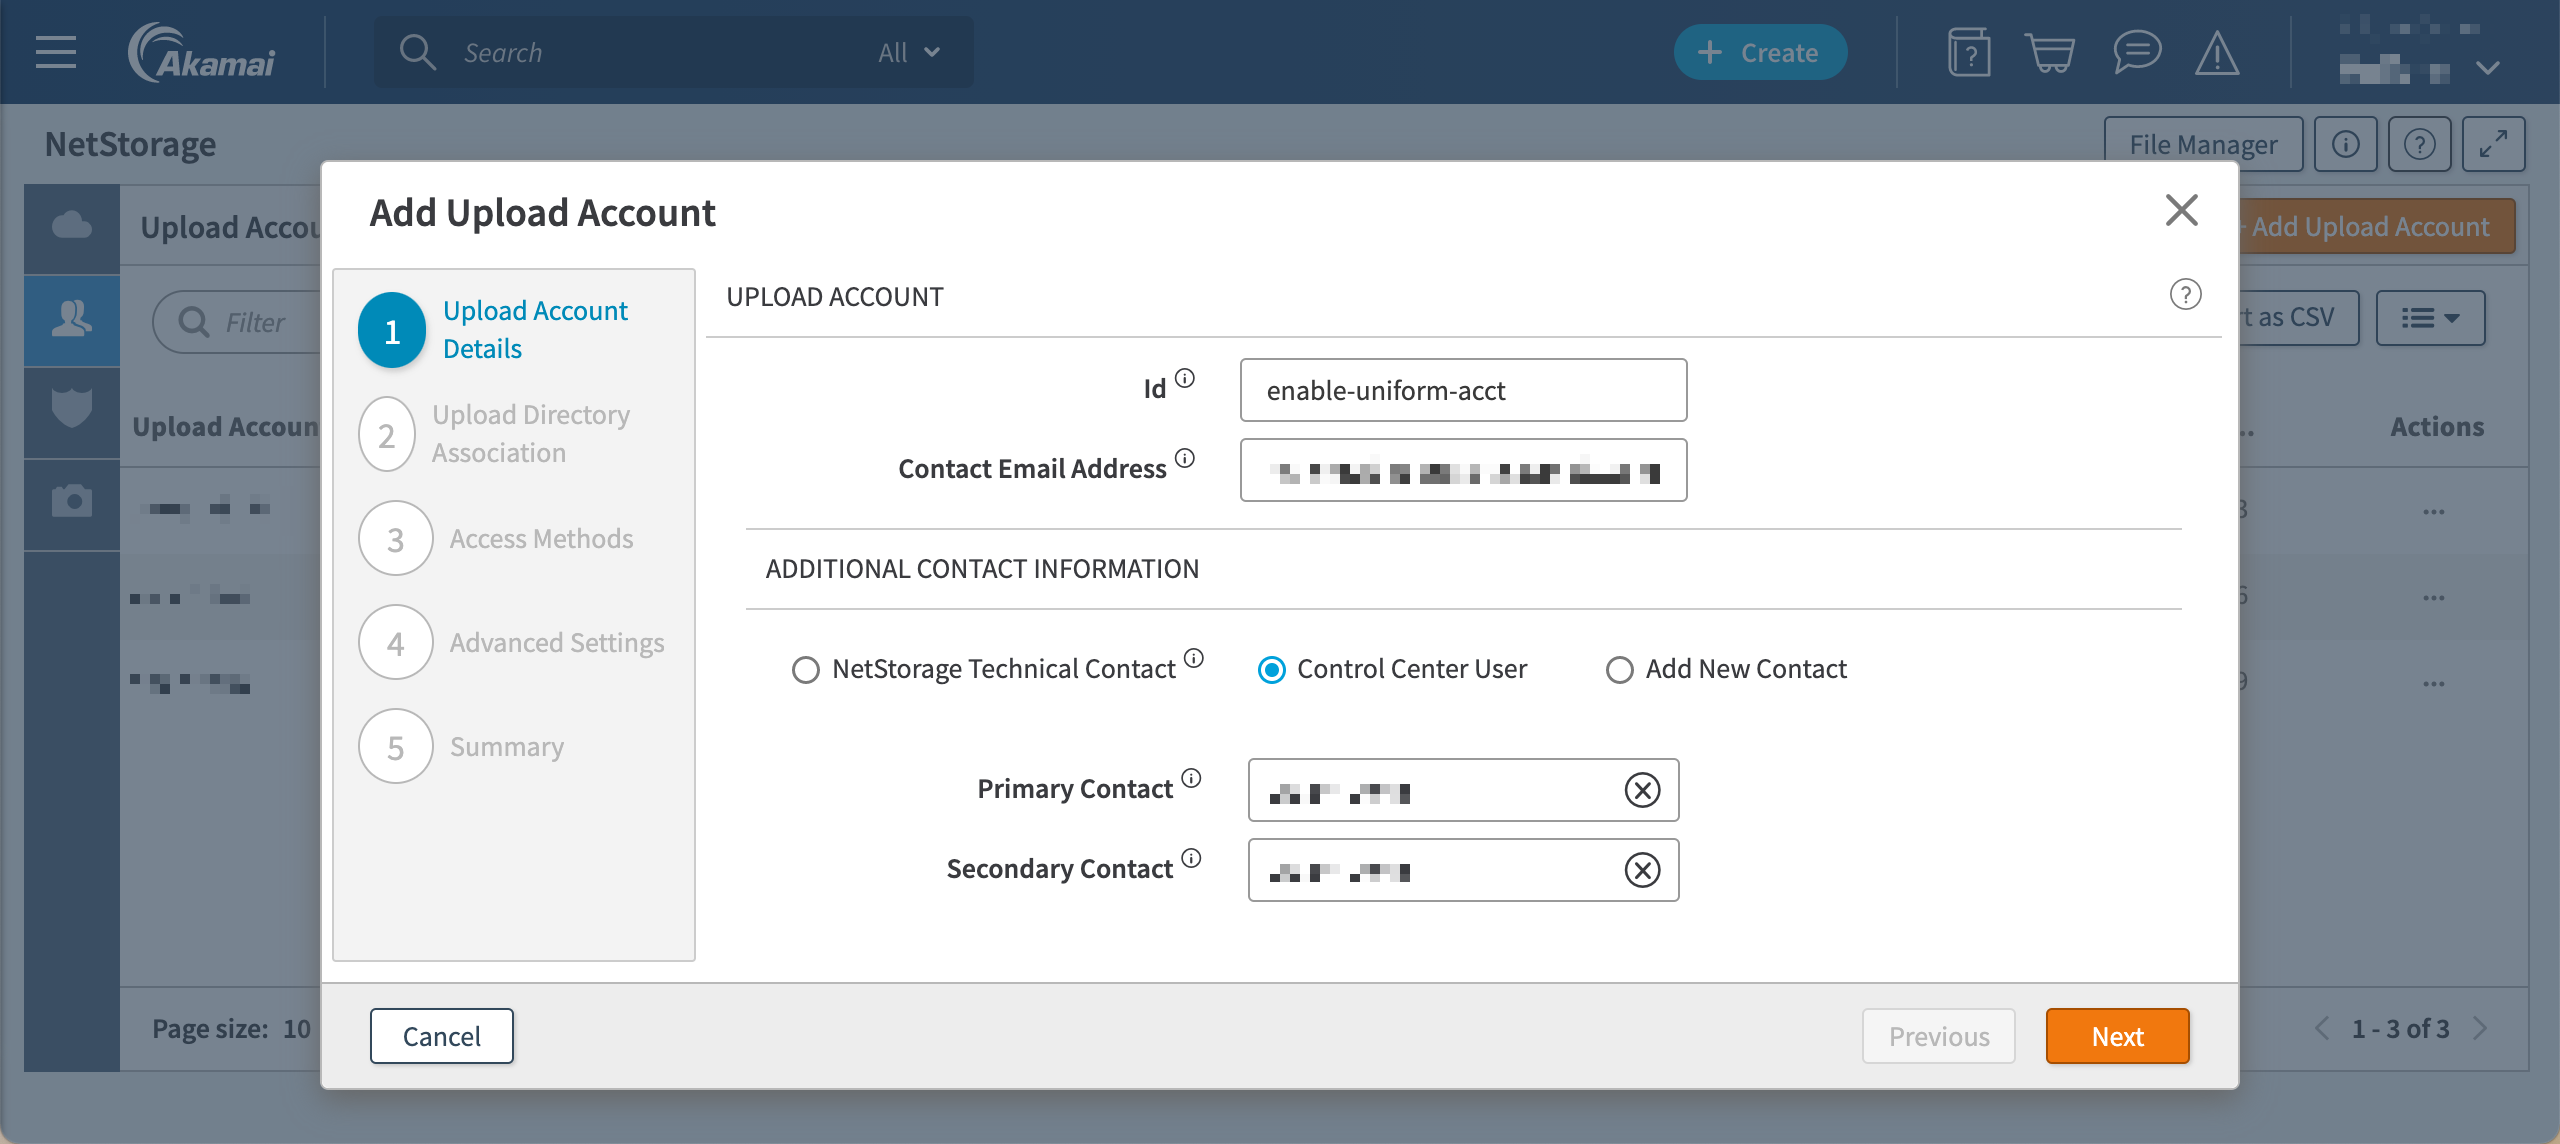
- Complete the form, then click Next.
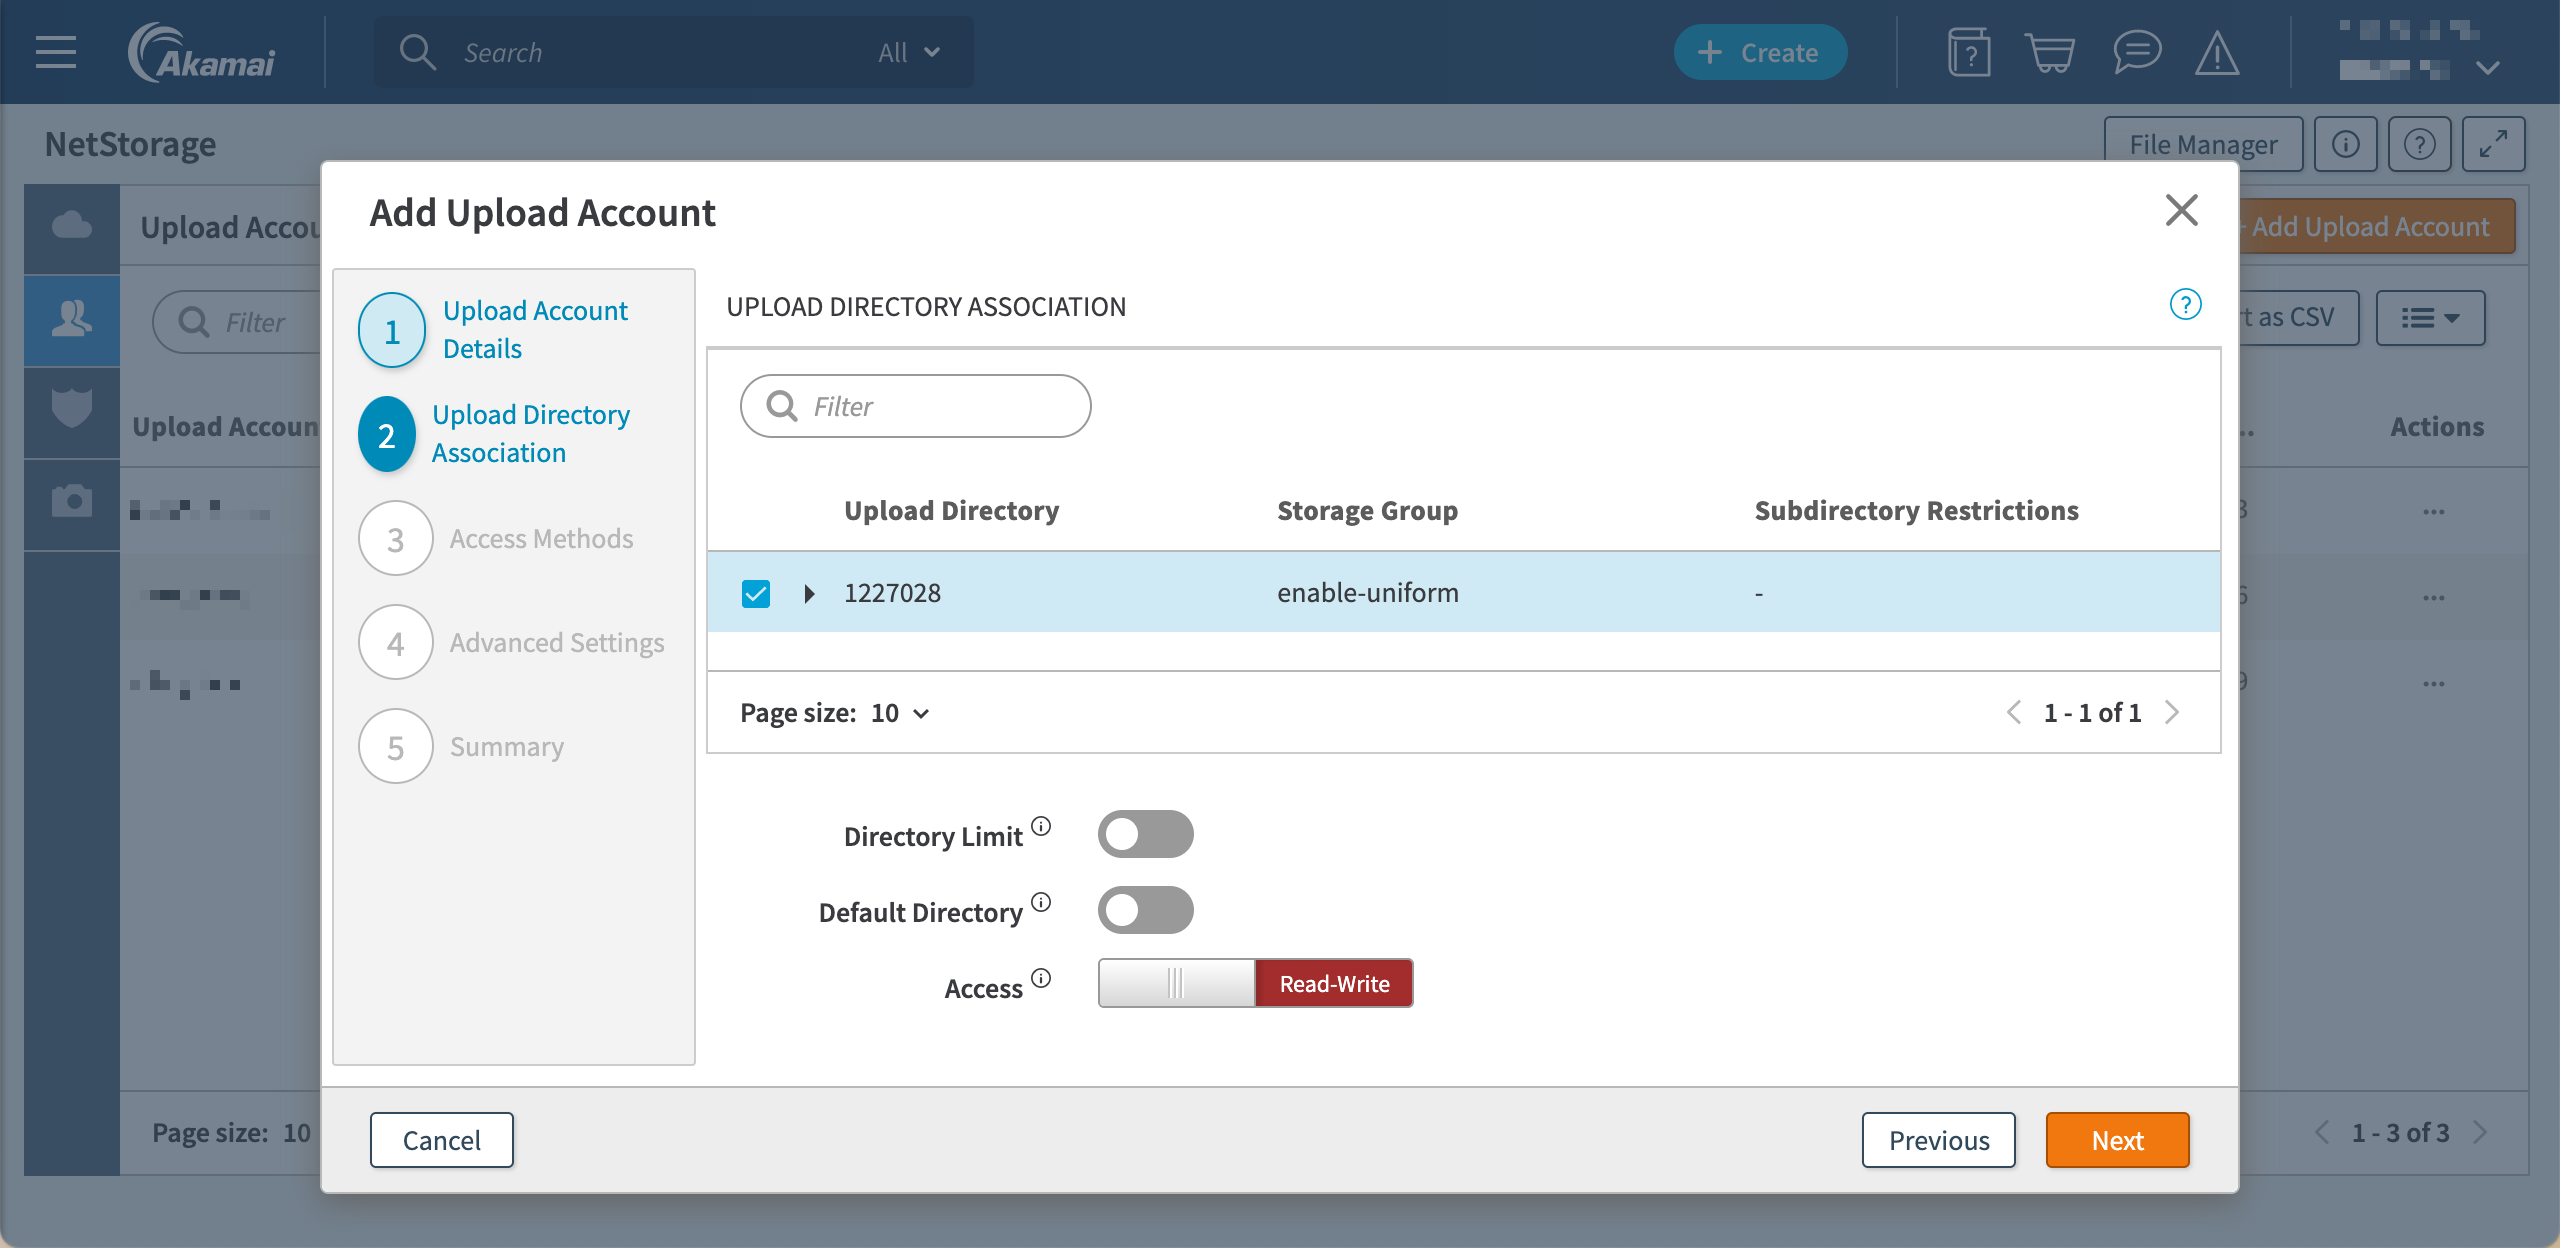
- Tick the box next to the storage group you created in the previous section, then click Next.
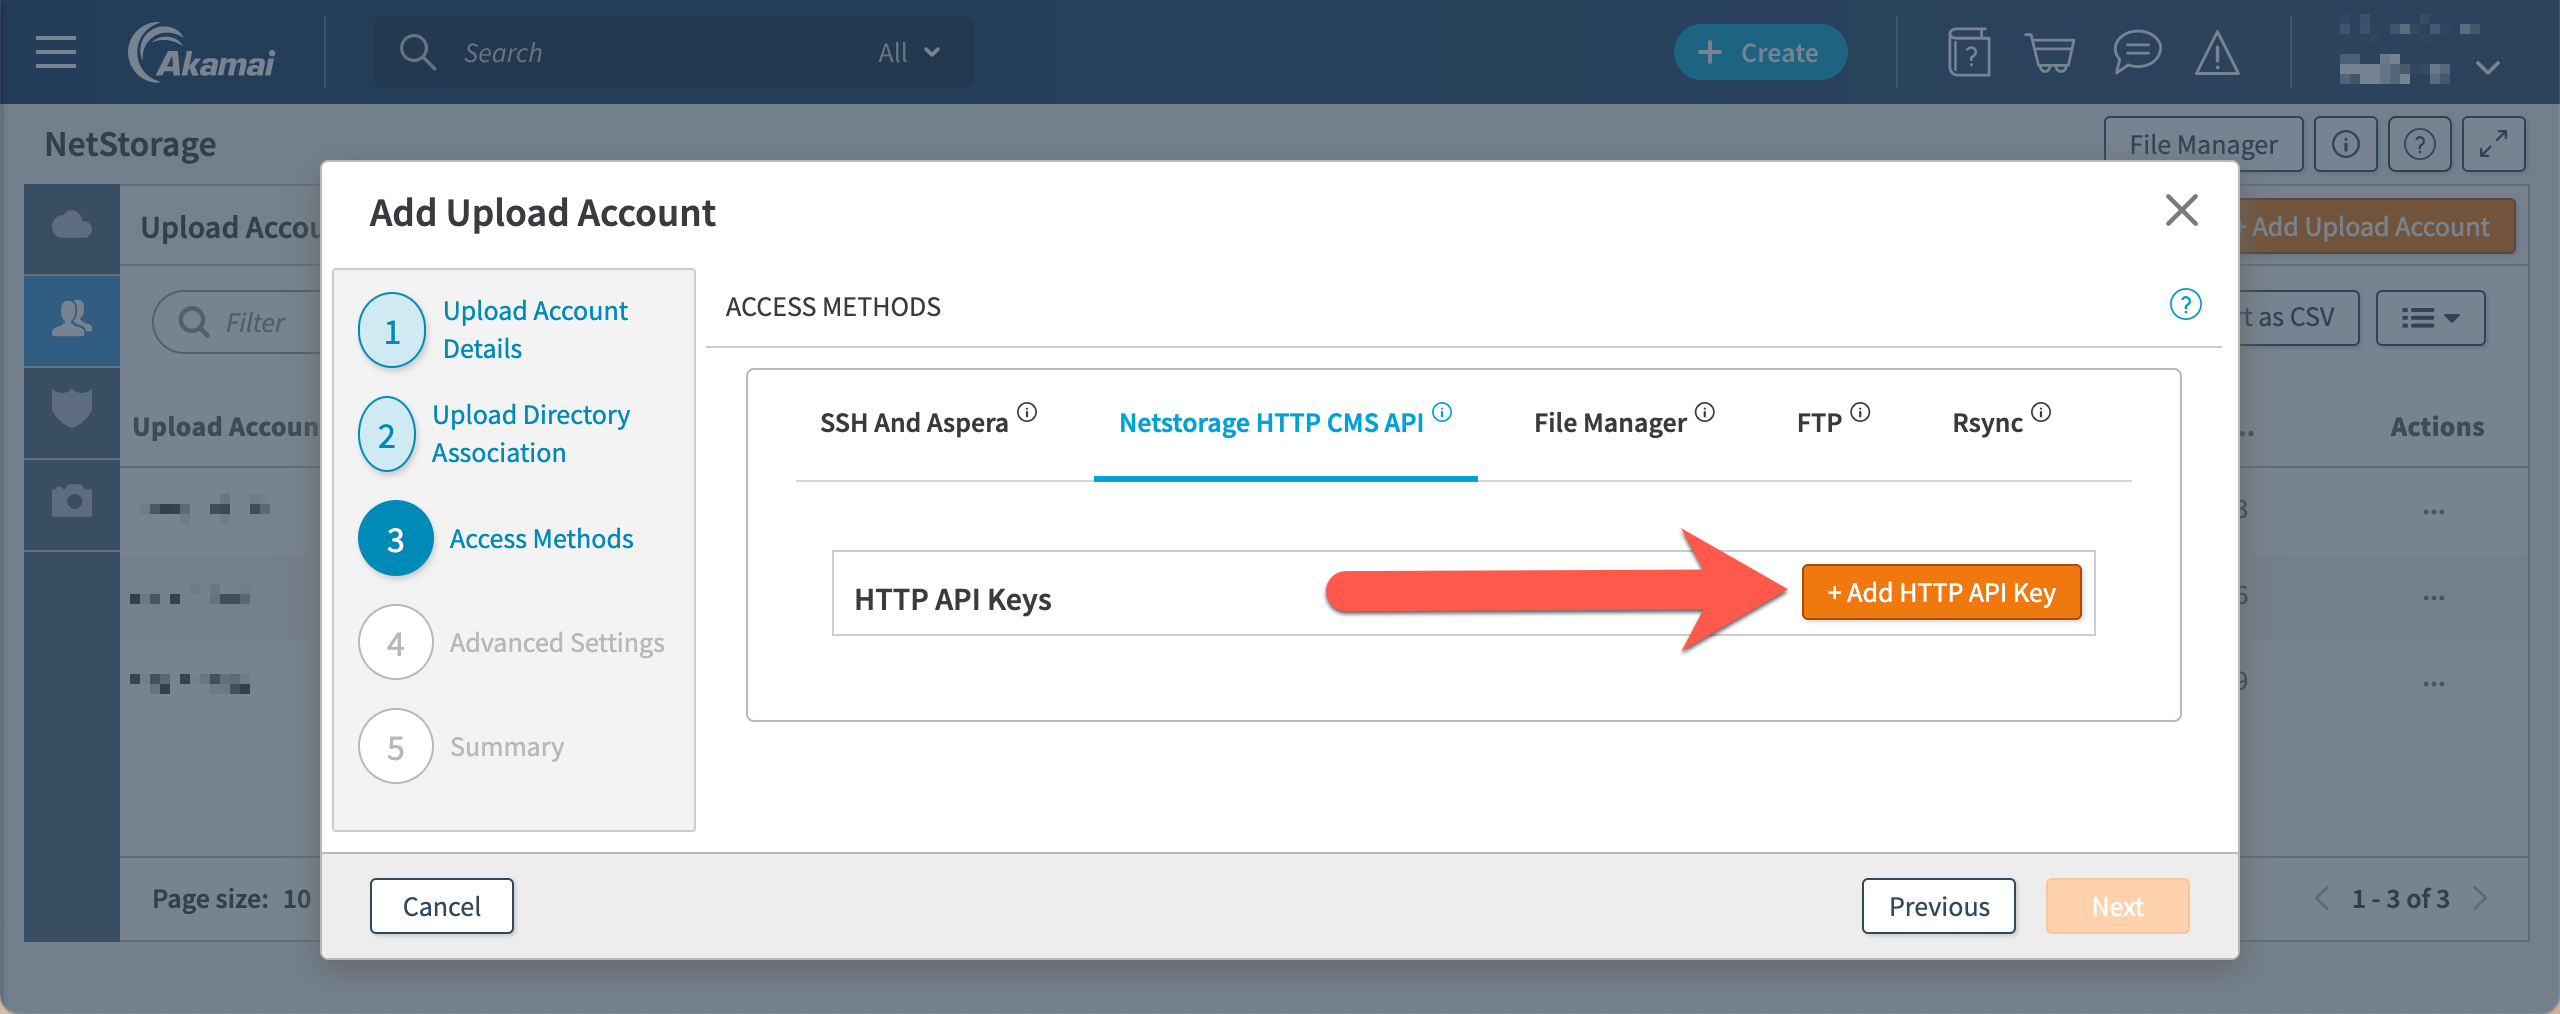
- Click Netstorage HTTP CMS API.
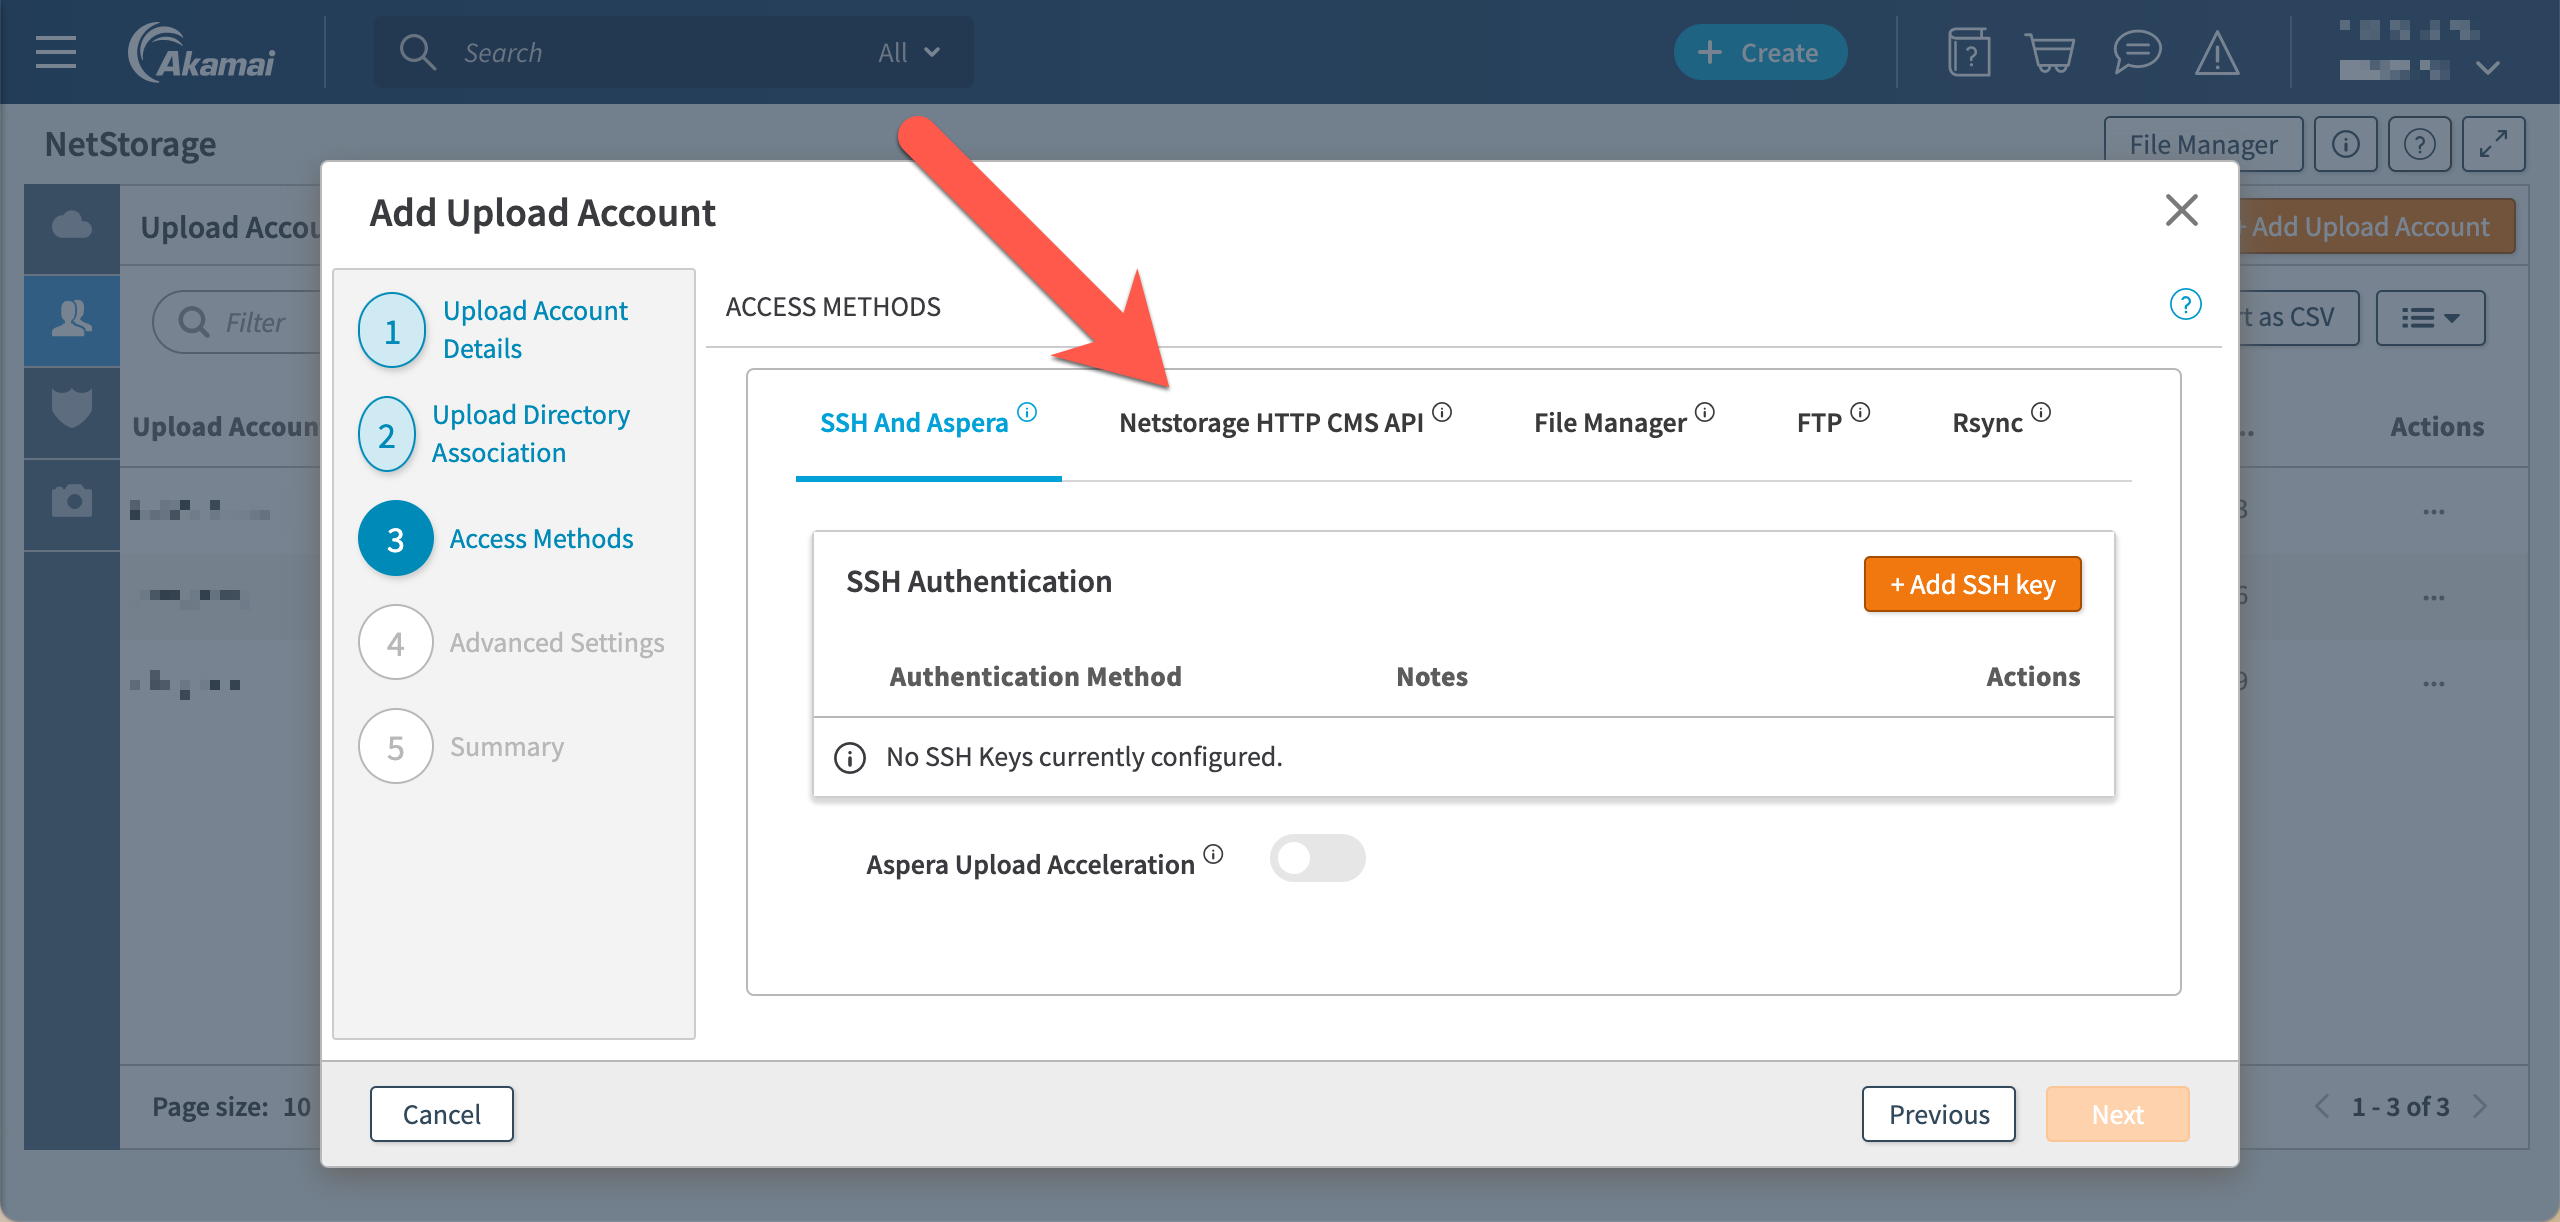
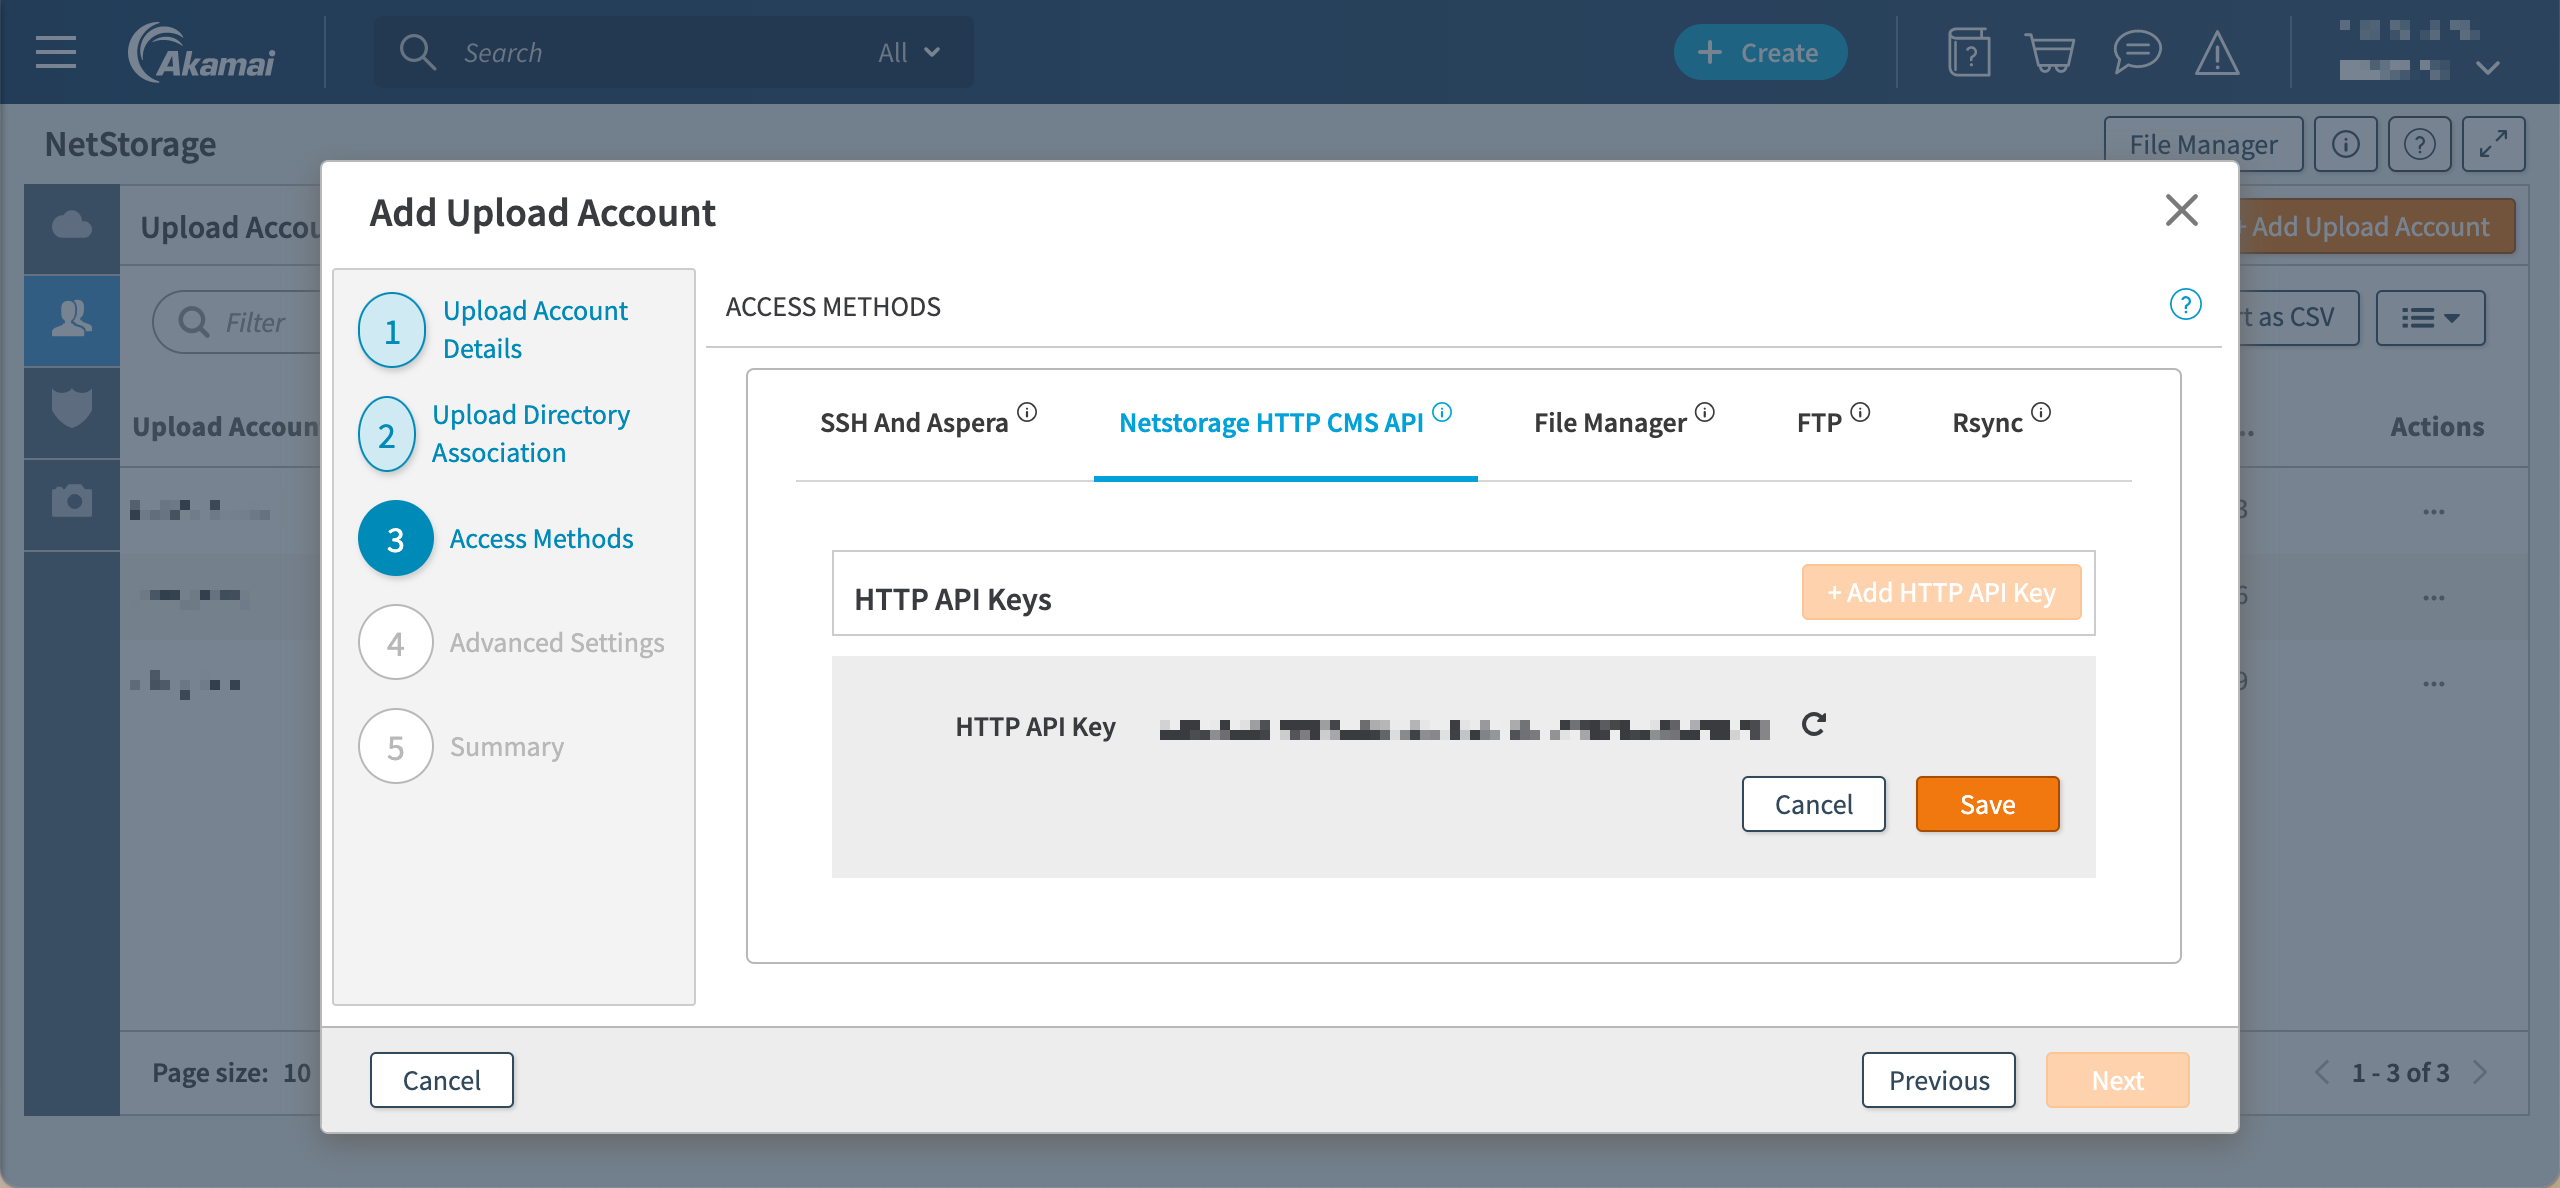
- Click + Add HTTP API Key.
- Click Save.
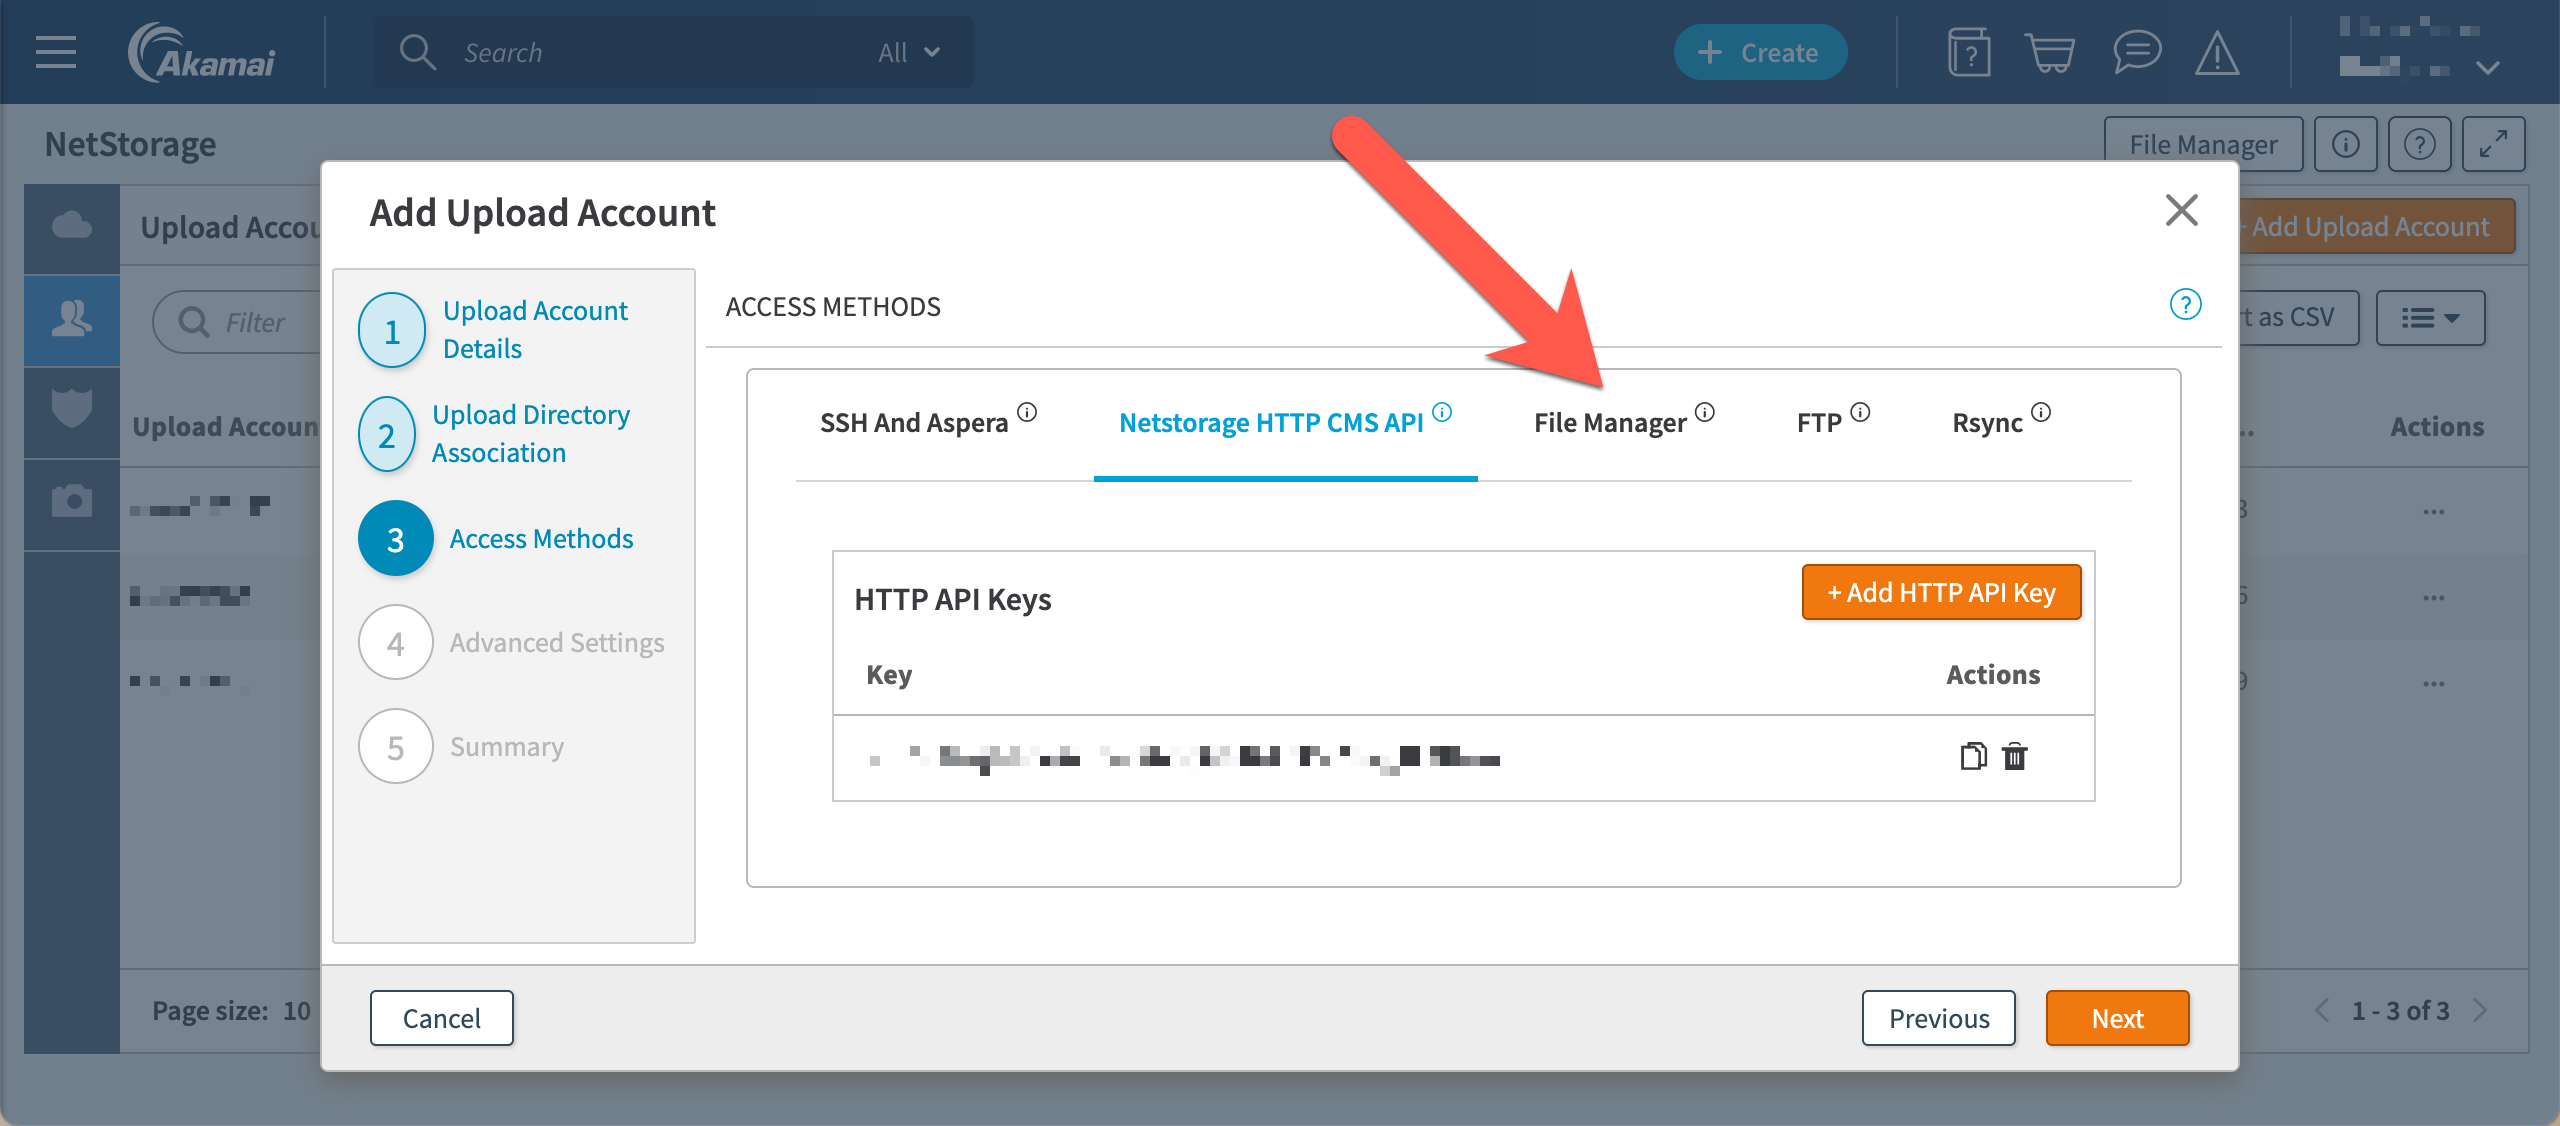
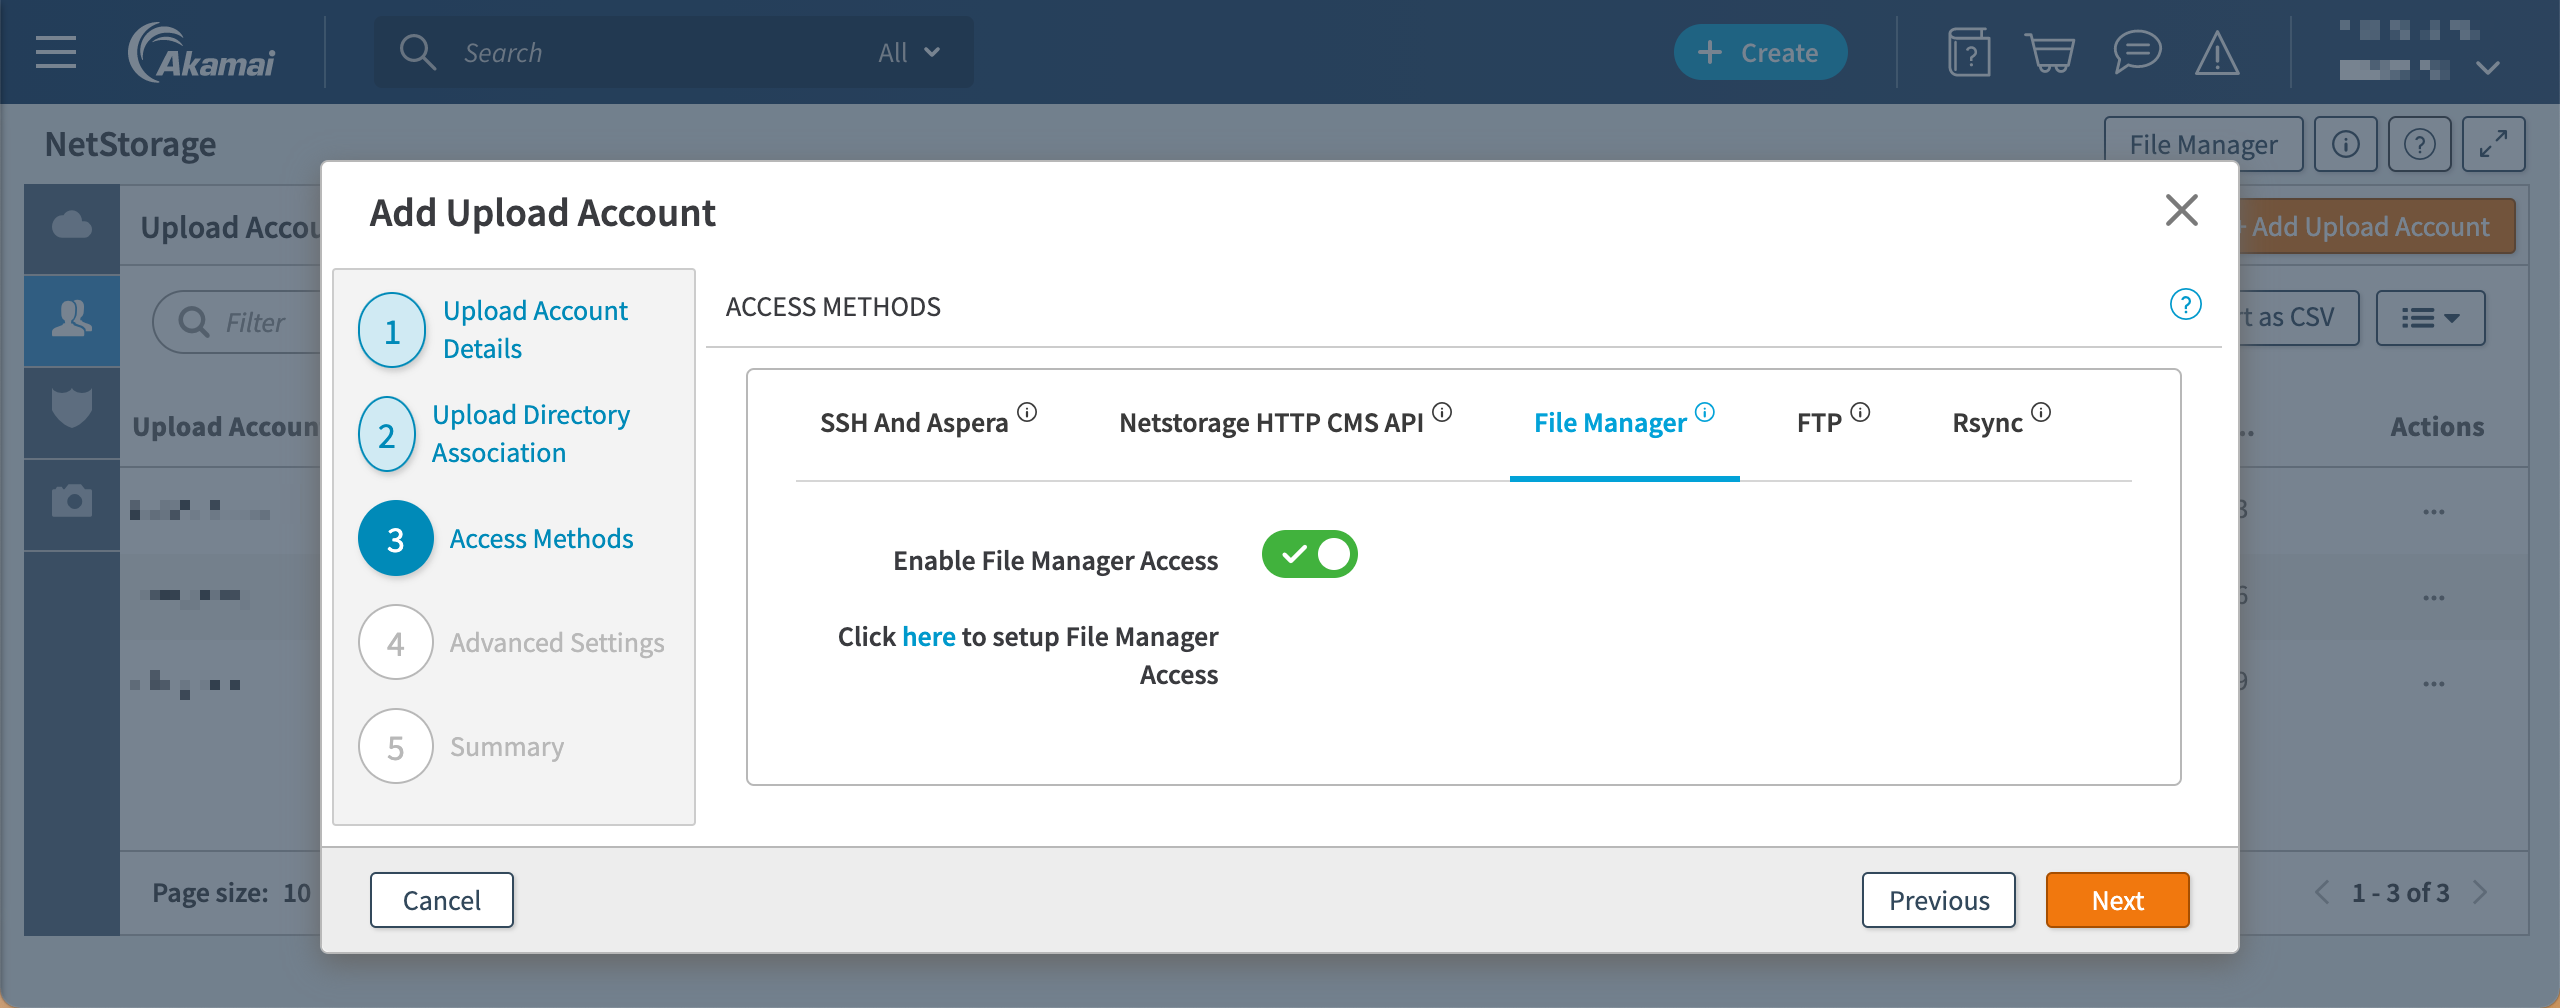
- Click File Manager.
- Enable the option "Enable File Manager Access", then click Next.
- Click Next.
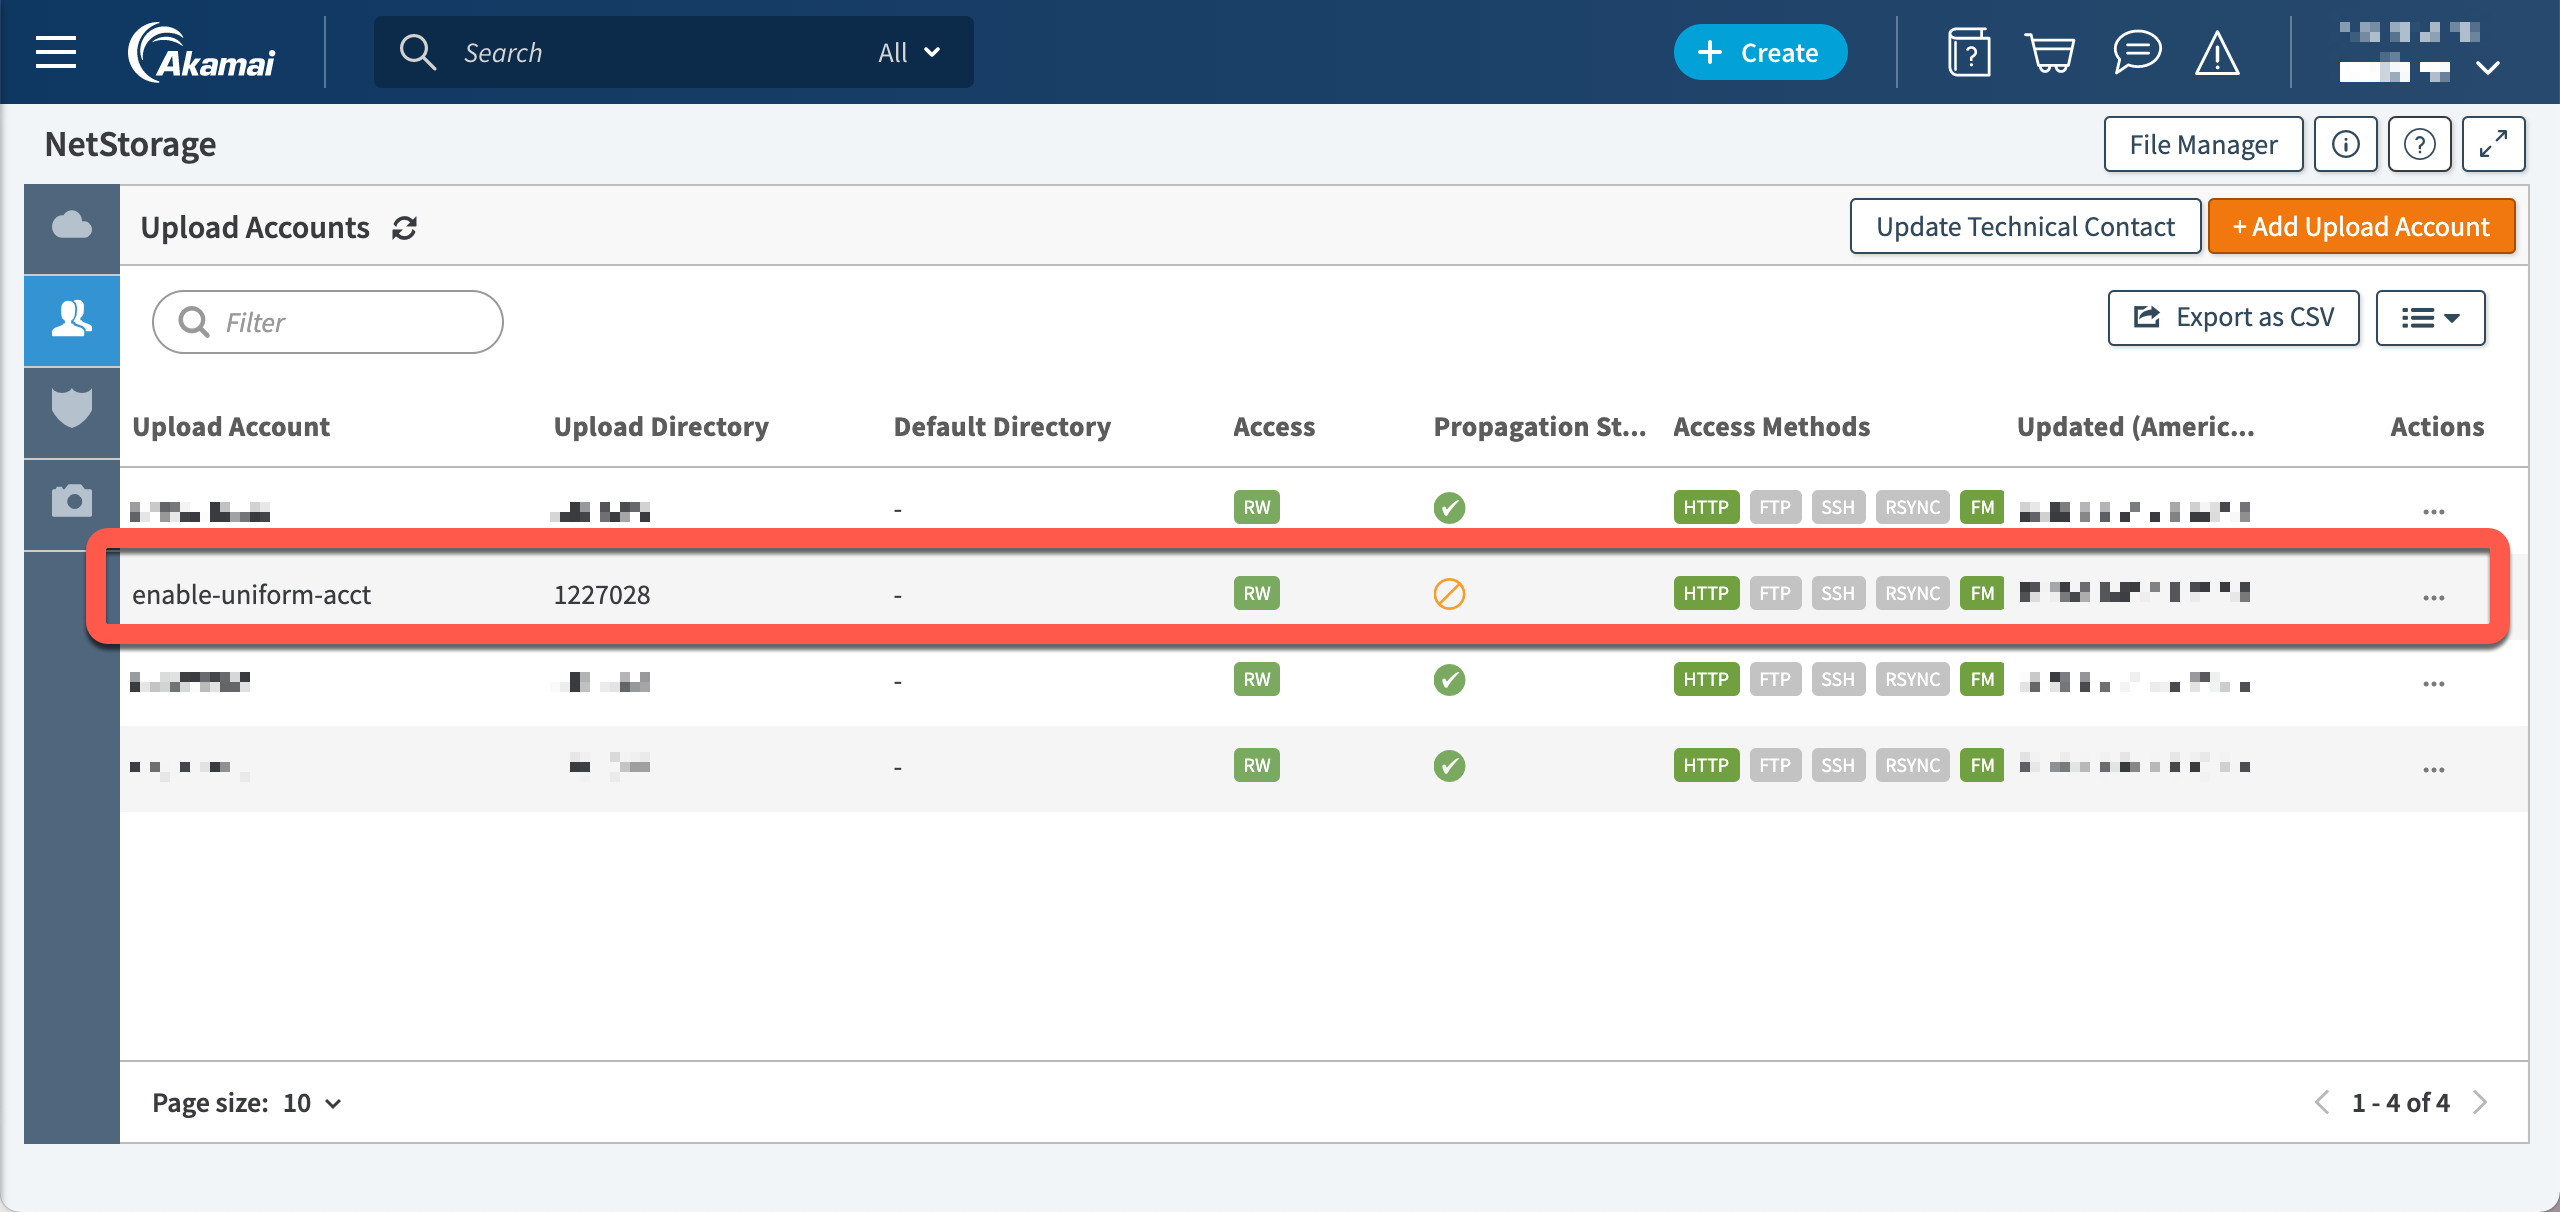
- Click Create.
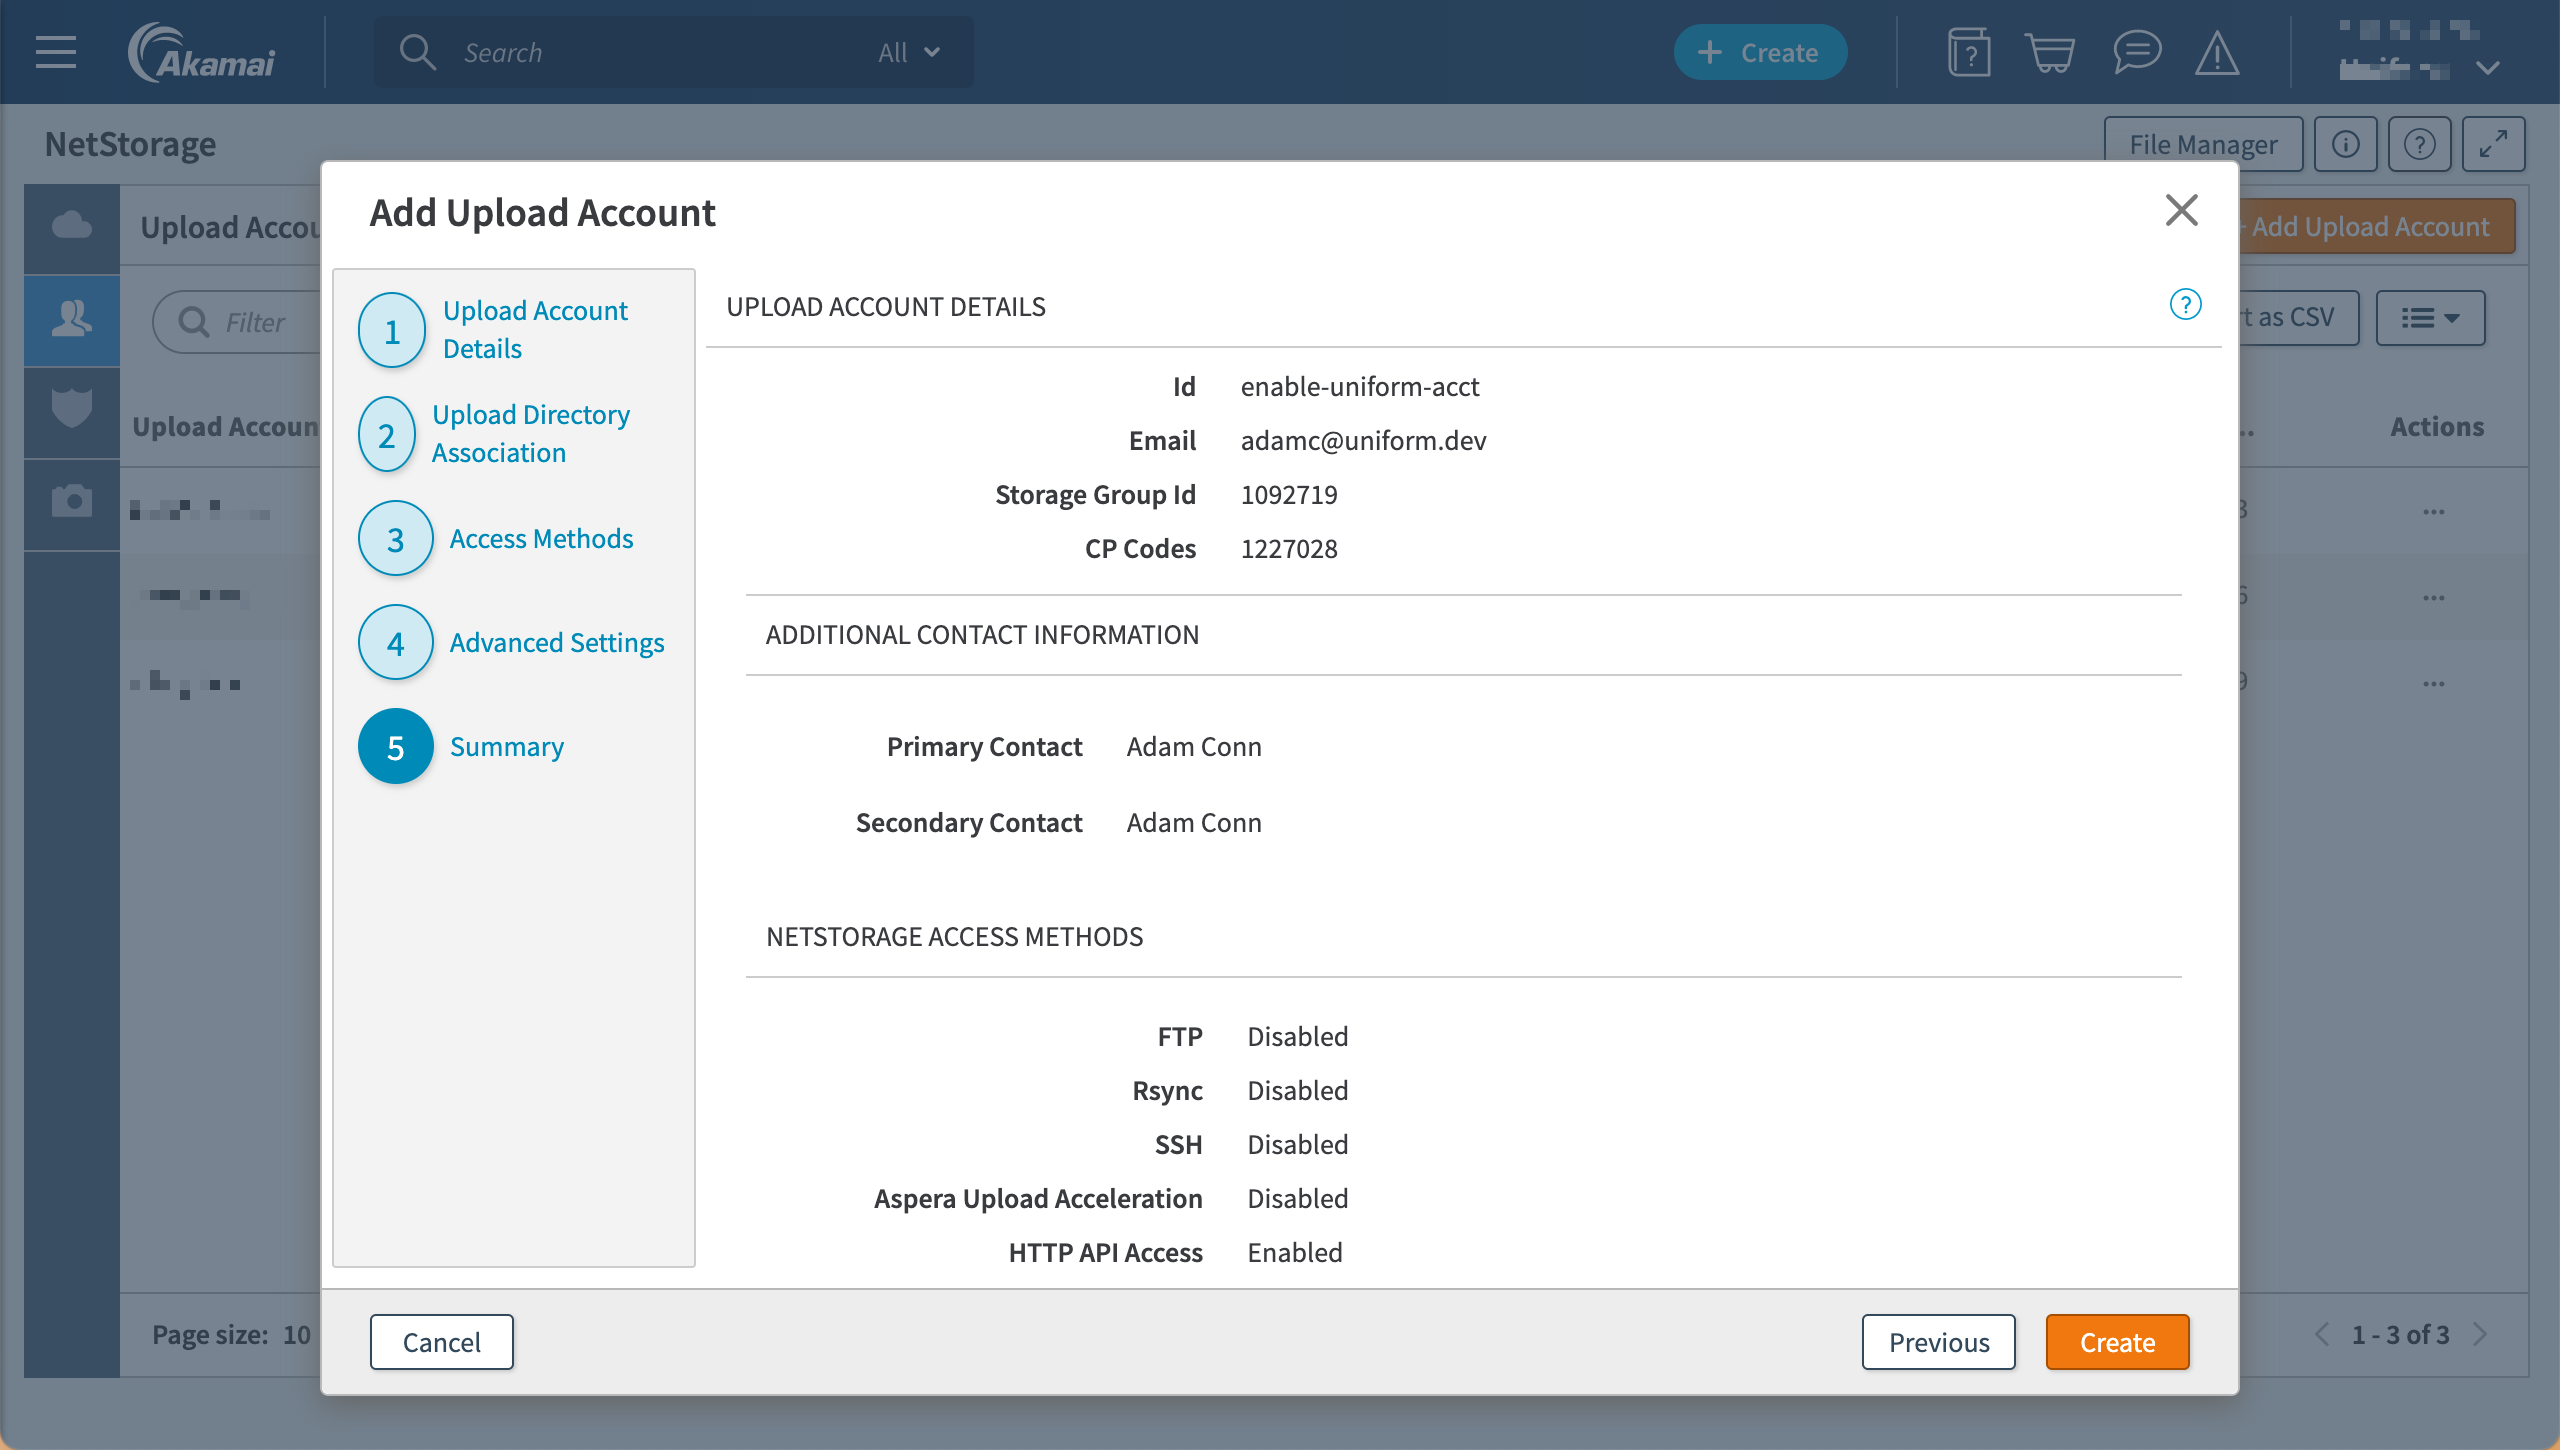
- You should see your upload account in the list.
note
It takes from 1-2 hours for the upload account to be propagated to the NetStorage network. You can continue to configure Akamai during this time.
Add property#
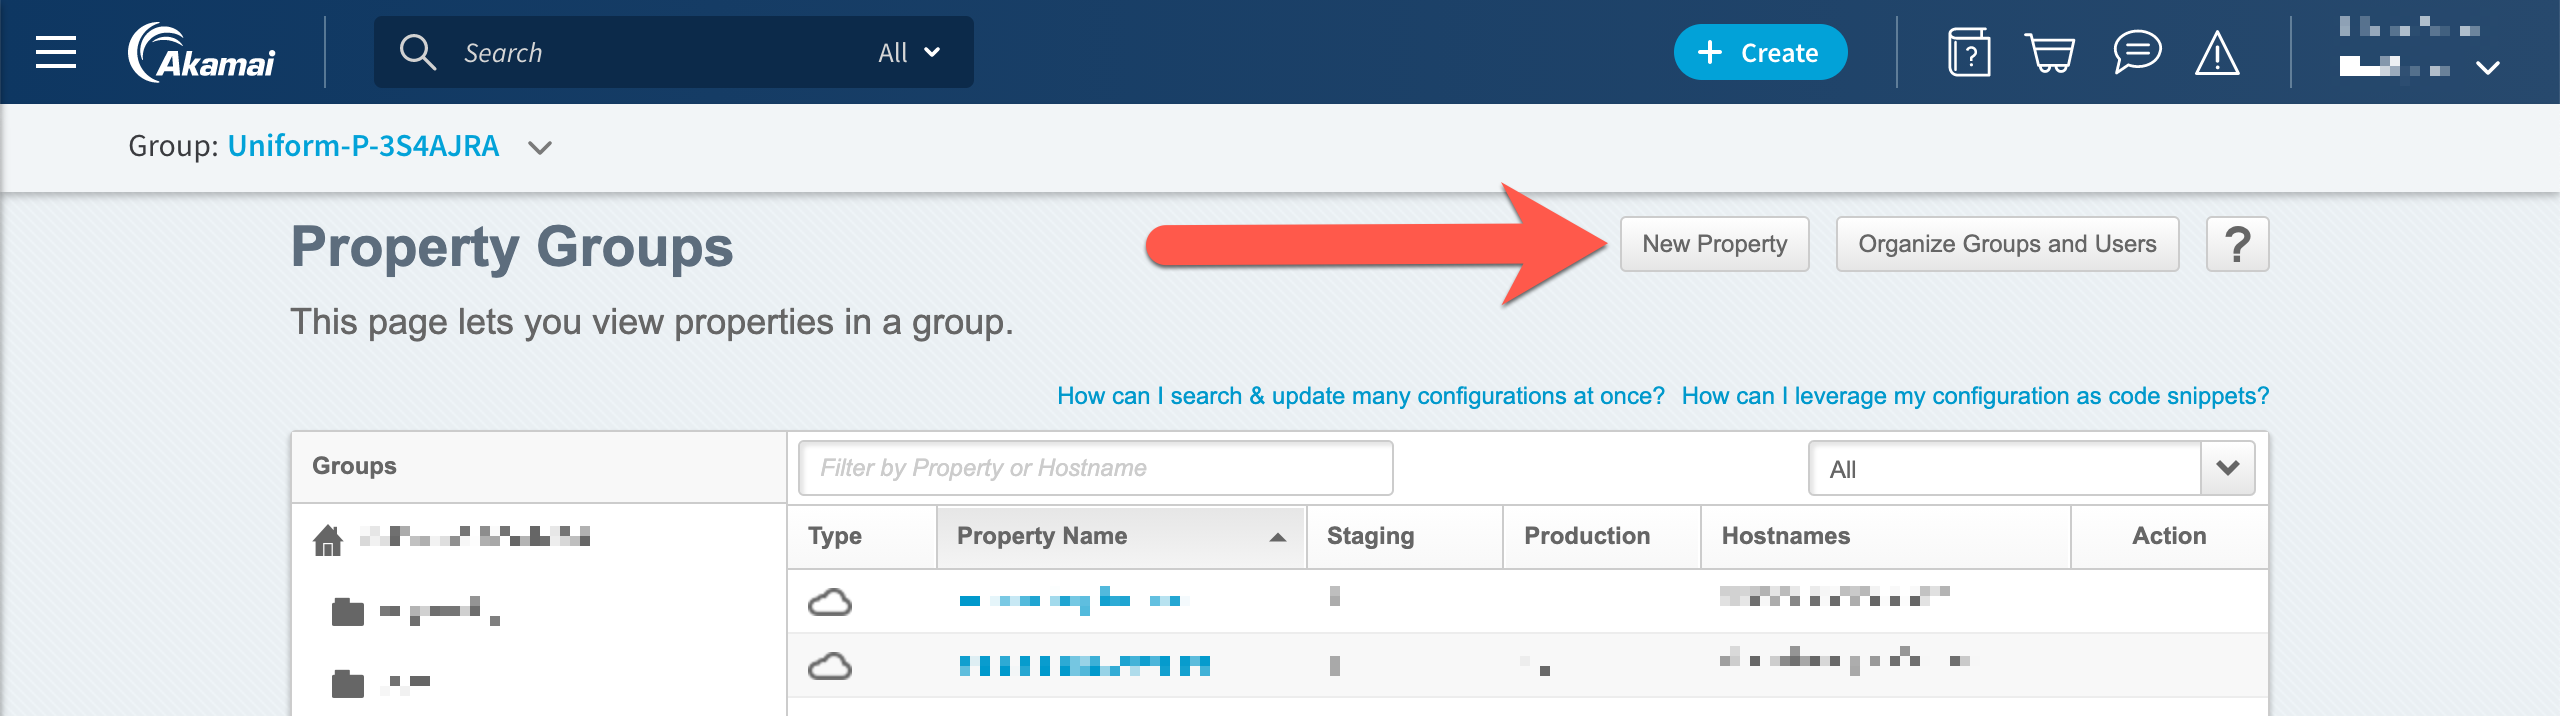
In Akamai, in the left menu navigate to CDN > Properties.
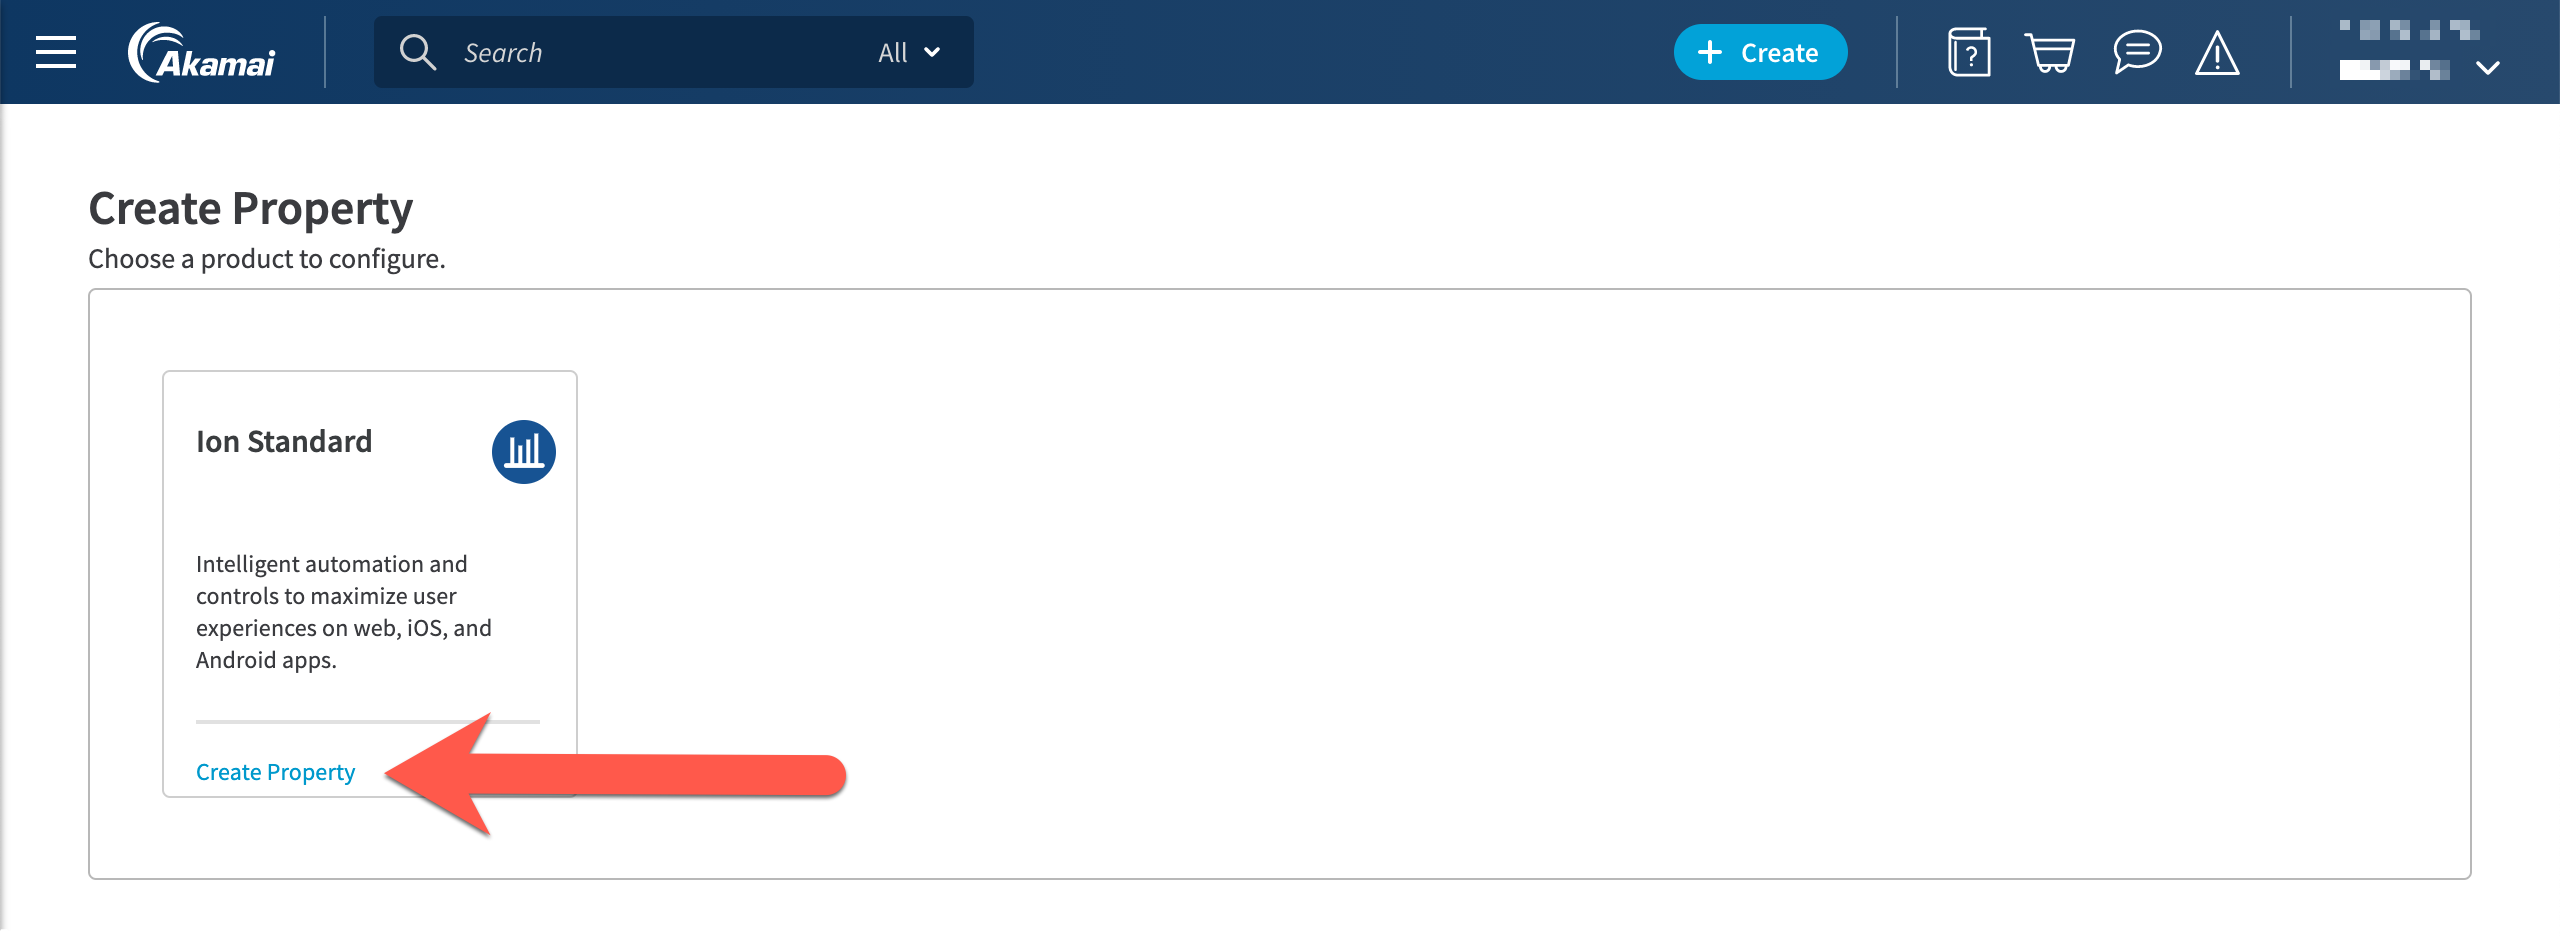
Click New Property.
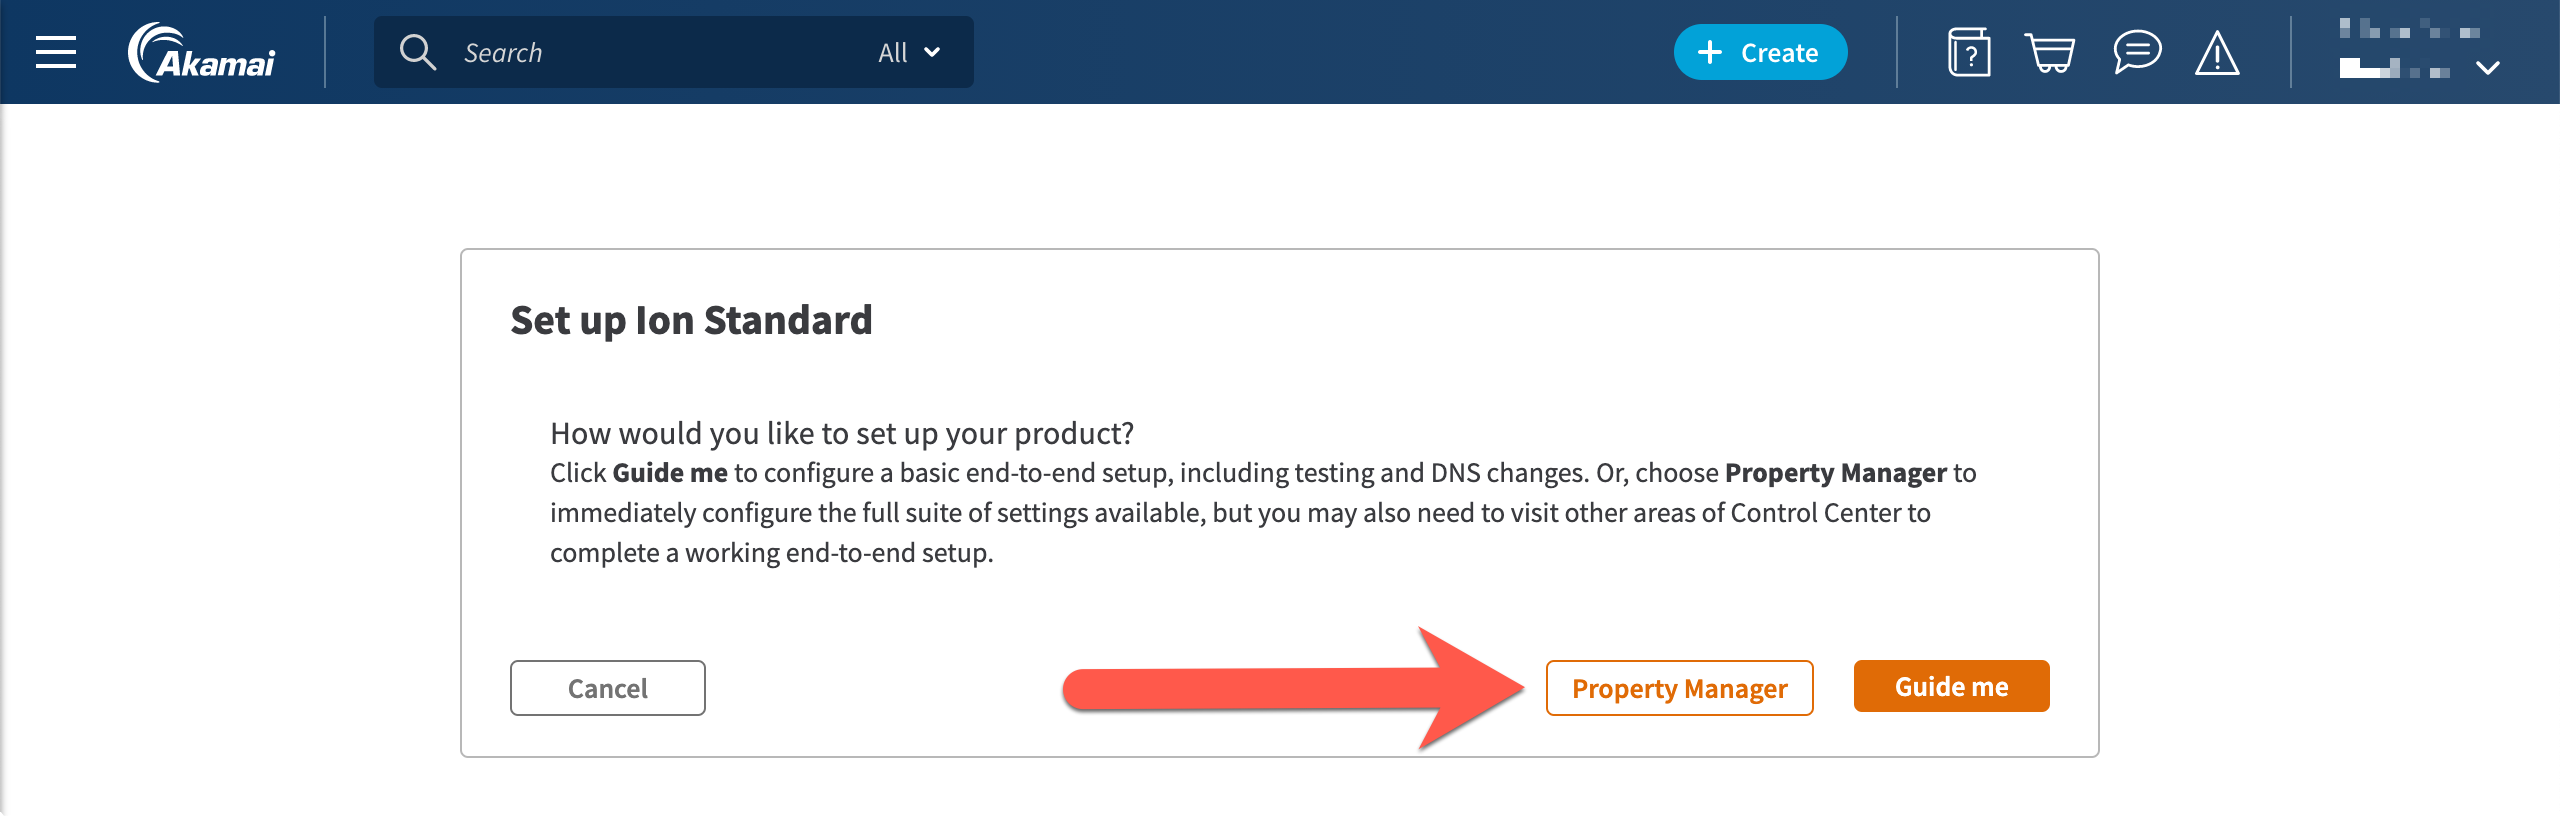
In the product "Ion Standard", click Create Property.
Click Property Manager.
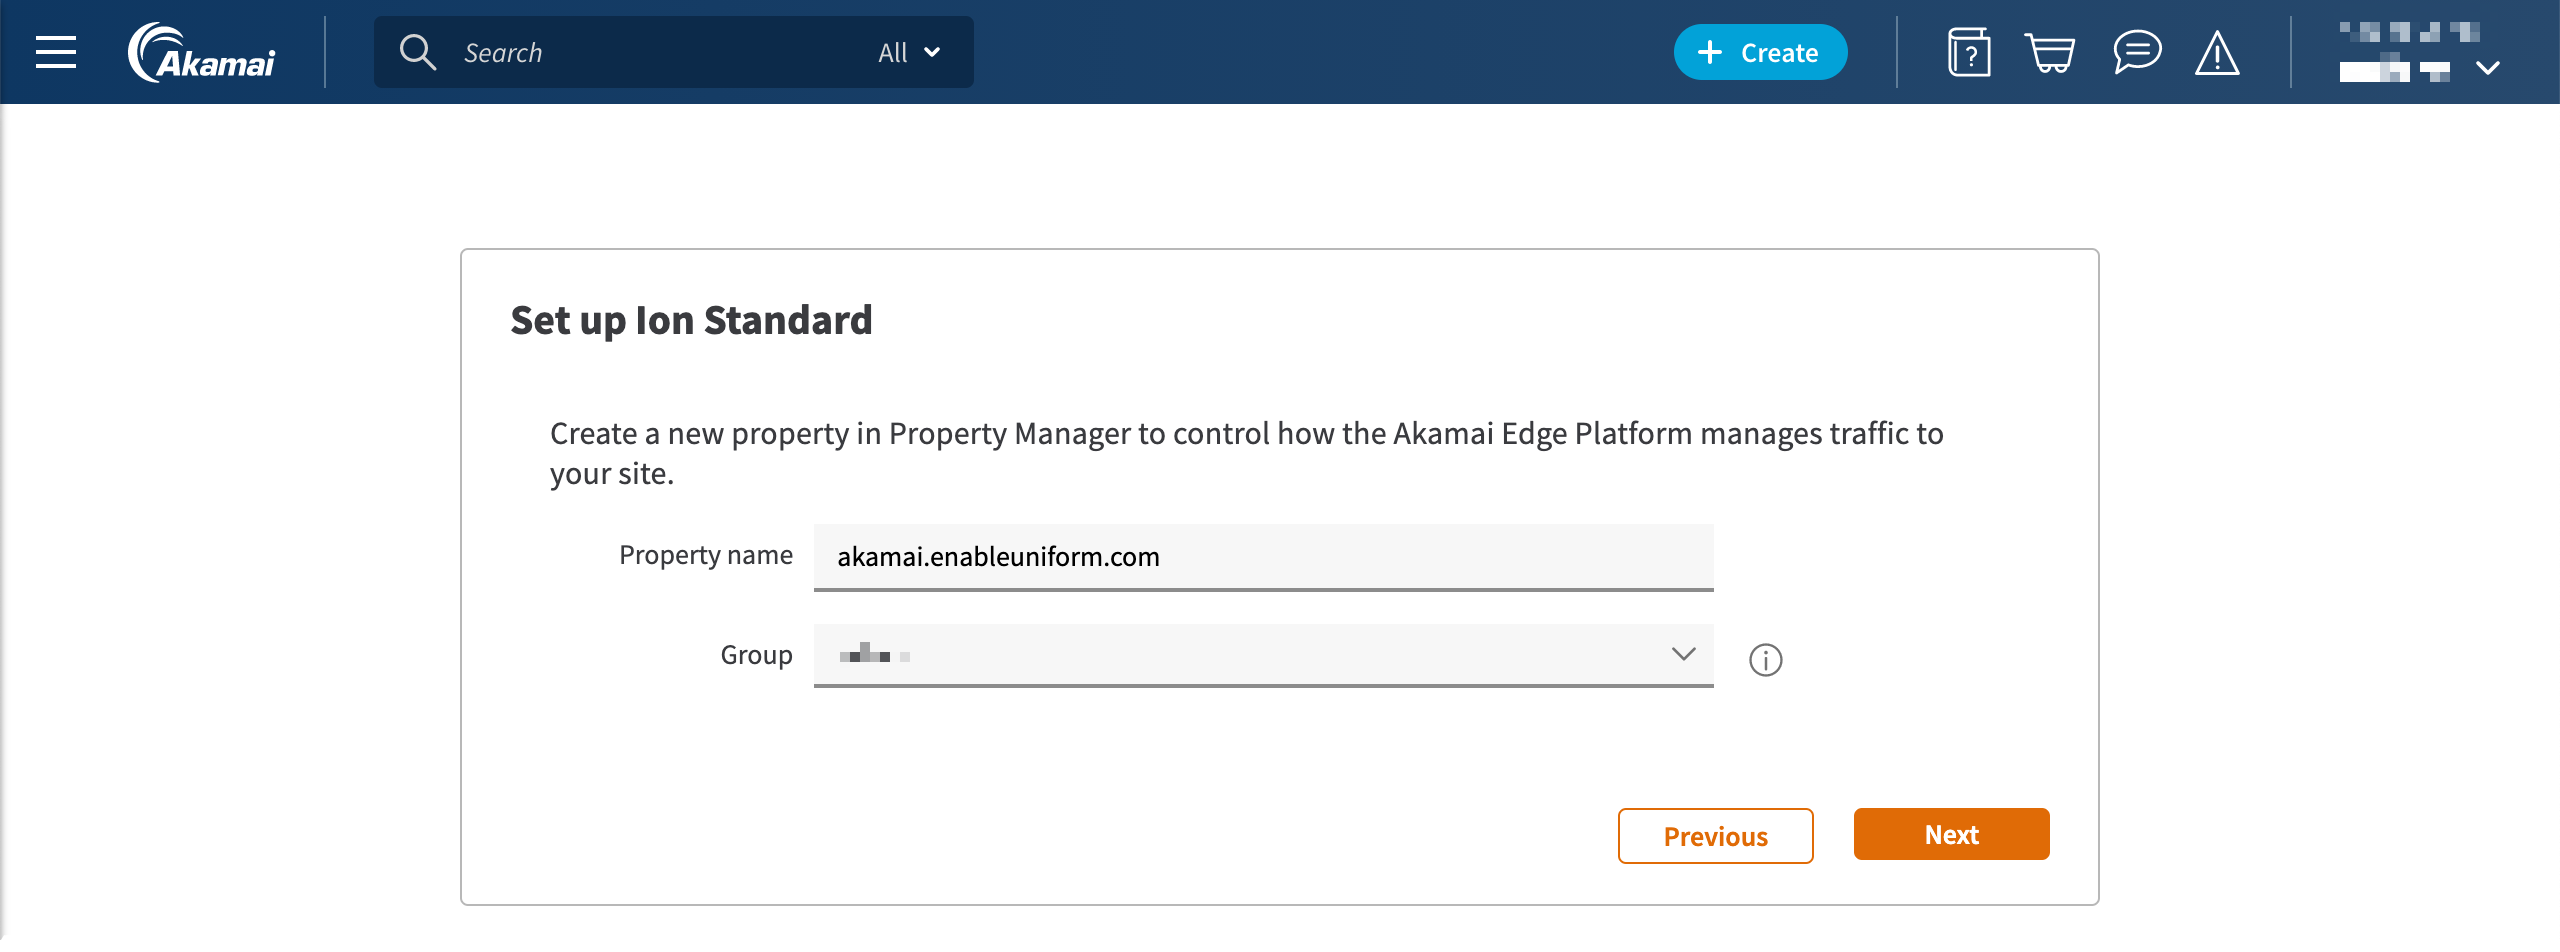
Complete the form, then click Next.
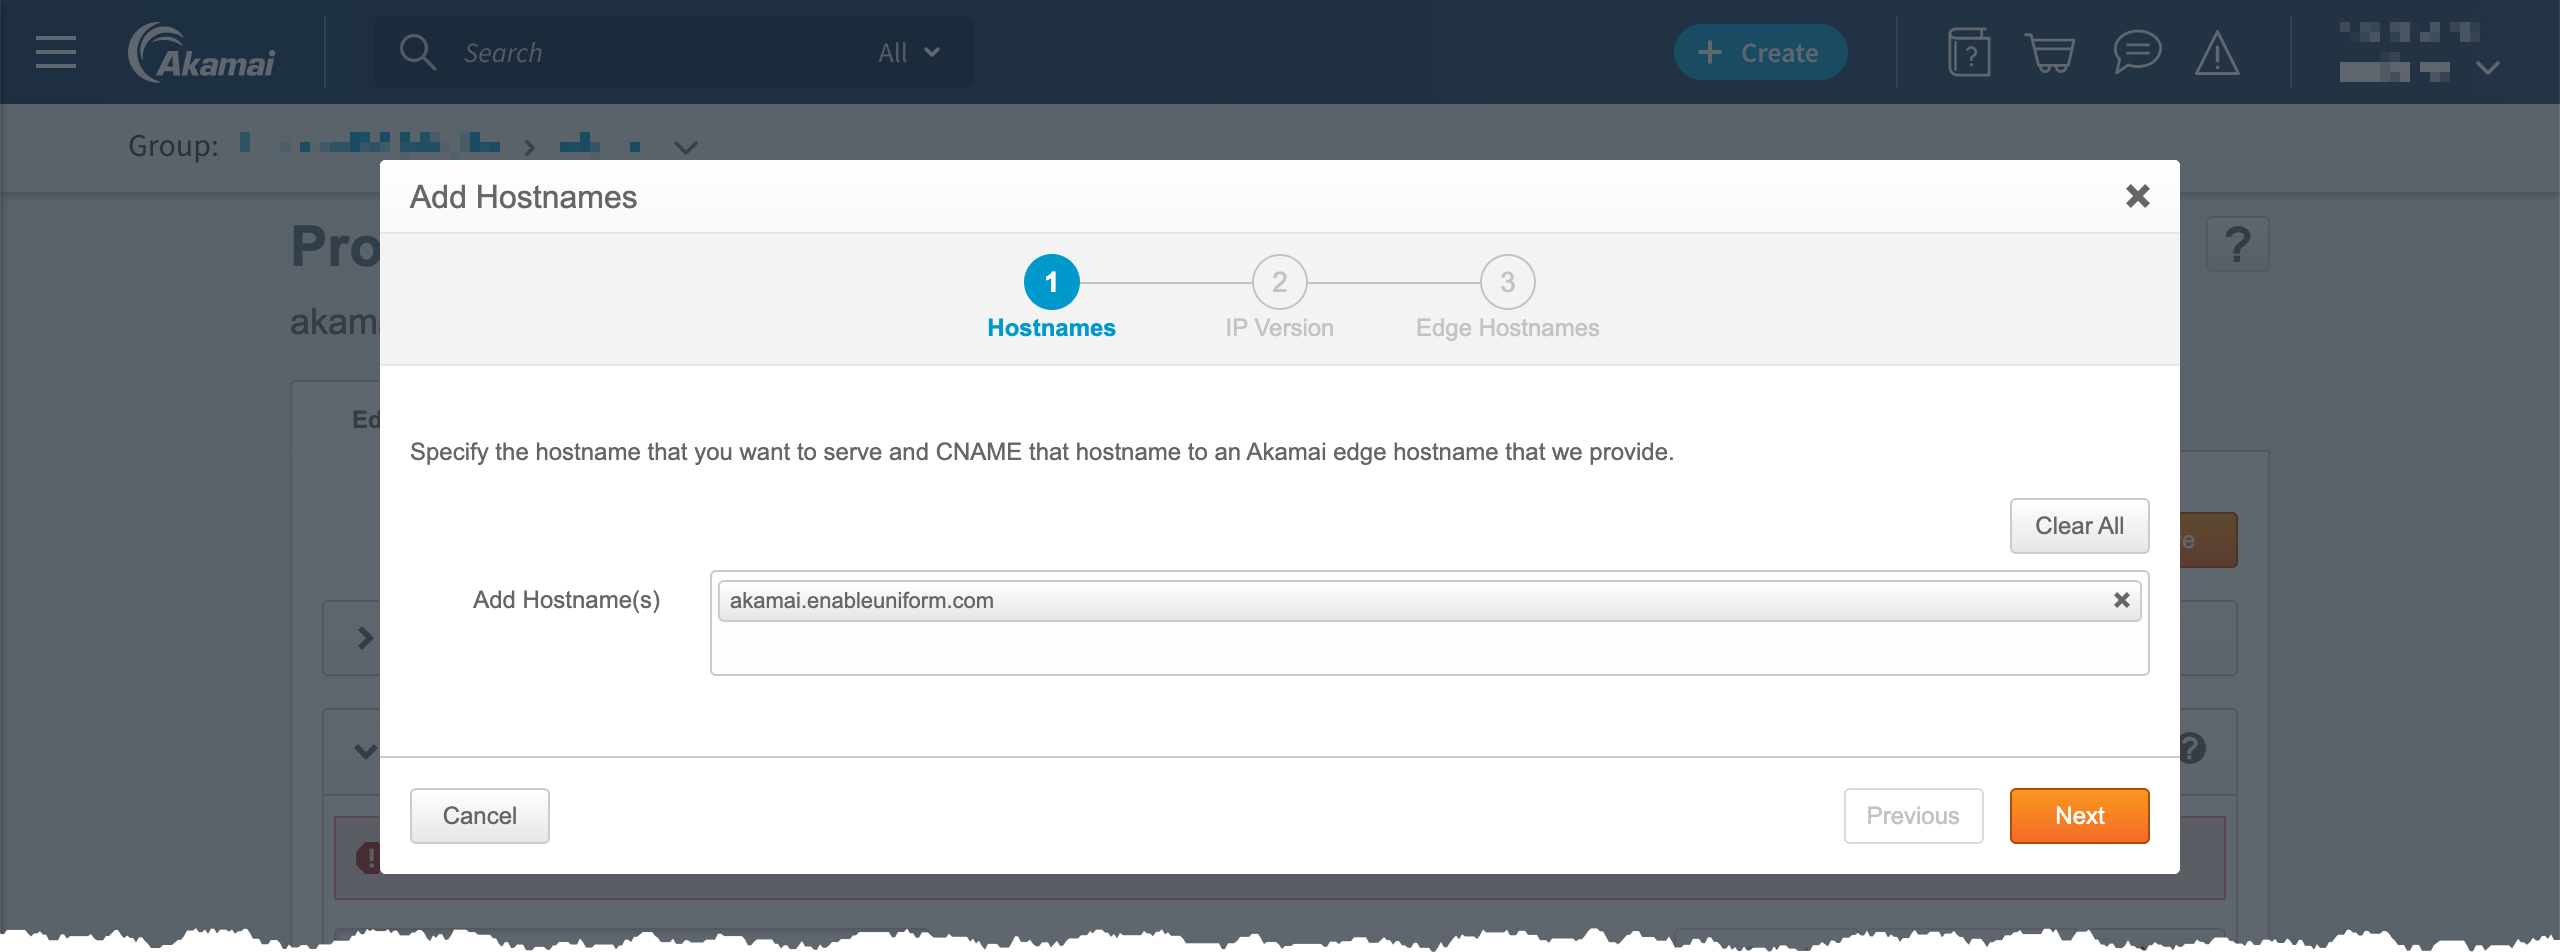
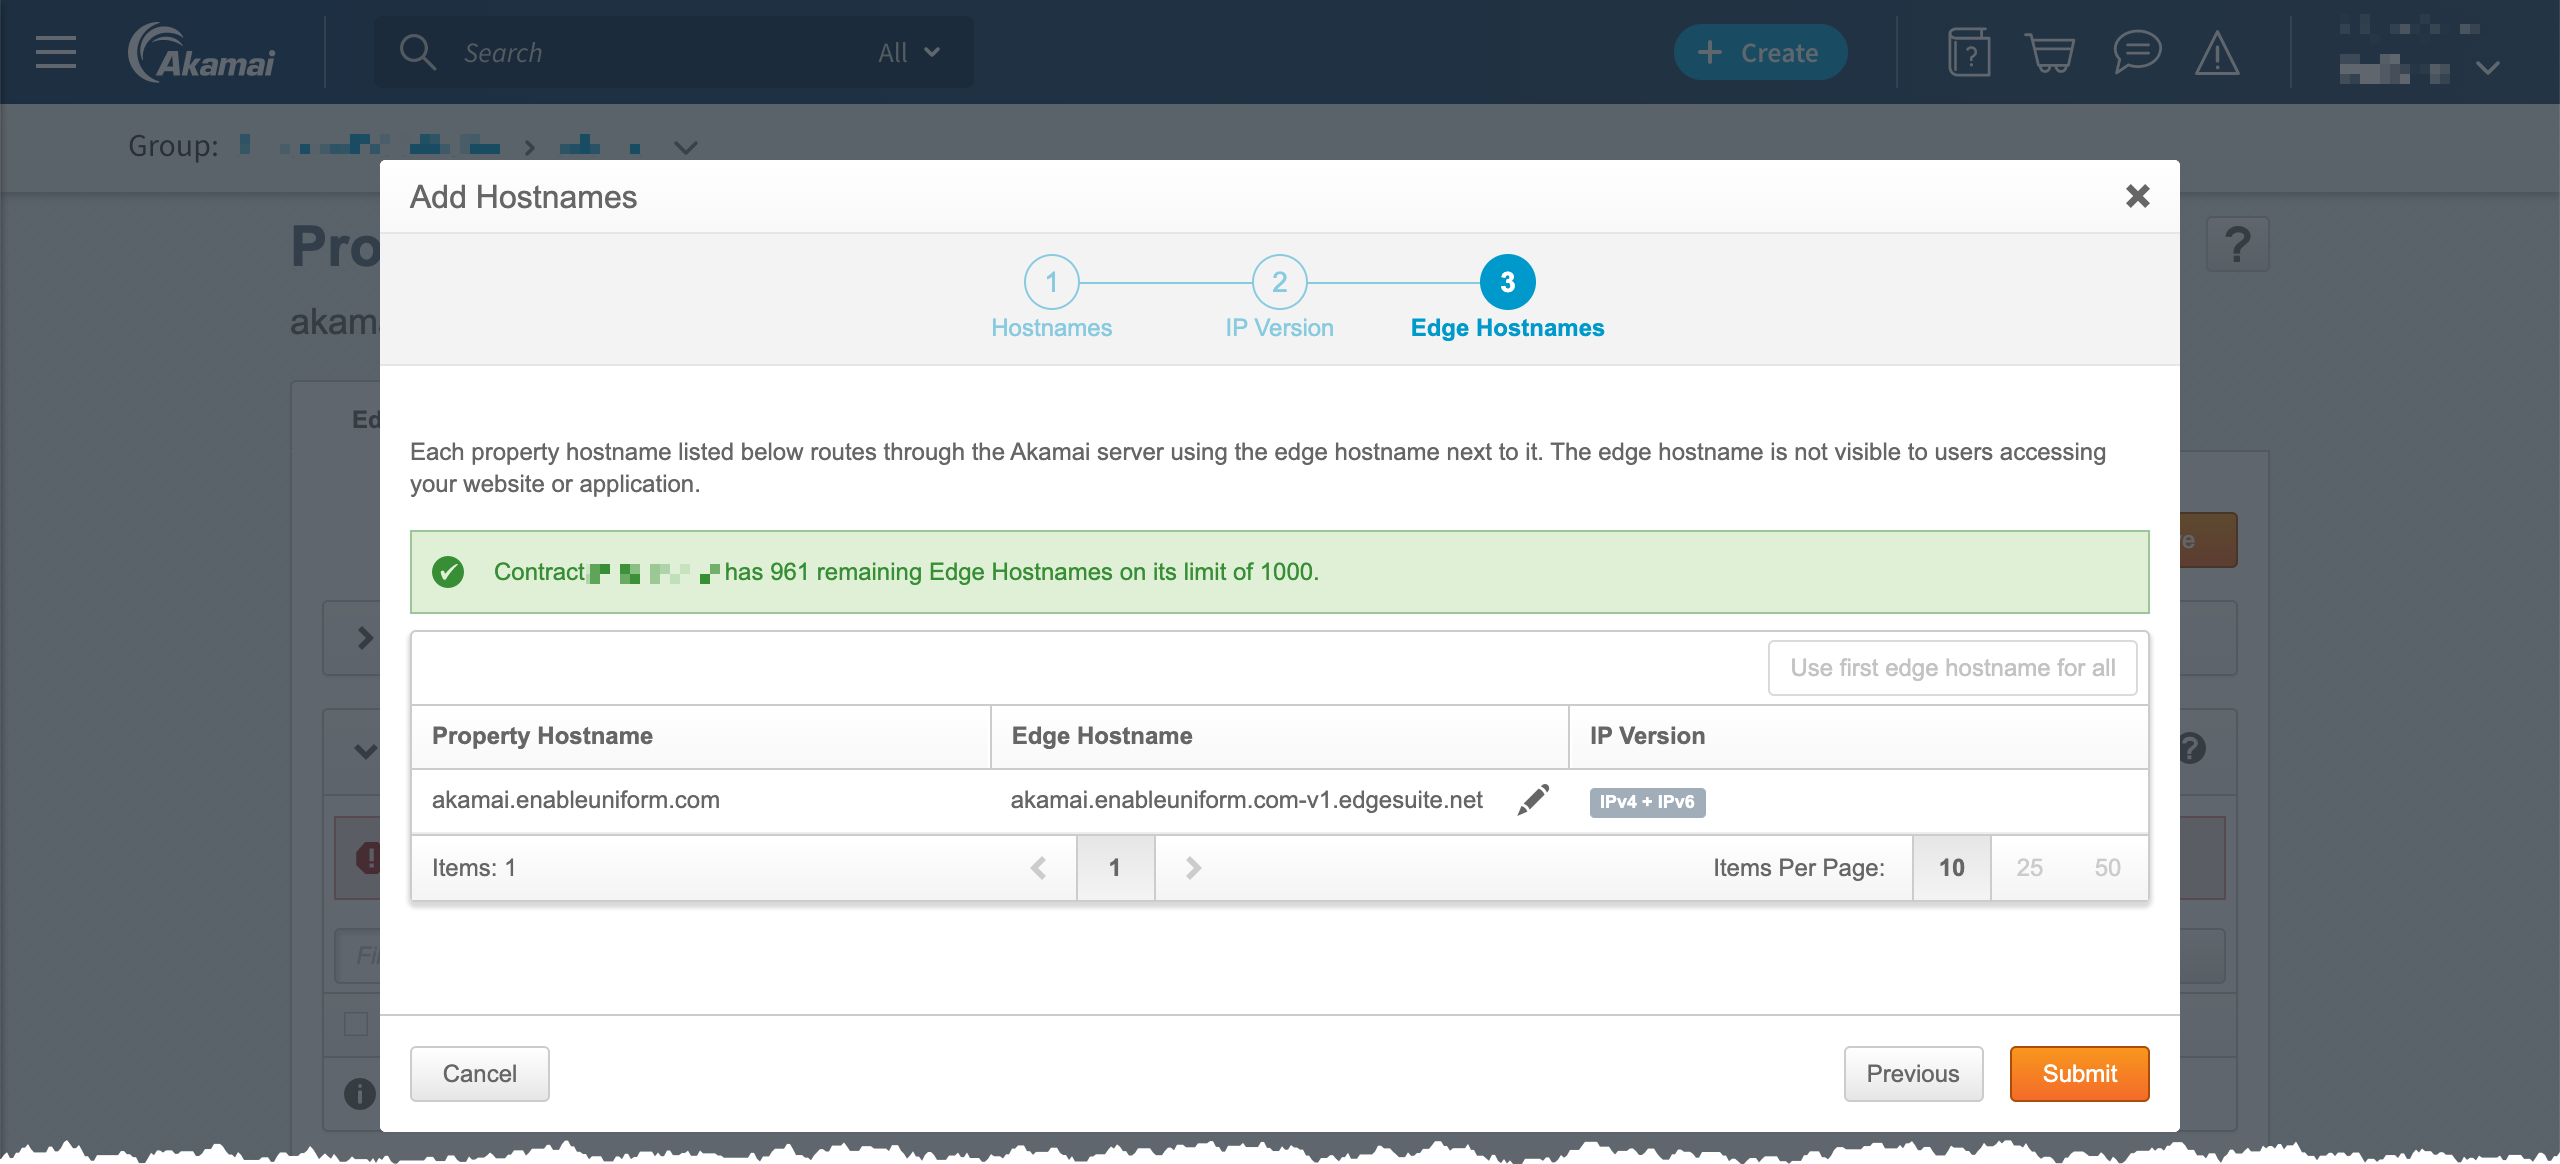
In the section Property Hostnames, click Add.

Add the hostname for the site, then click Next.
Click Next.

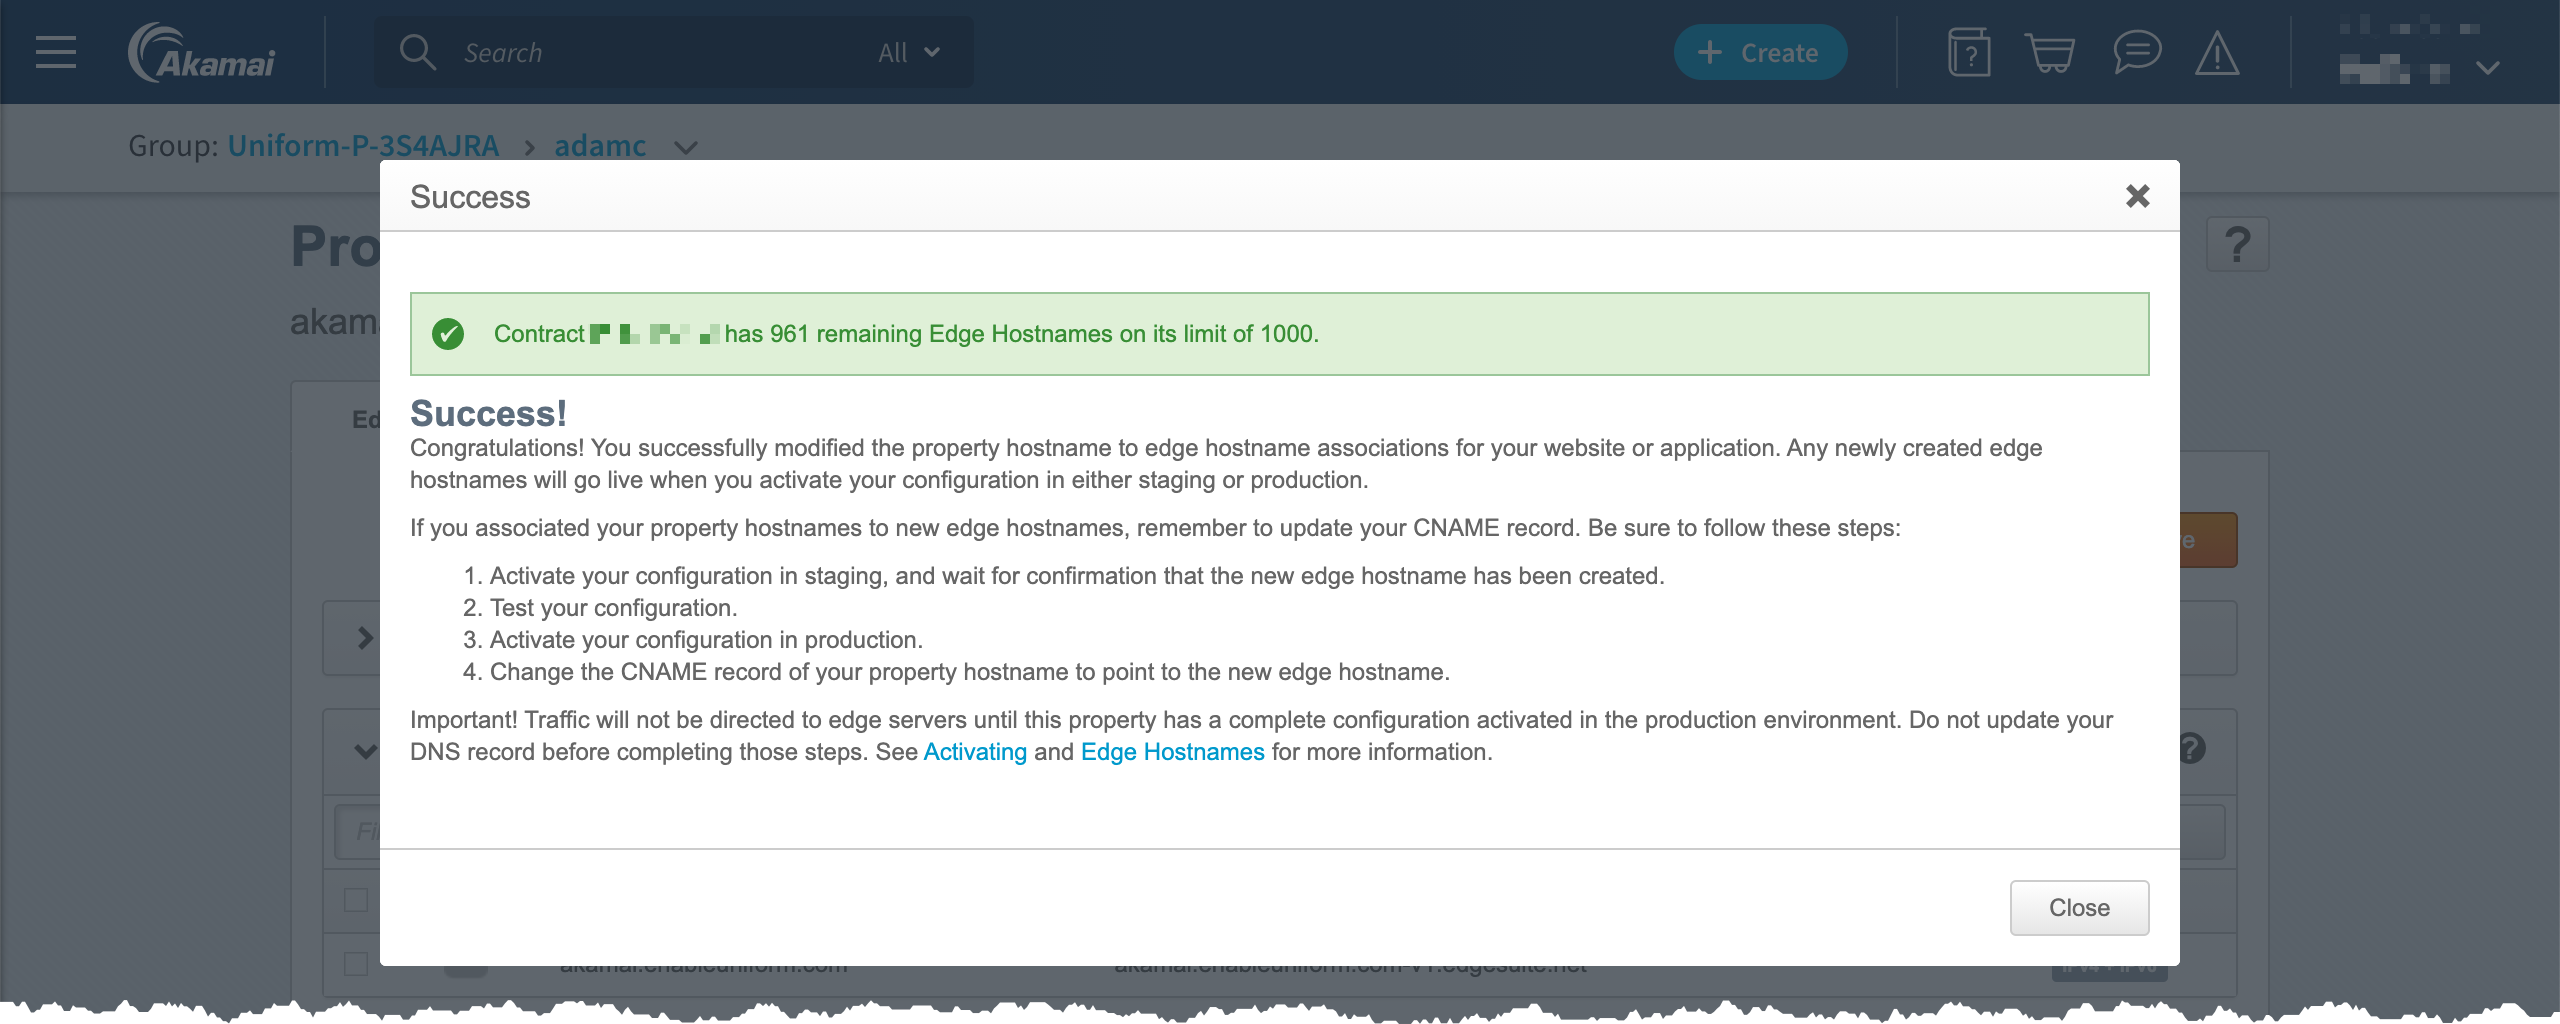
Click Submit.
Click Close.
Scroll down to the section Property Configuration Settings.
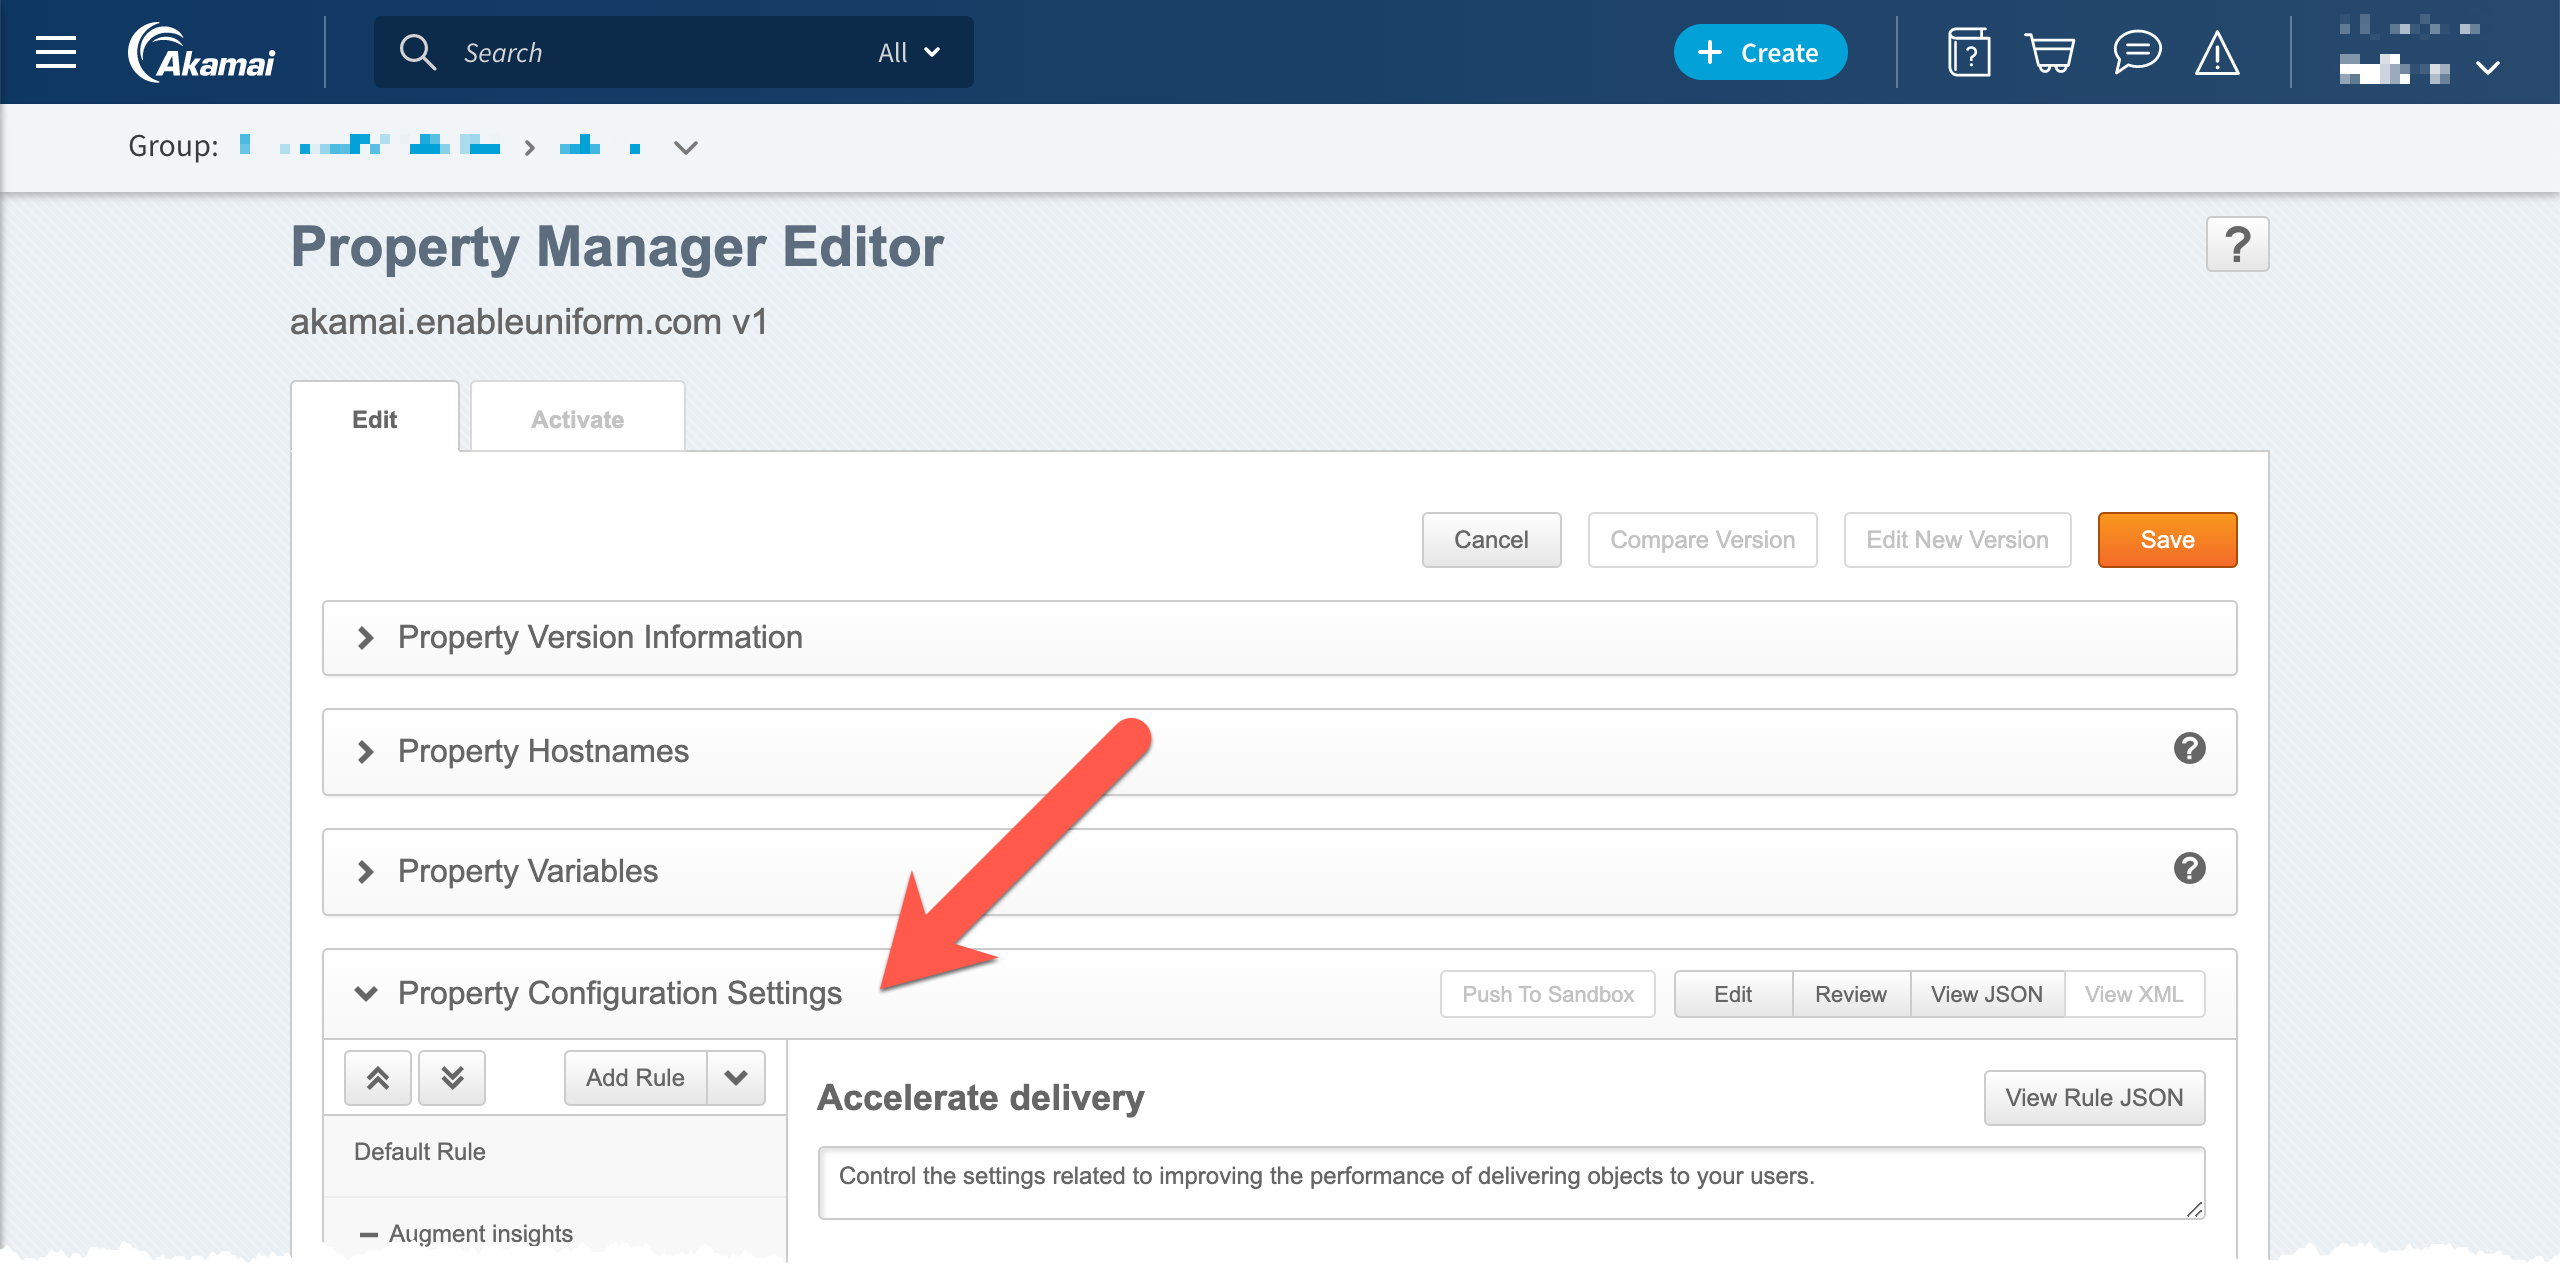
Click Default Rule.
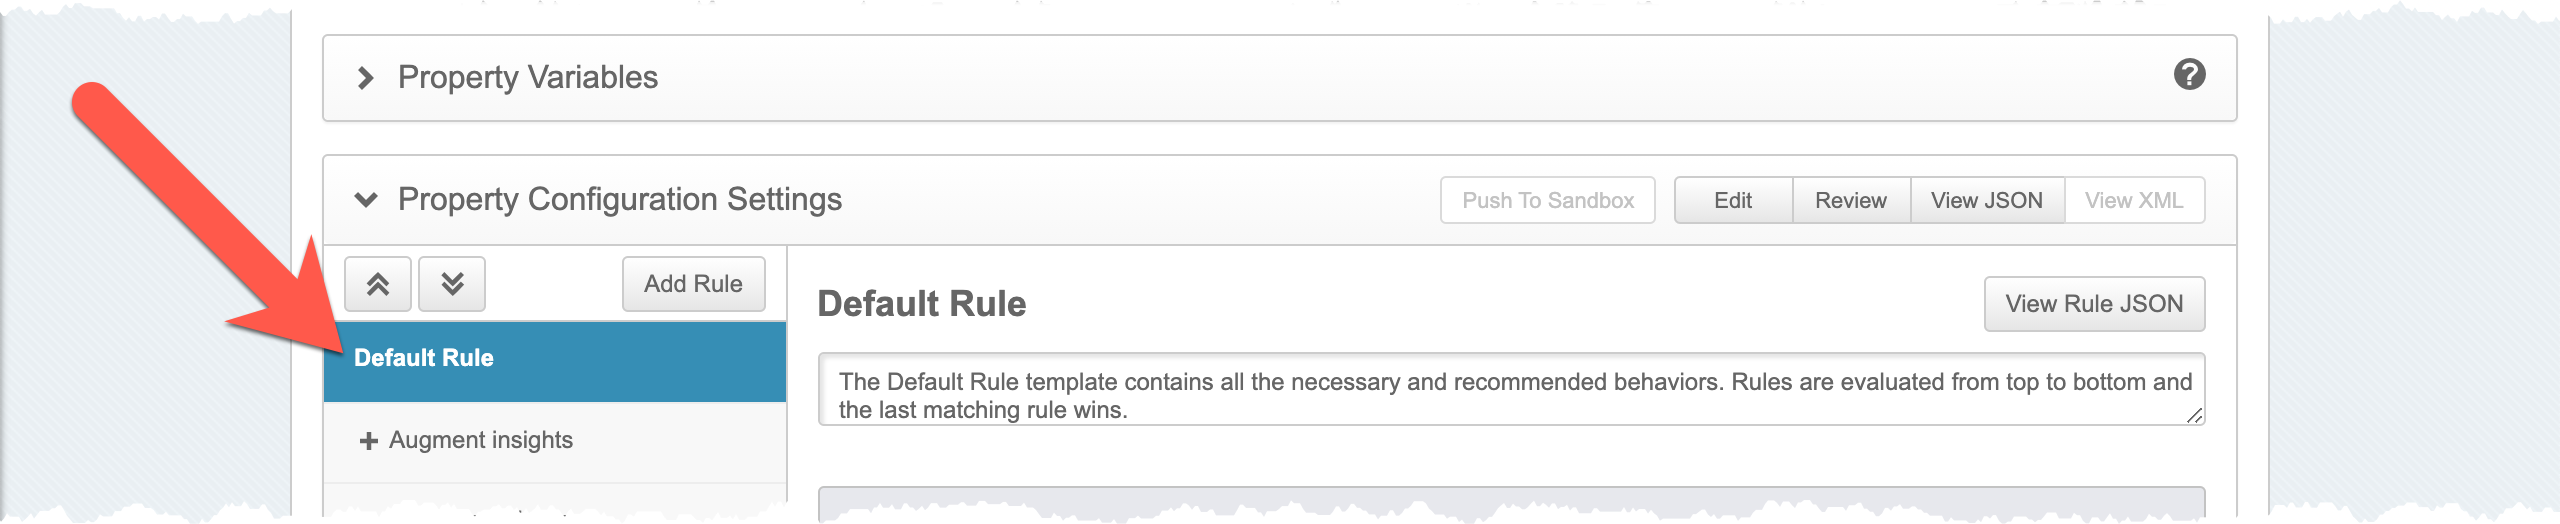
In the section Behaviors, find the behavior Origin Server.
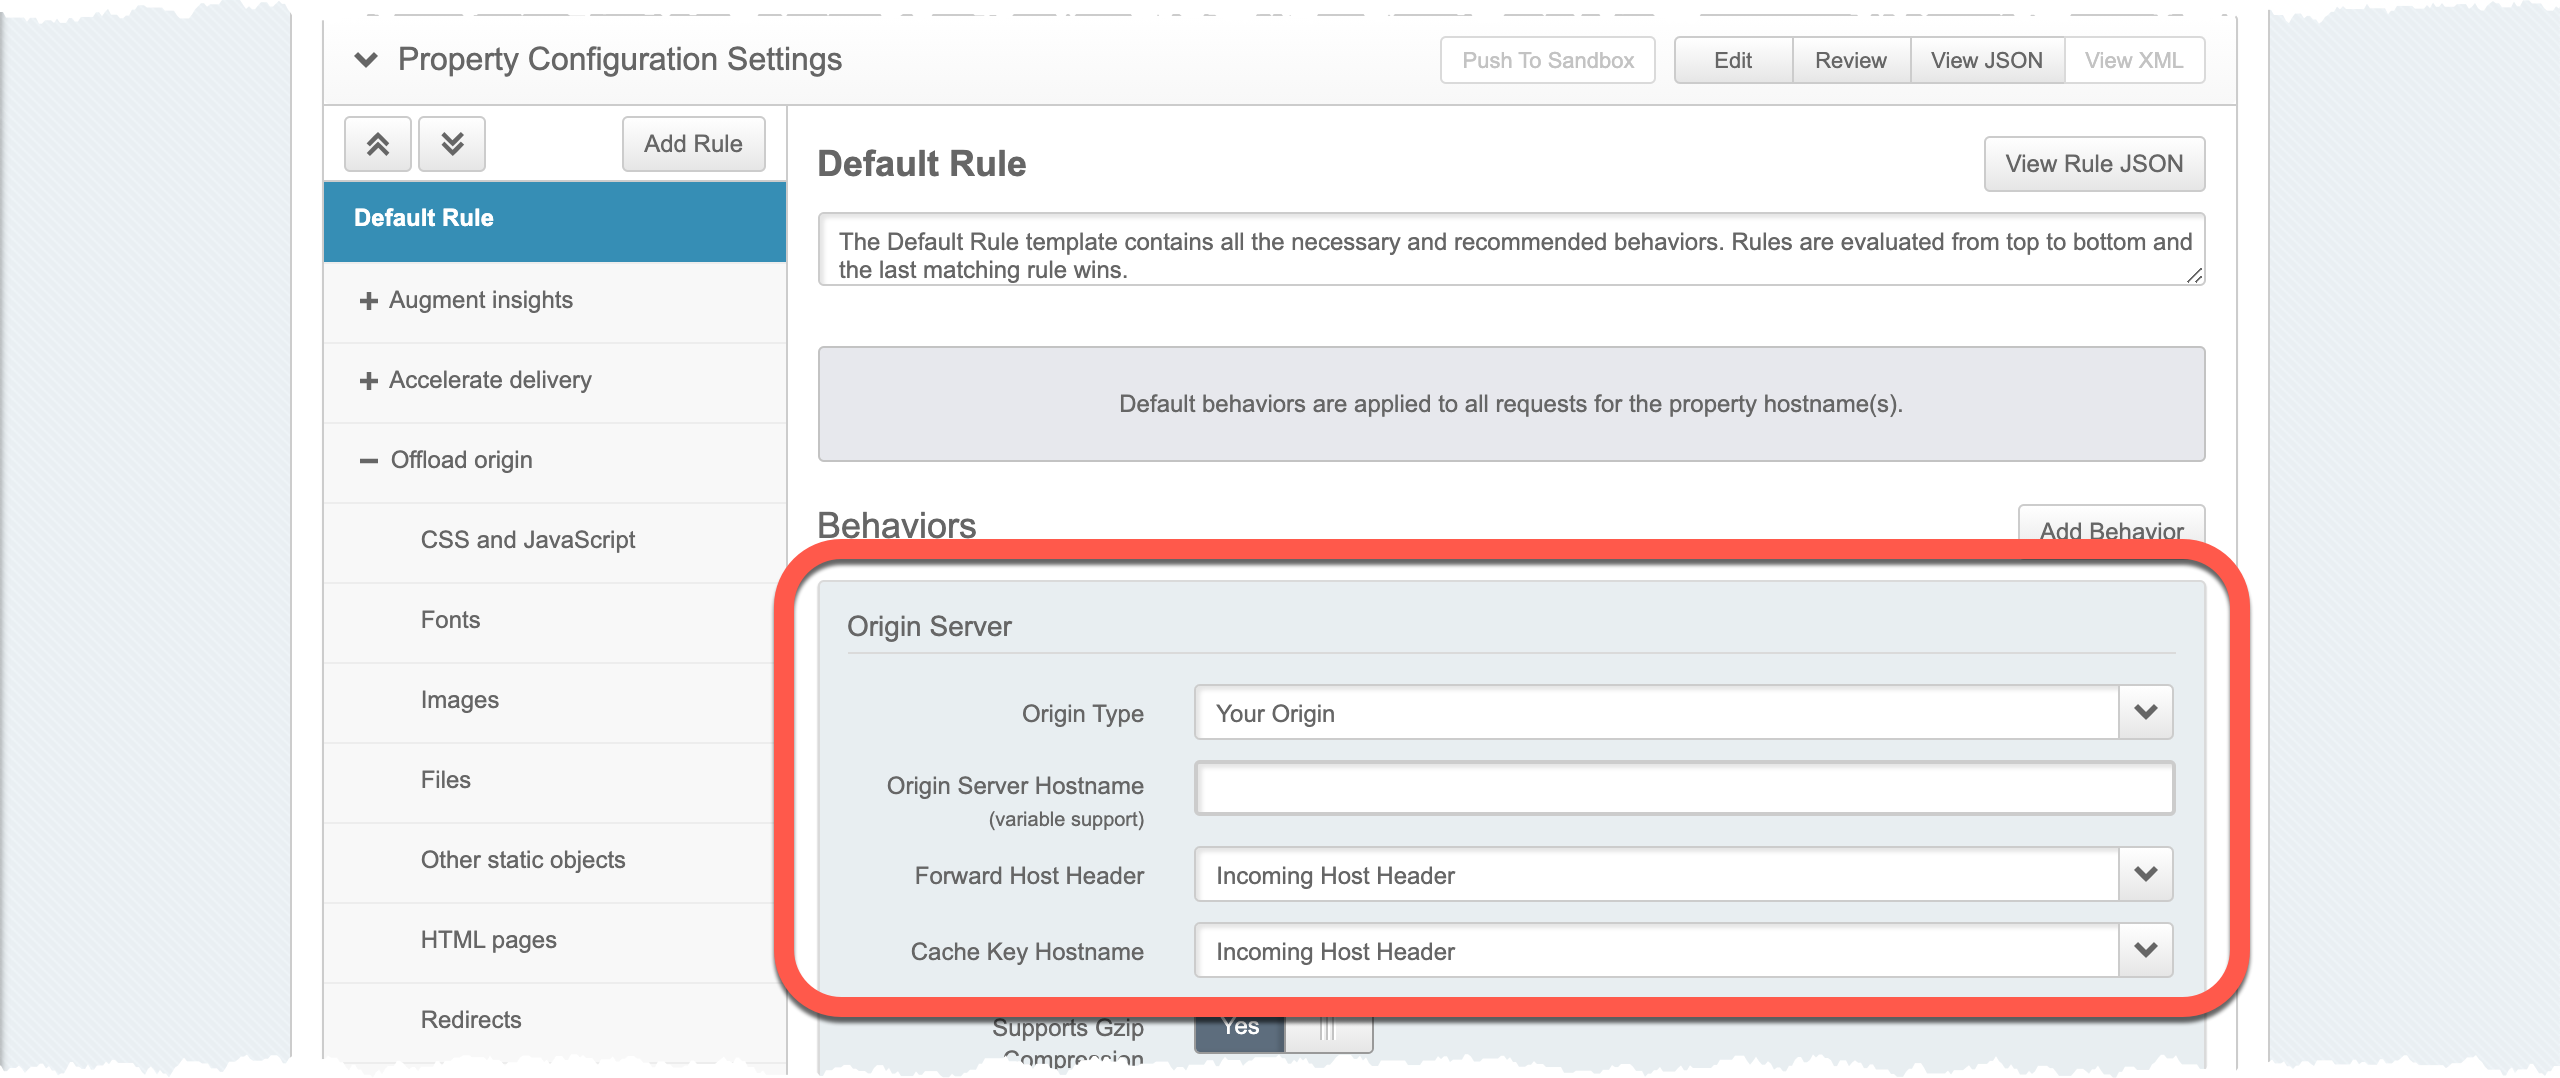
Enter the following values:
- Origin Type -
NetStorage - NetStorage Account - Select the storage account you created in the earlier section.

- Origin Type -
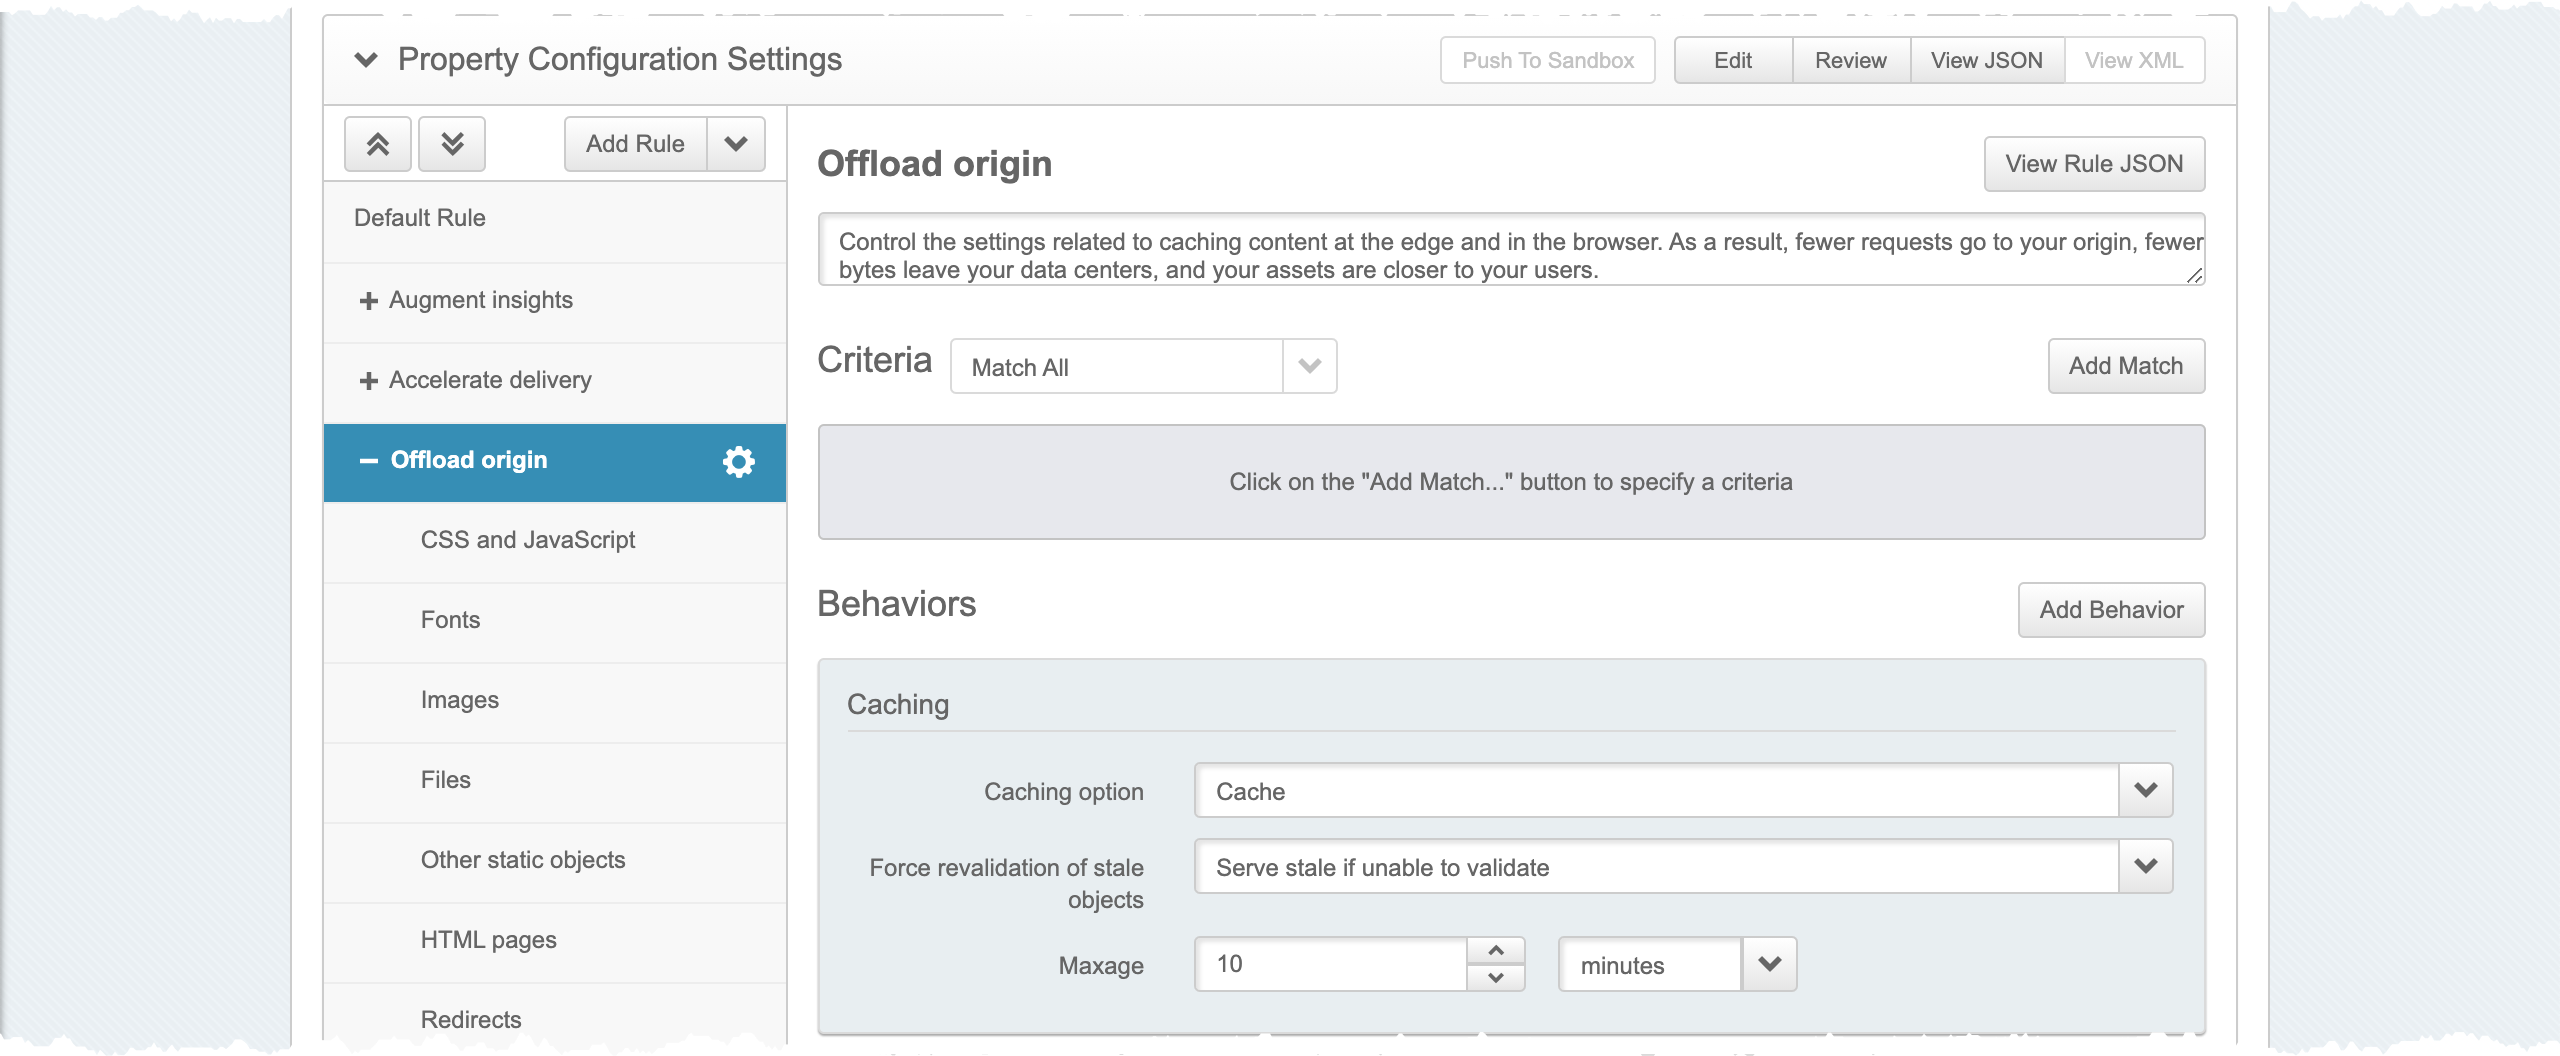
Under Default Rule, navigate to Offload origin.
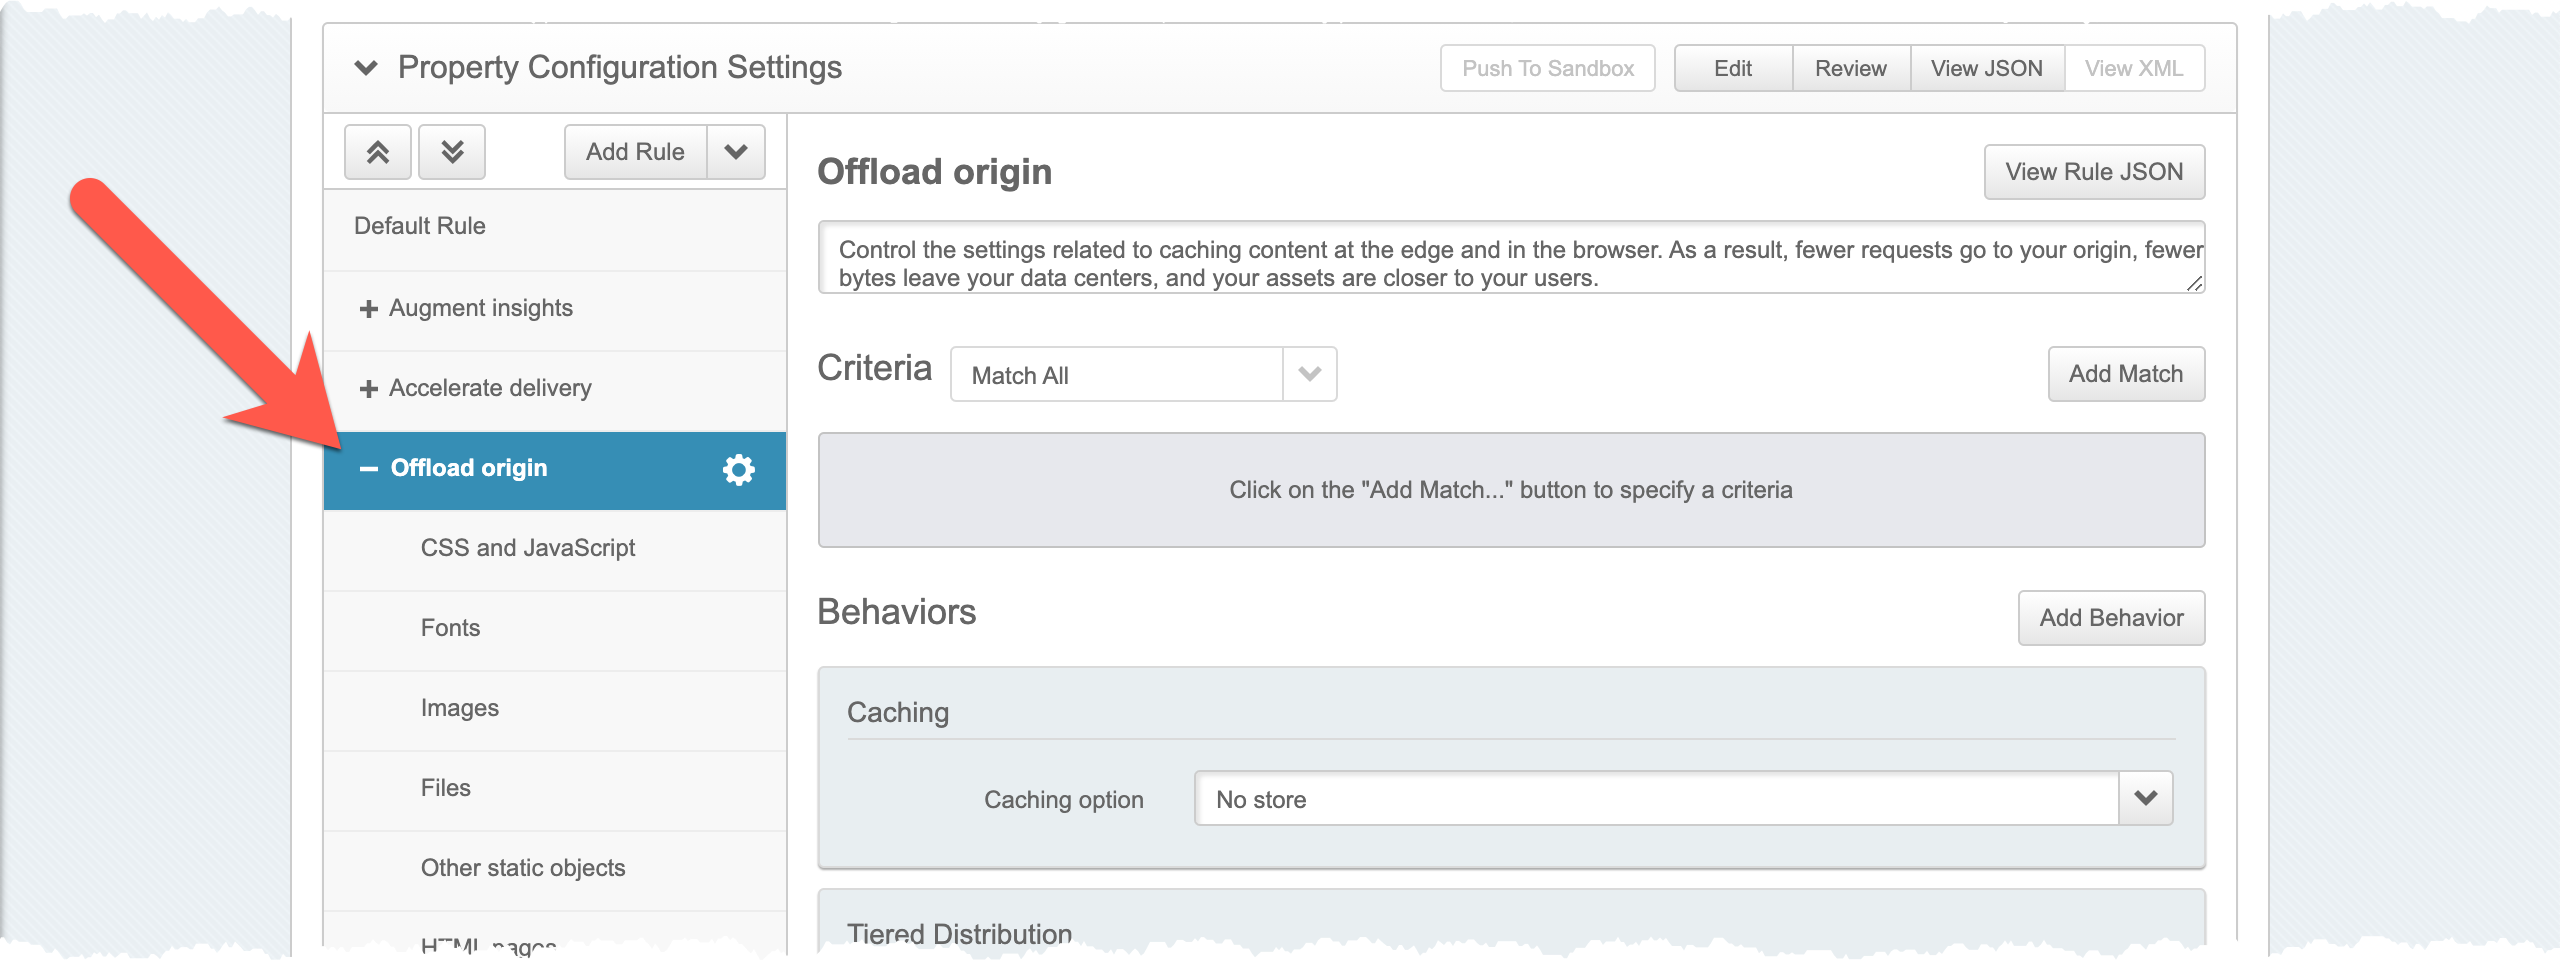
In the section Behaviors, find the behavior Caching.

Set the following values:
- Caching option -
Cache - Maxage -
10 minutes
- Caching option -
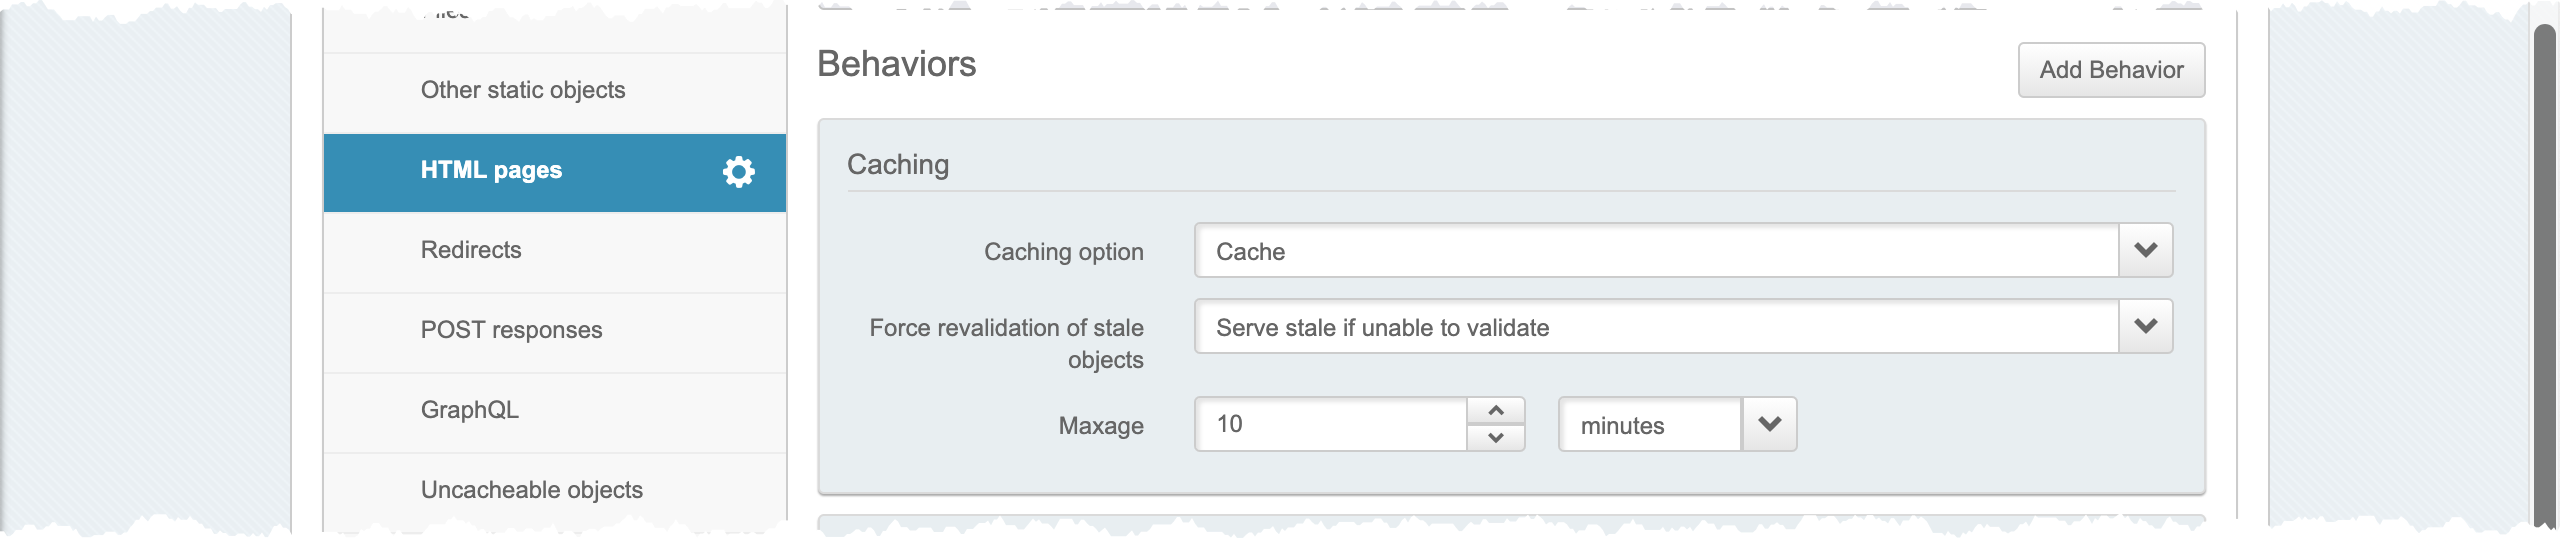
Under Default Rule, navigate to Offload origin > HTML pages.
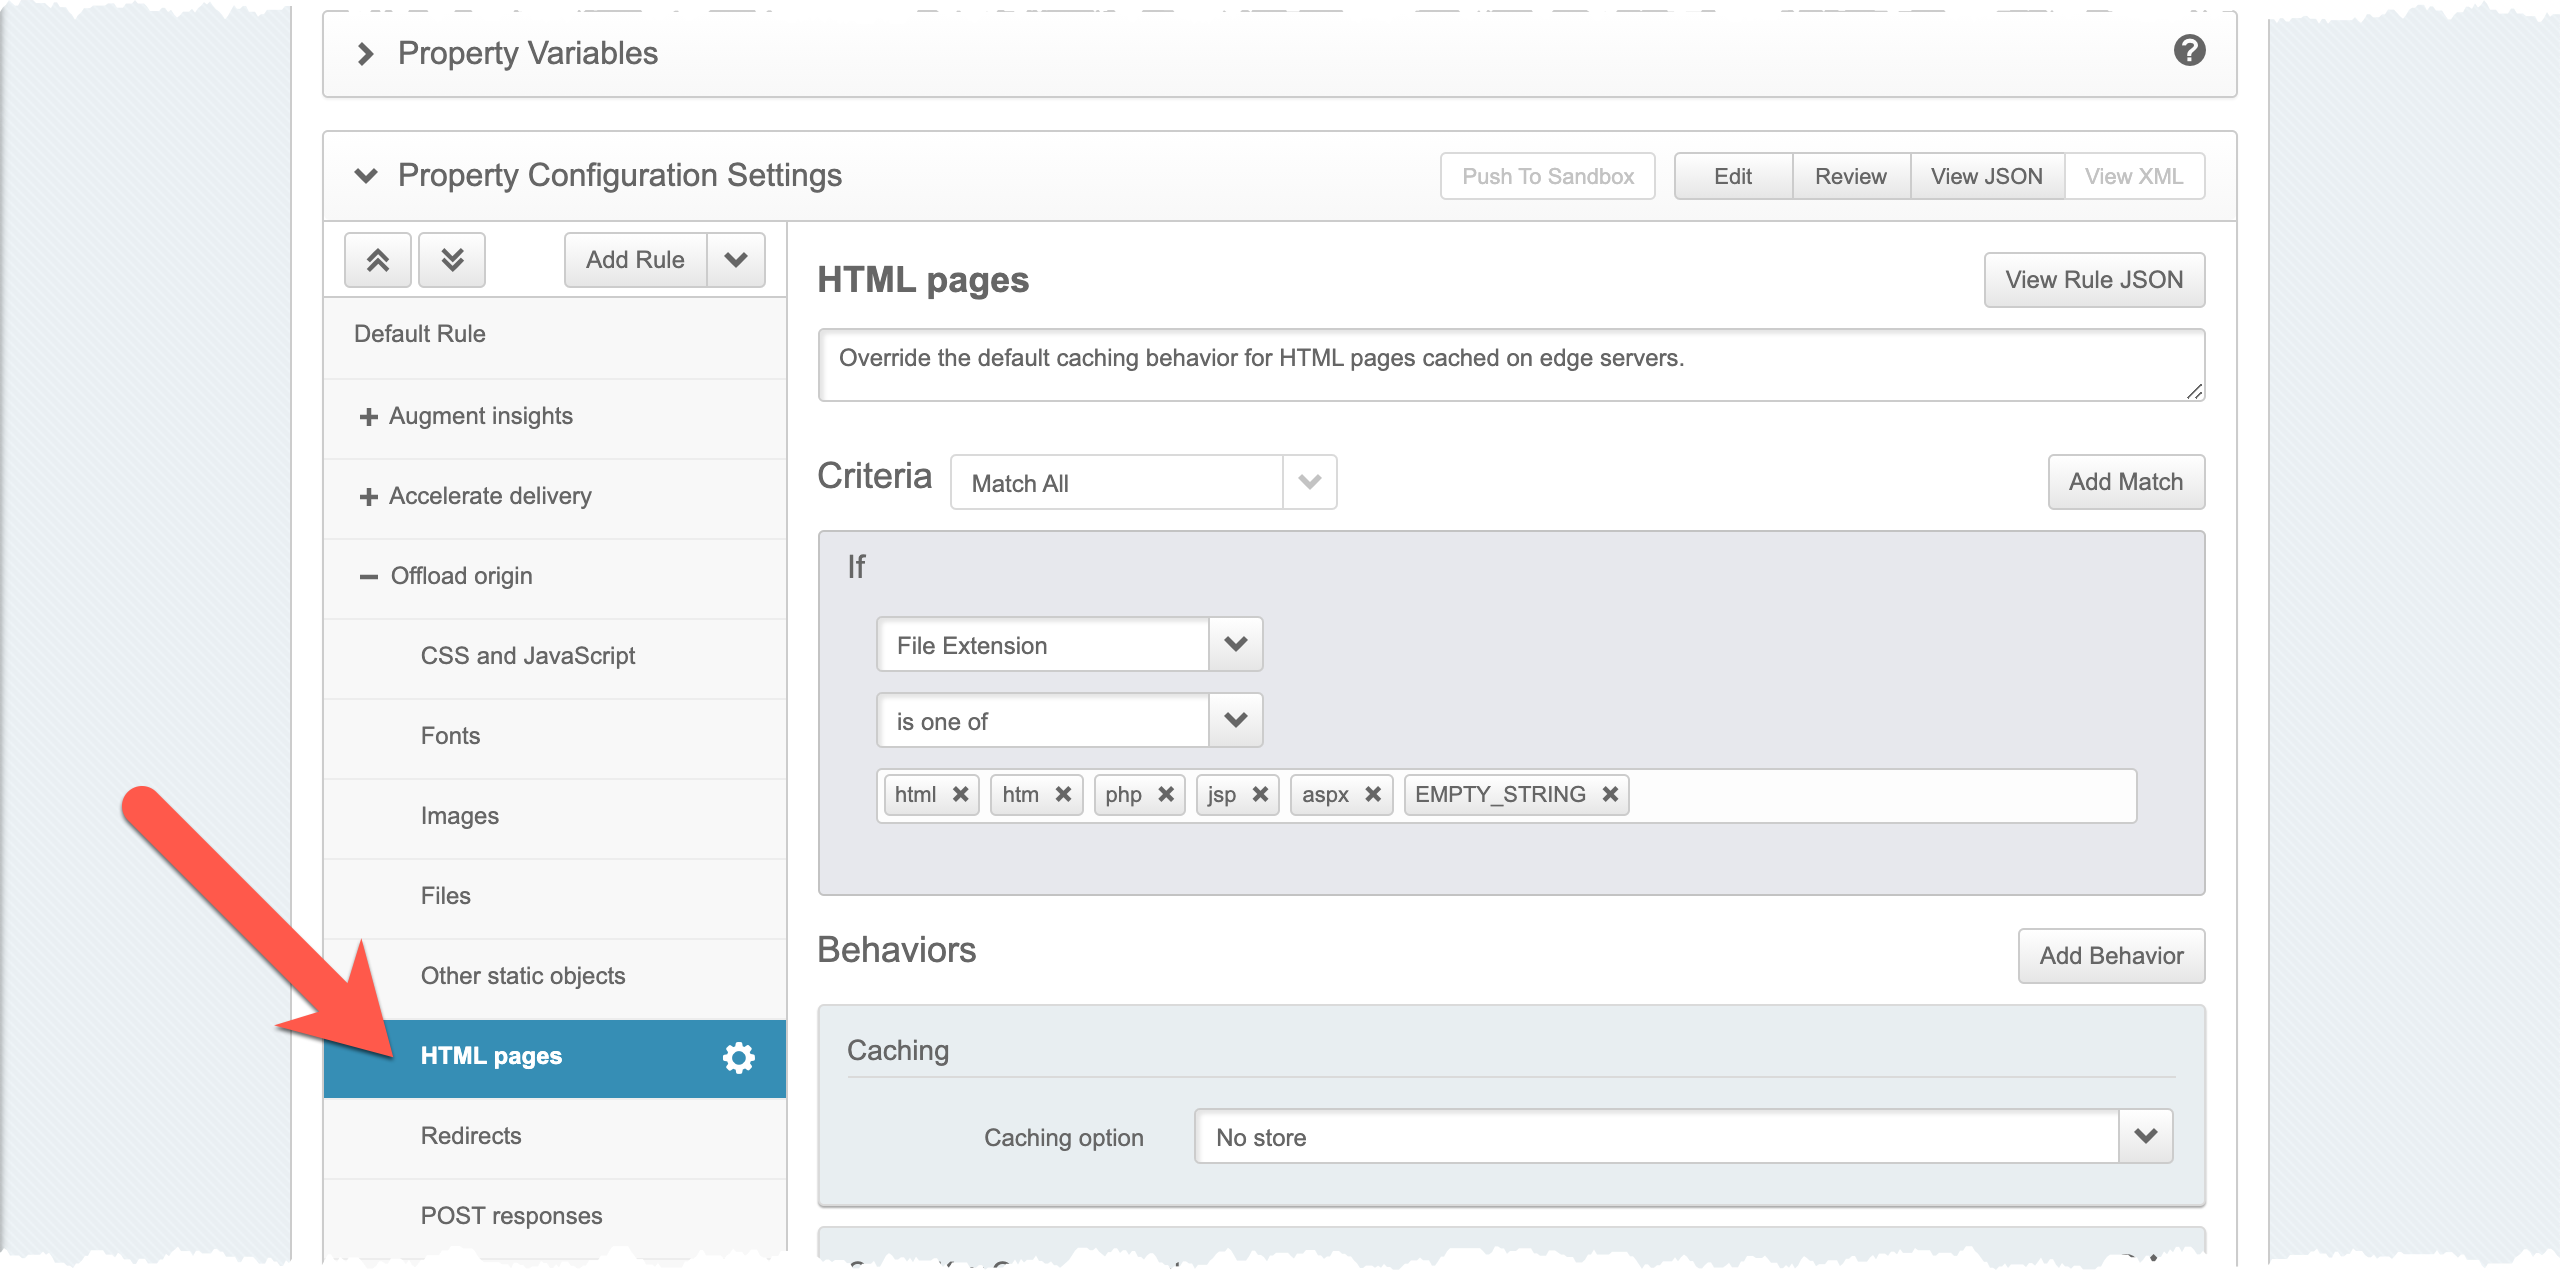
In the section Behaviors, find the behavior Caching.

Set the following values:
- Caching option -
Cache - Maxage -
10 minutes
- Caching option -
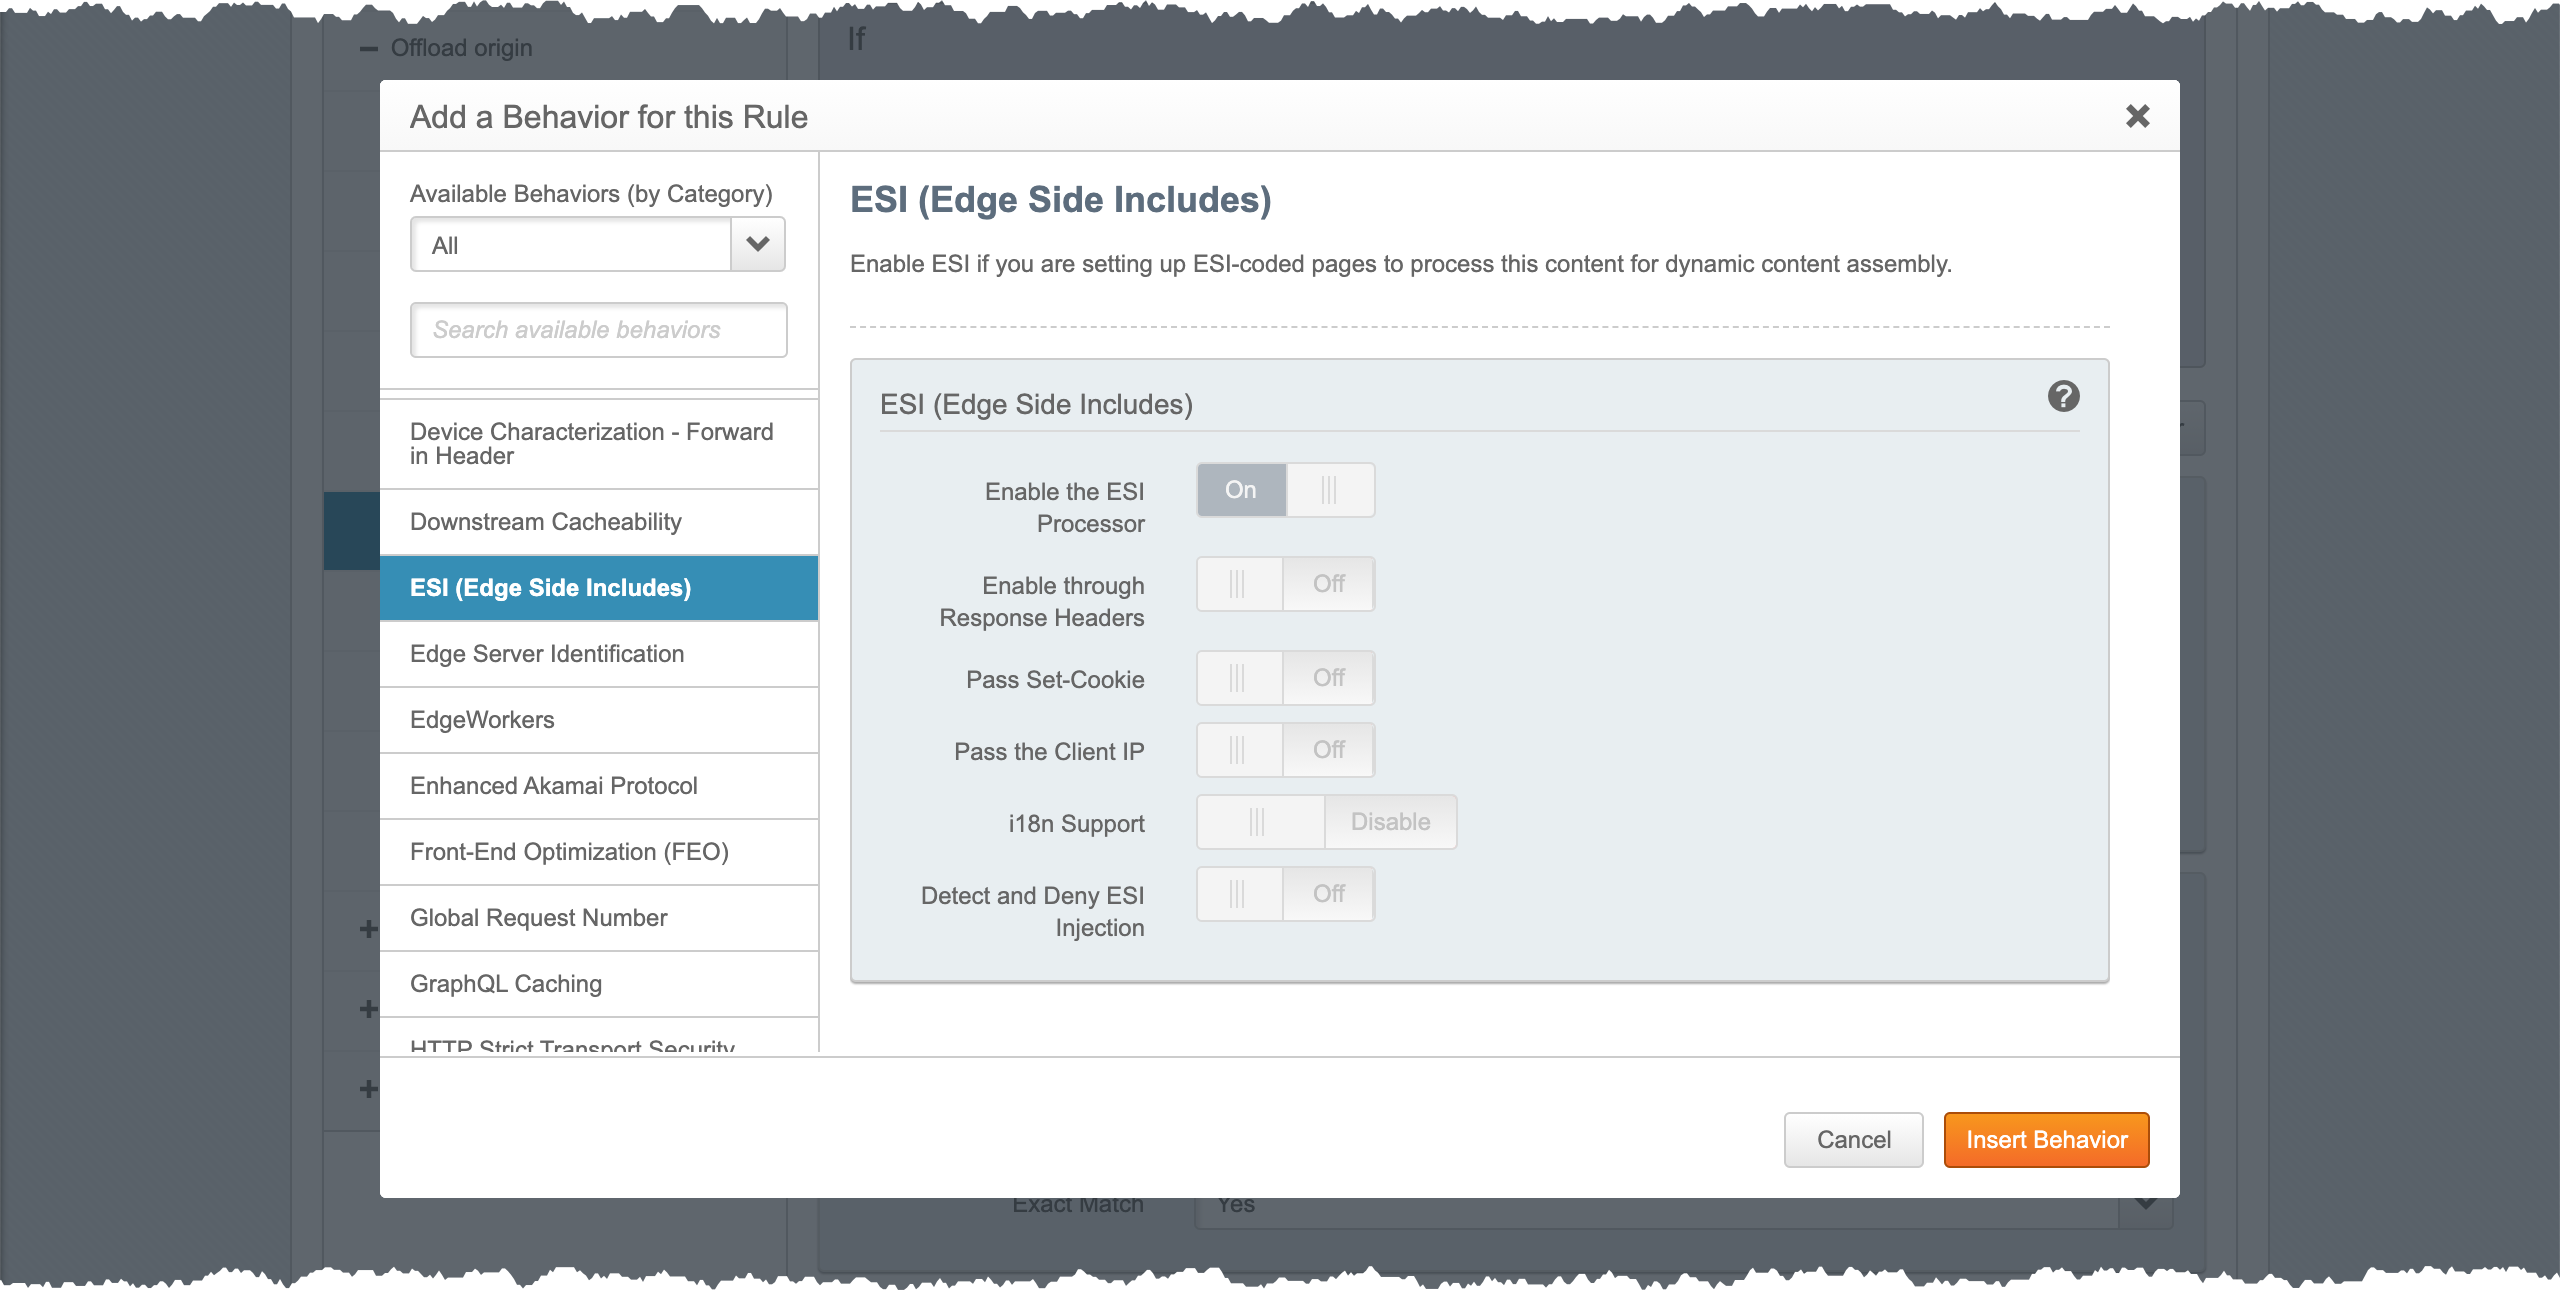
Click Add Behavior.
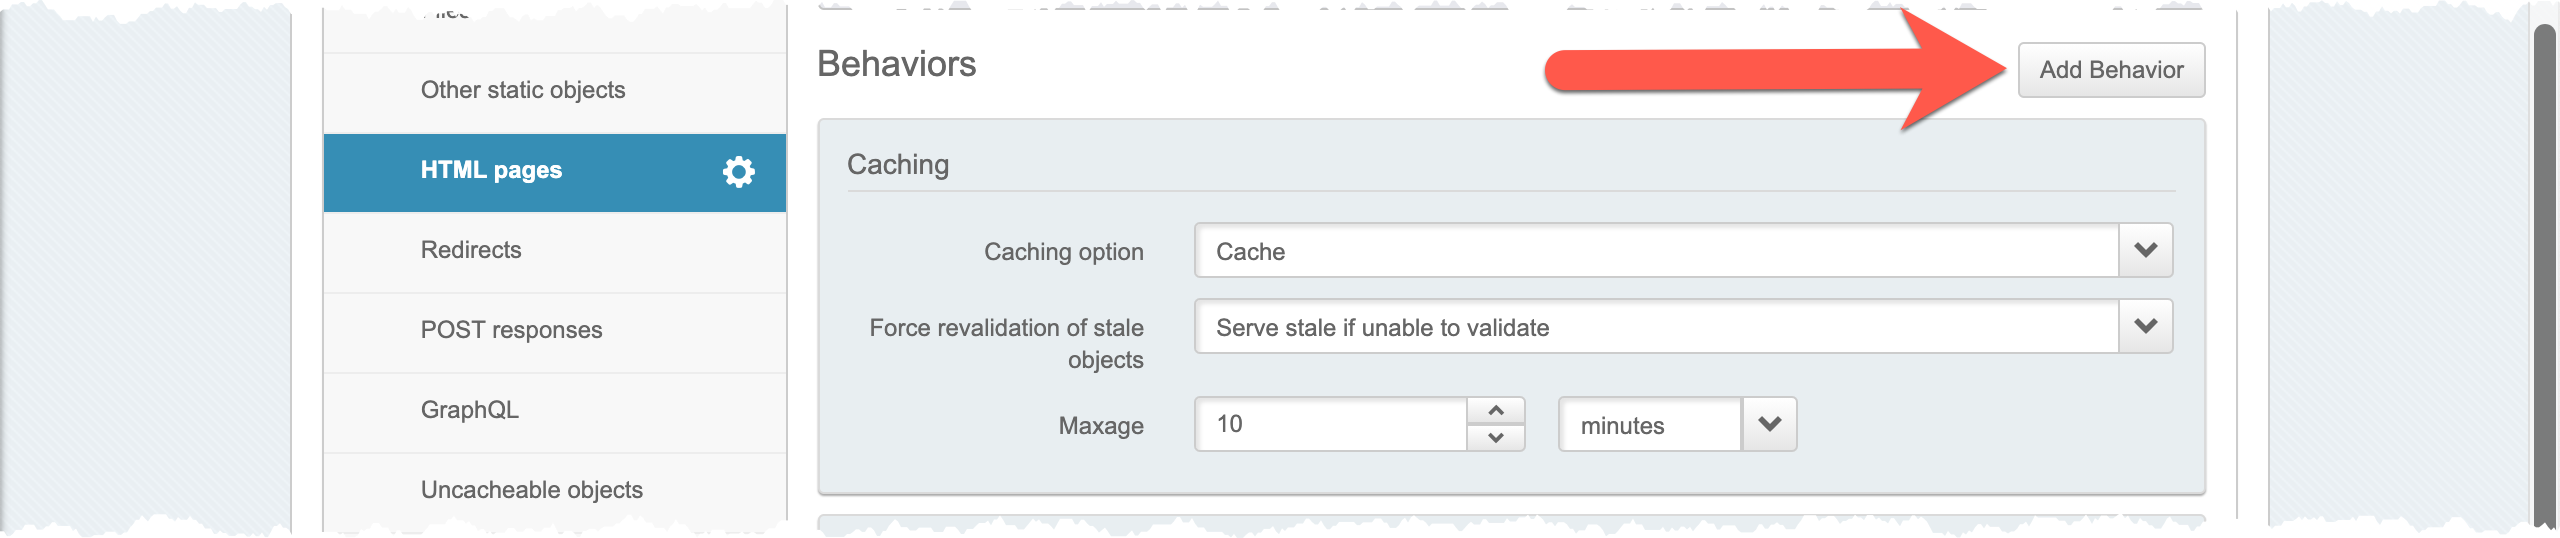
Select ESI (Edge Side Includes) and click Insert Behavior.
Click Add Behavior.
Select Downstream Cacheability and click Insert Behavior.

Scroll down to the behavior.
For the value Caching Option, select Don't allow caching (bust).
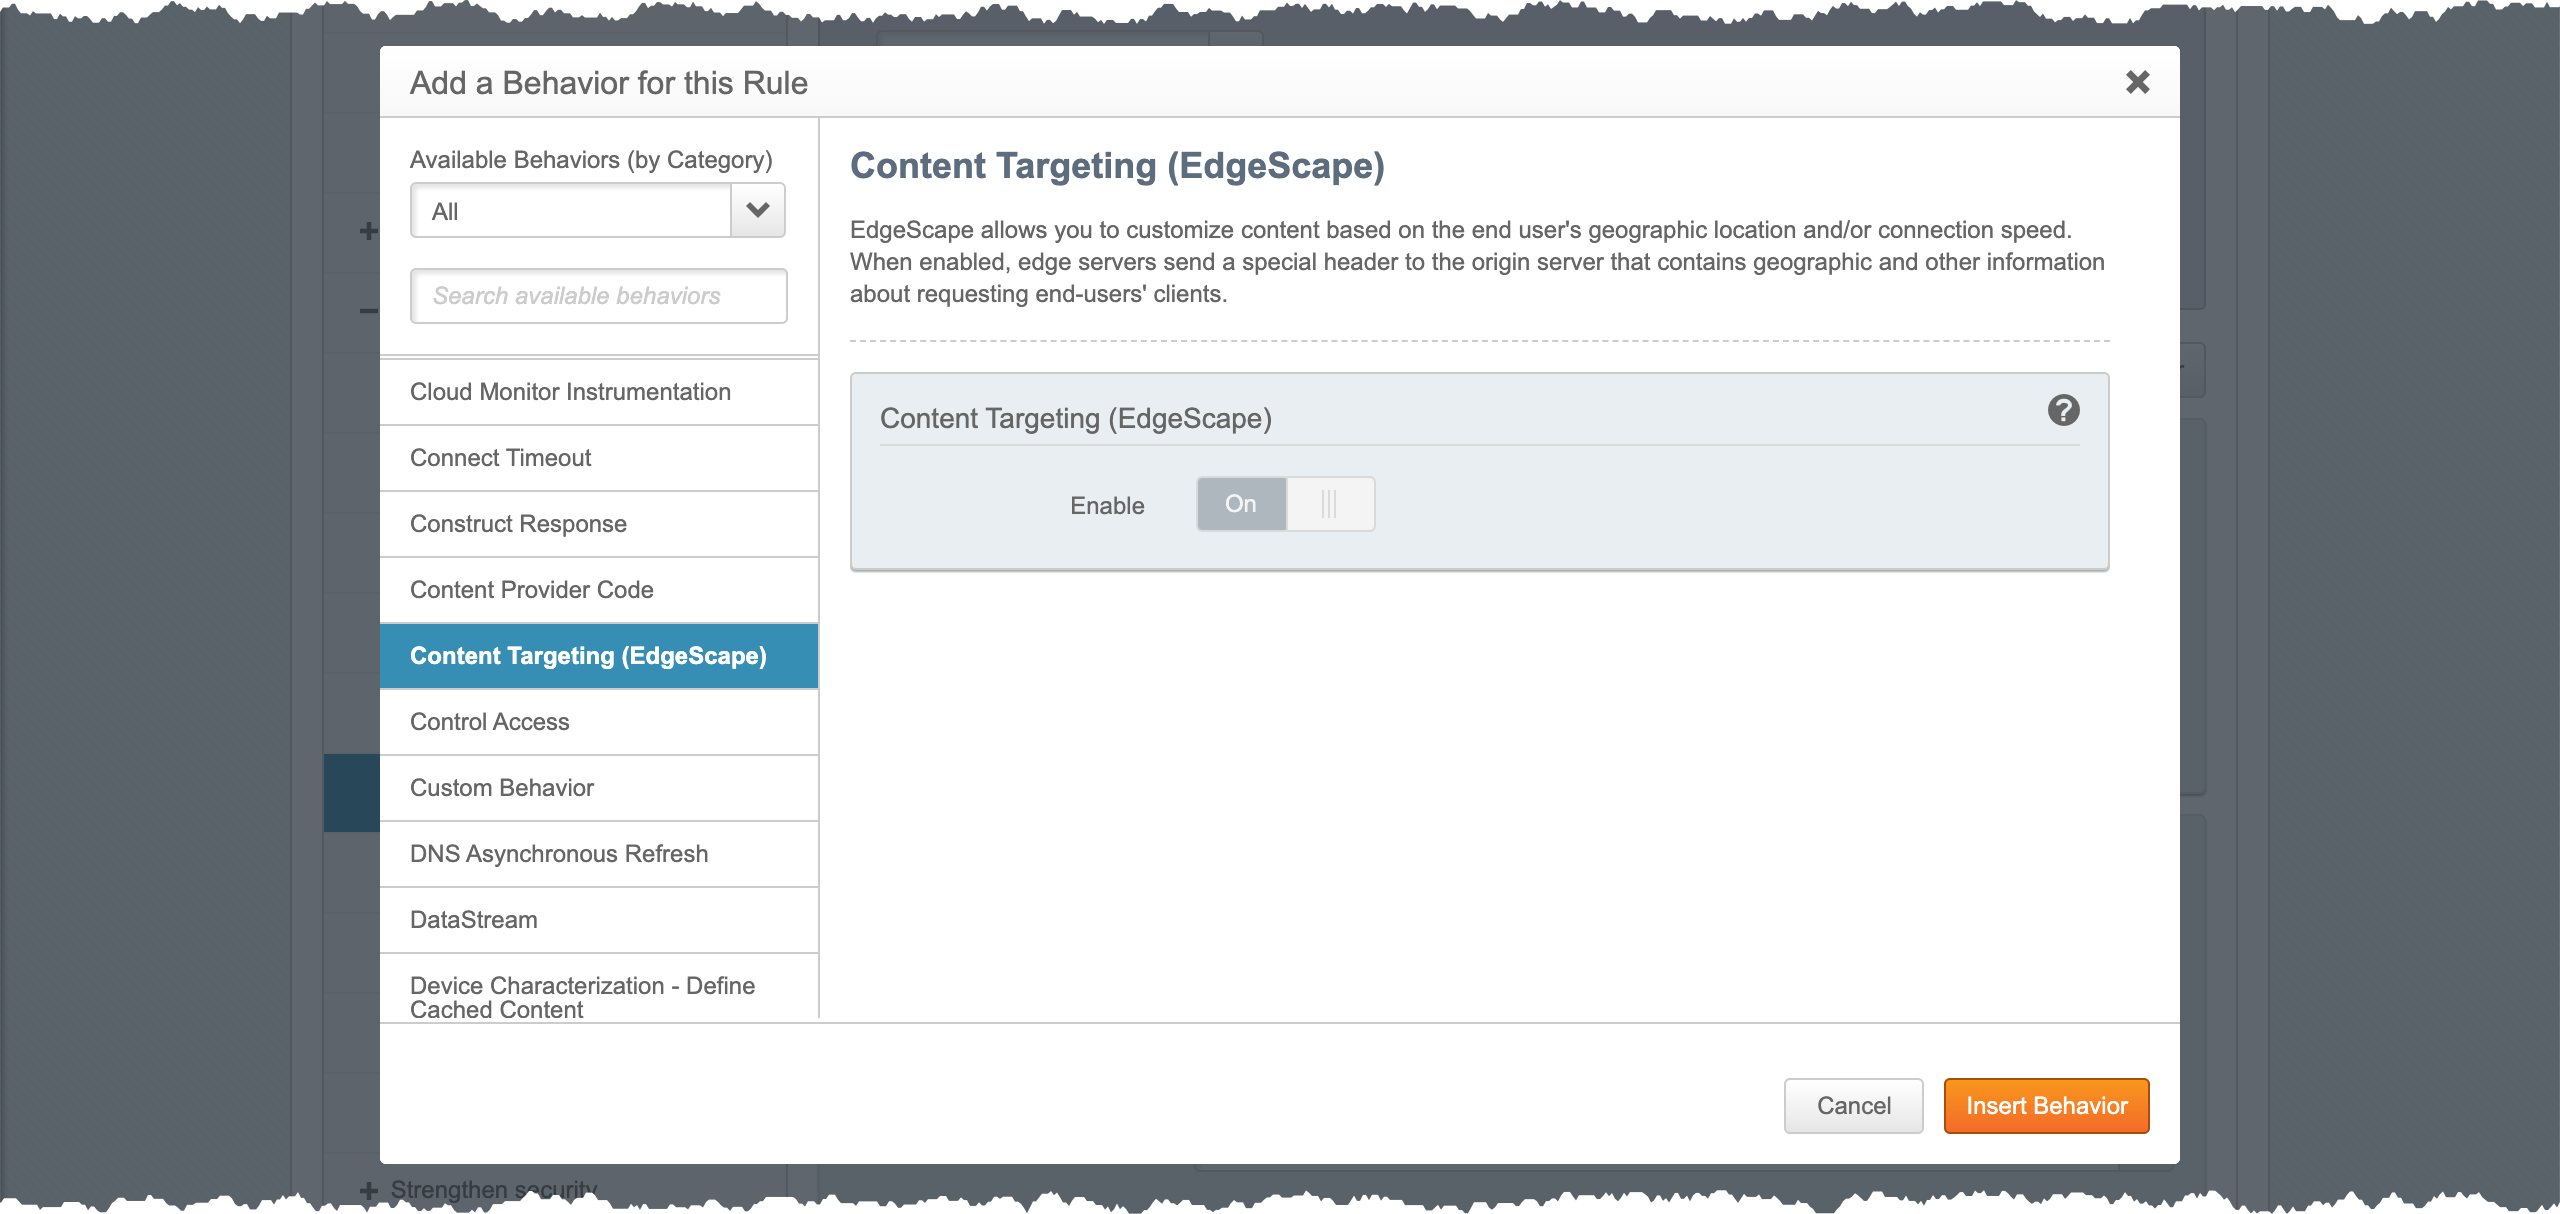
(optional) If you are personalizing based on geographic location, click Insert Behavior.
(optional, continued) Select Content Targeting (EdgeScape) and click Insert Behavior.
(optional) If you are personalizing based on device characterization, click Insert Behavior.
(optional, continued) Select Device Characterization - Forward in Header and click Insert Behavior.

(optional, continued) Scroll down to the behavior.

(optional, continued) Select the following characterizations:
brand_namedevice_osdevice_os_versionis_mobileis_tabletmarketing_namemobile_browsermobile_browser_versionmodel_name

Under Default Rule, navigate to Augment insights > Traffic reporting.
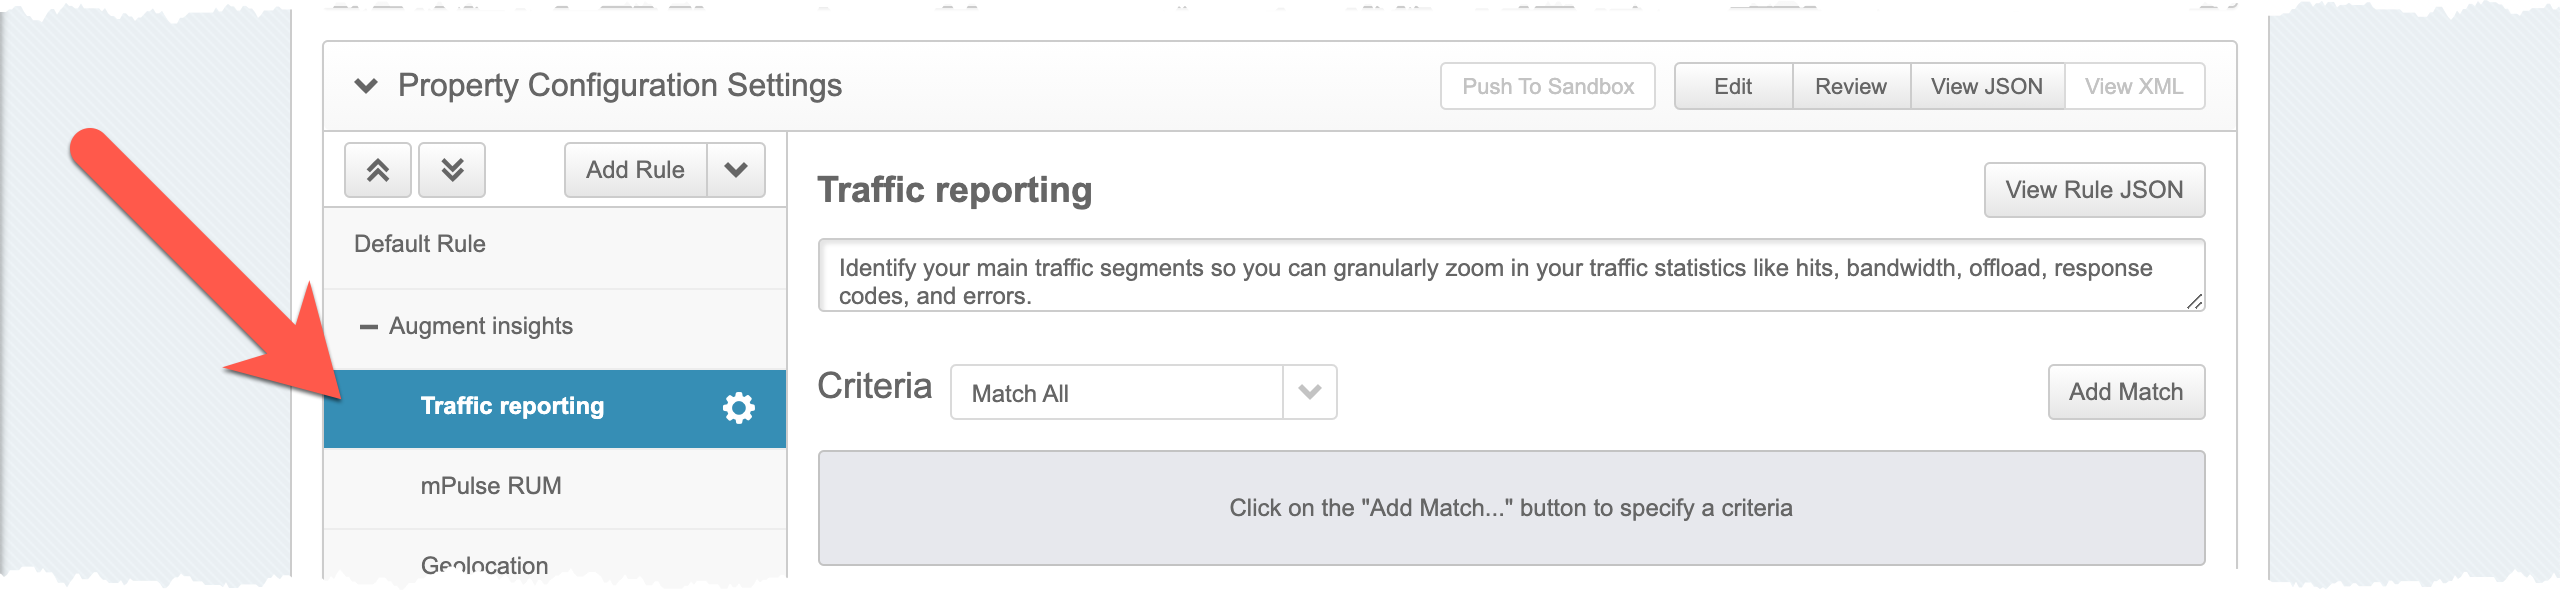
In the section Behaviors, find the behavior Content Provider Code.
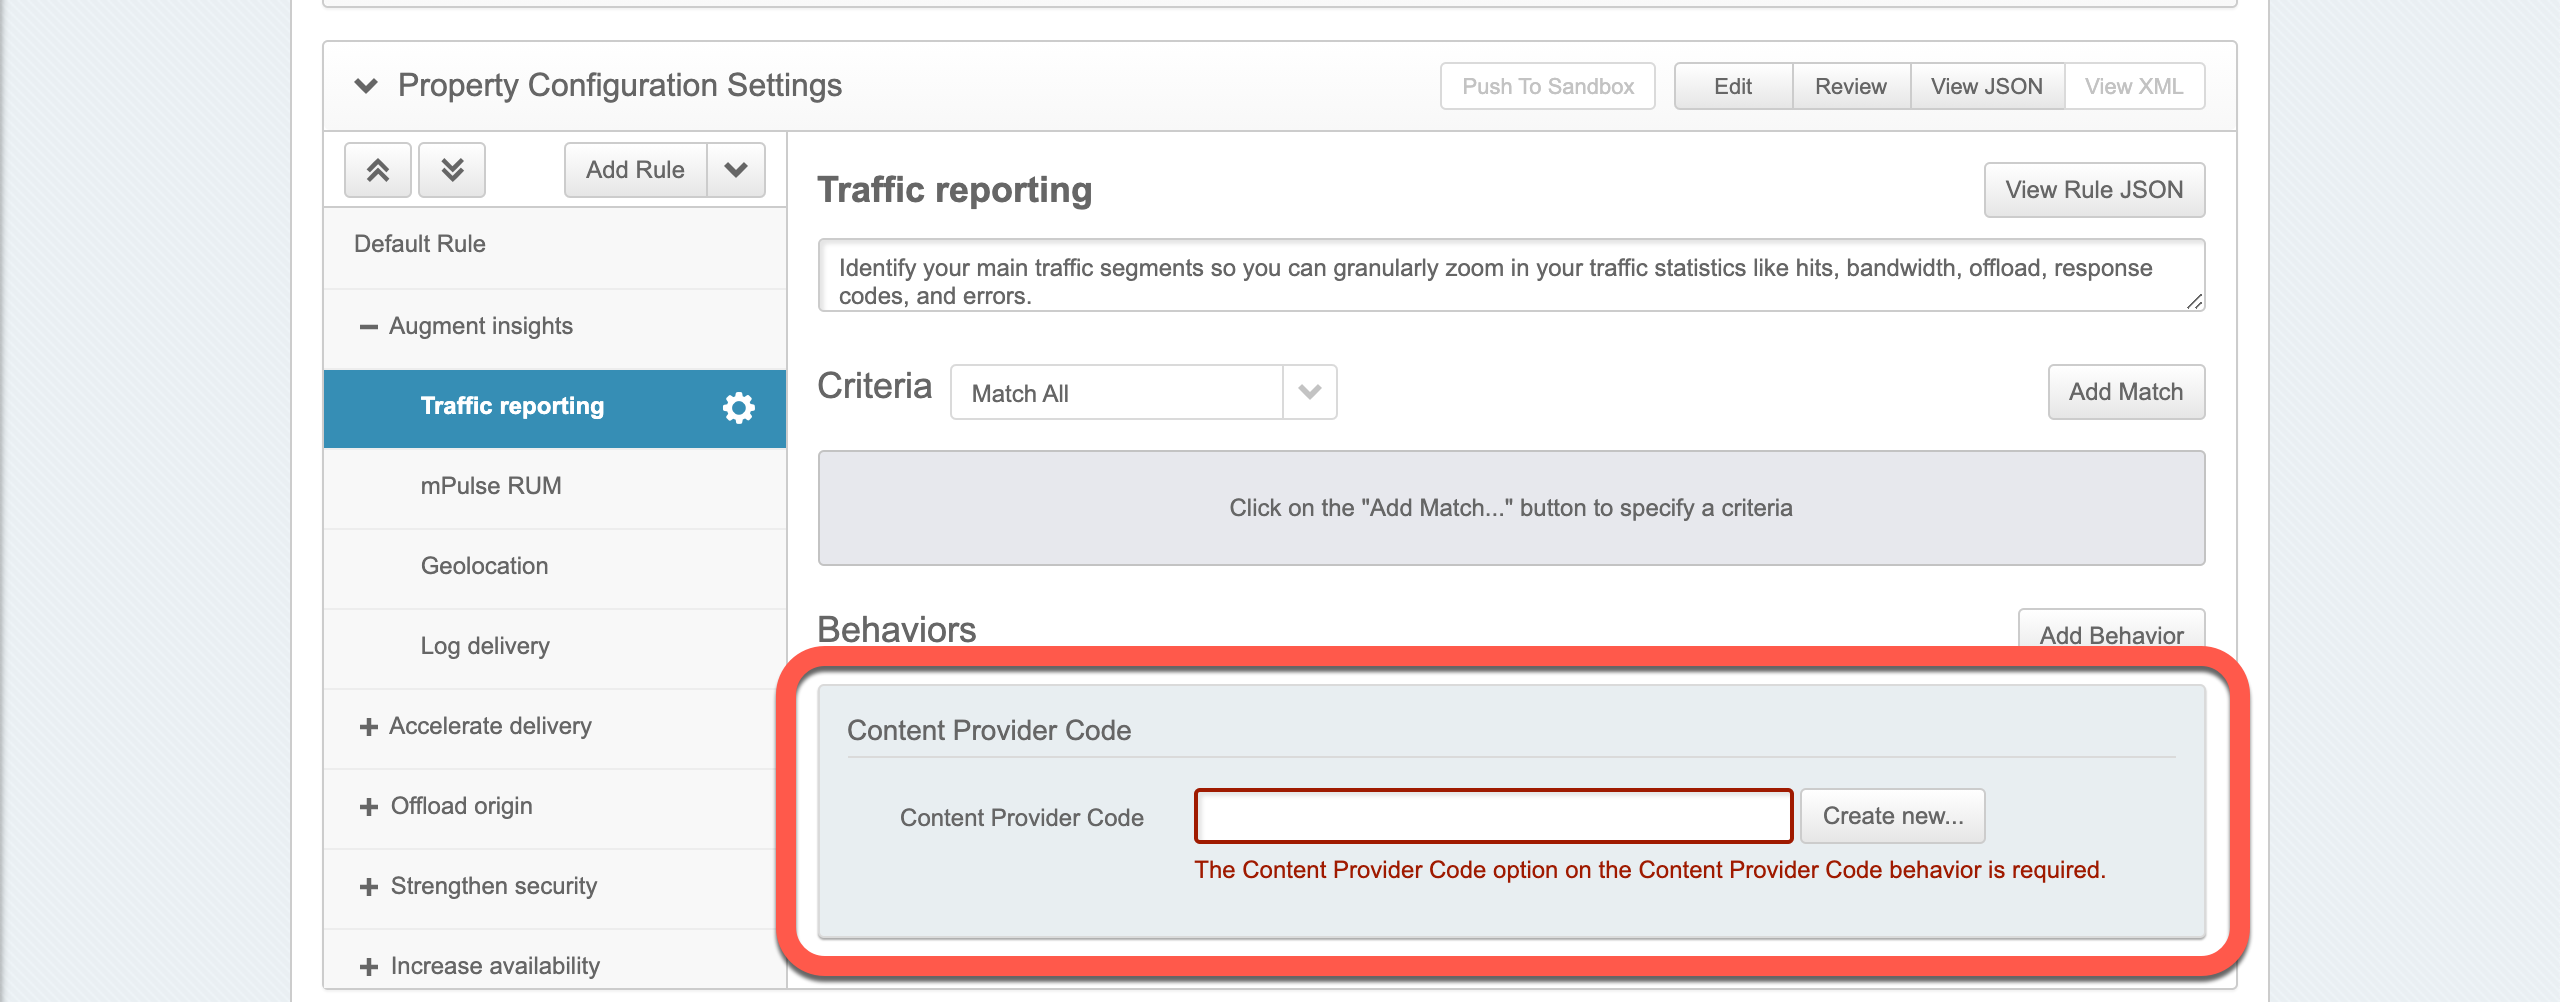
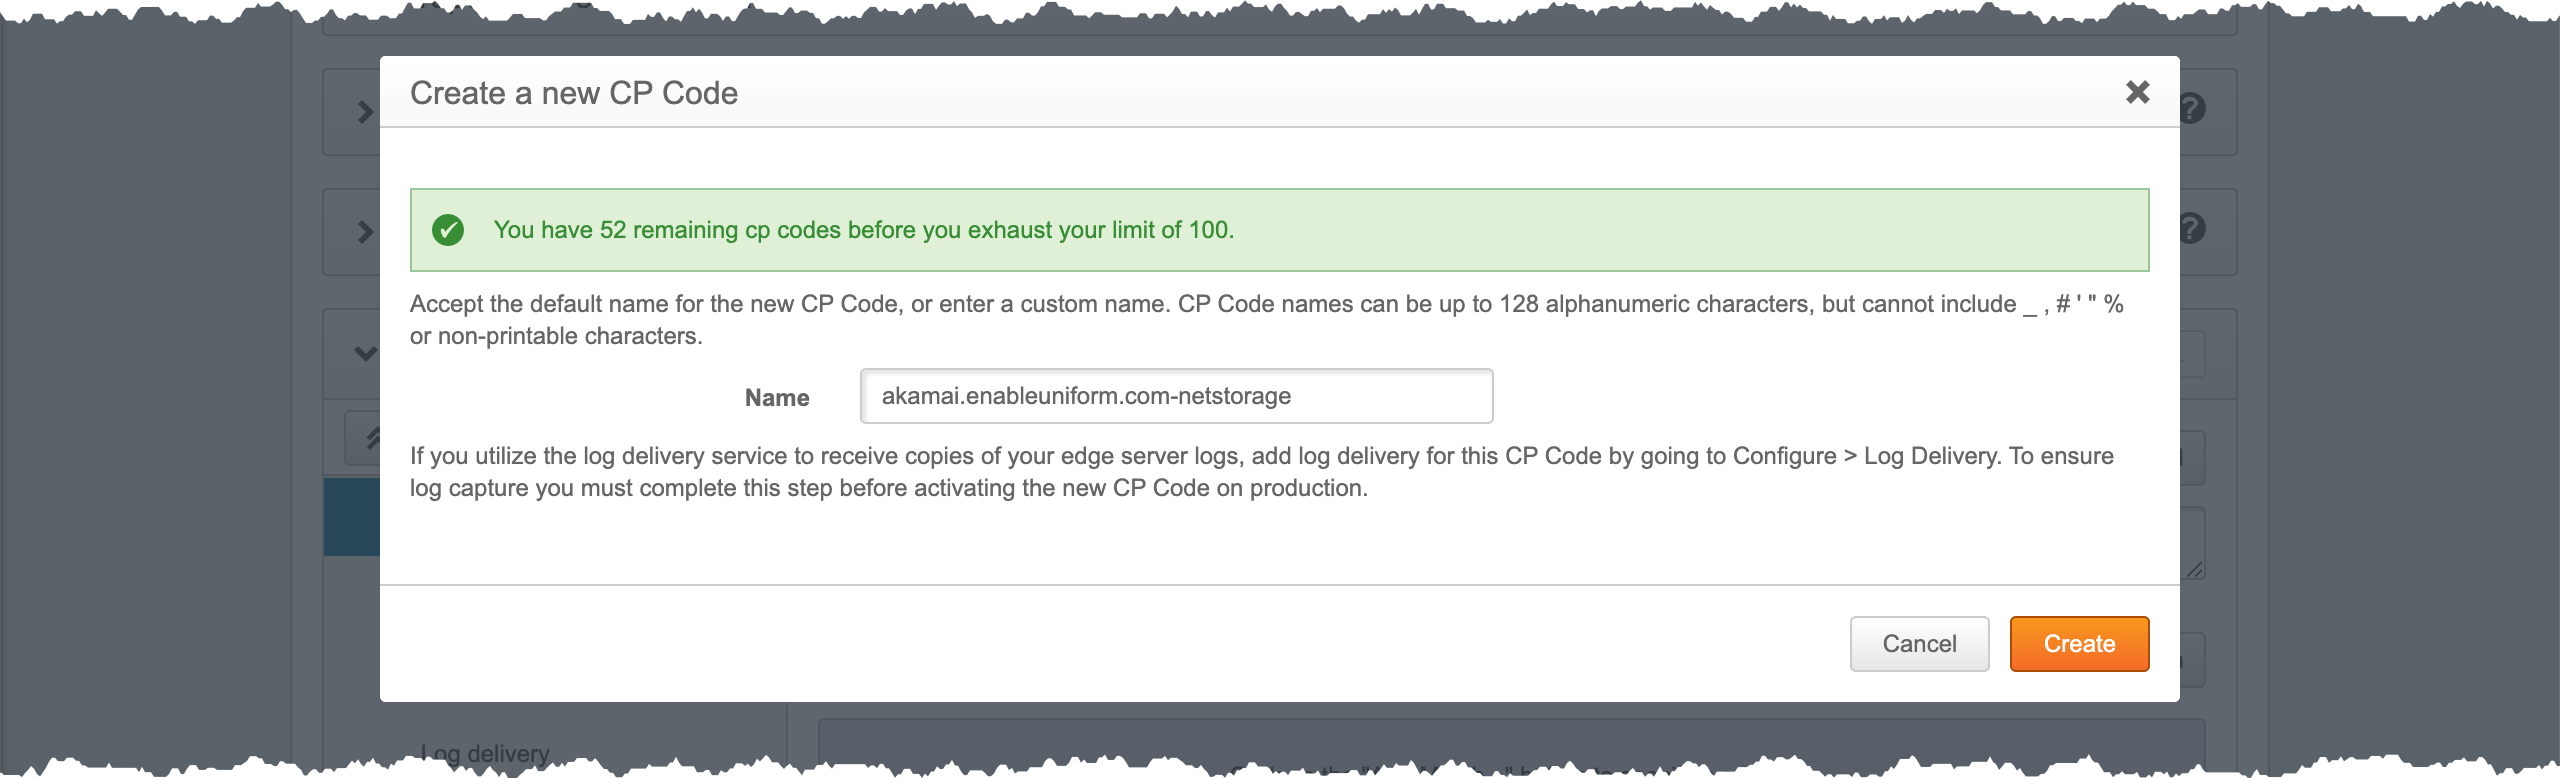
Click Create new....
Enter a name for the CP code and click Create.
Scroll to the top of the page and click Save.
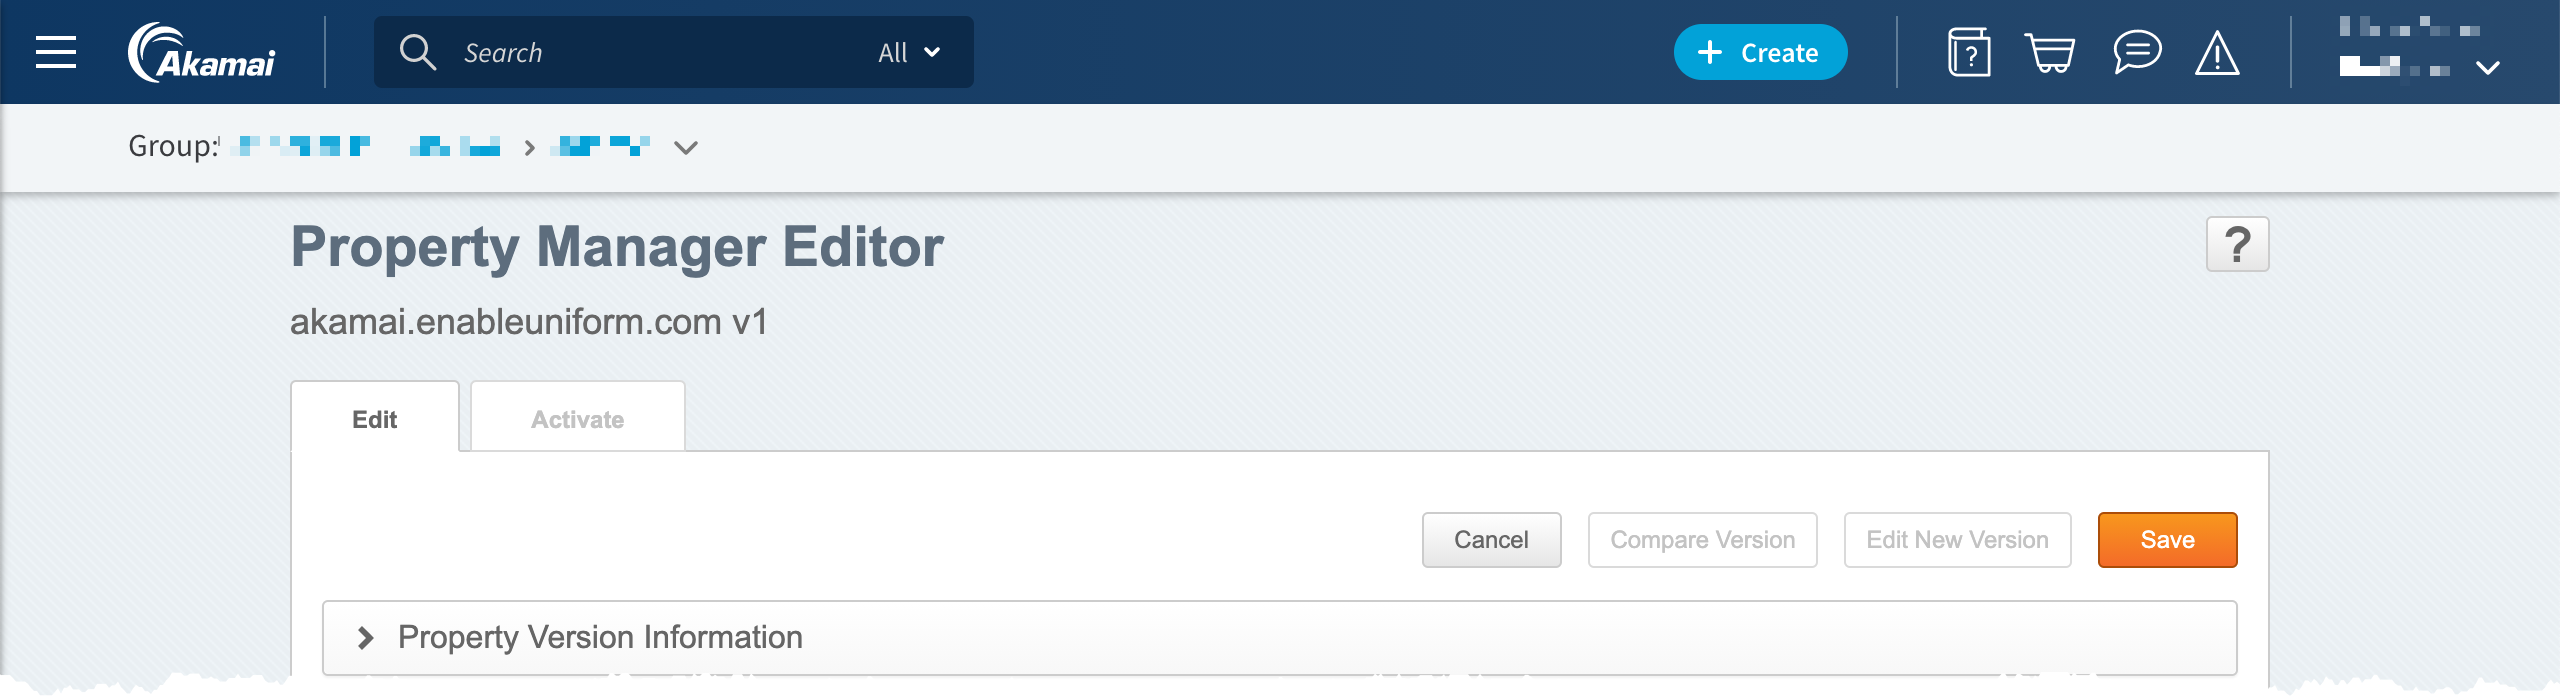
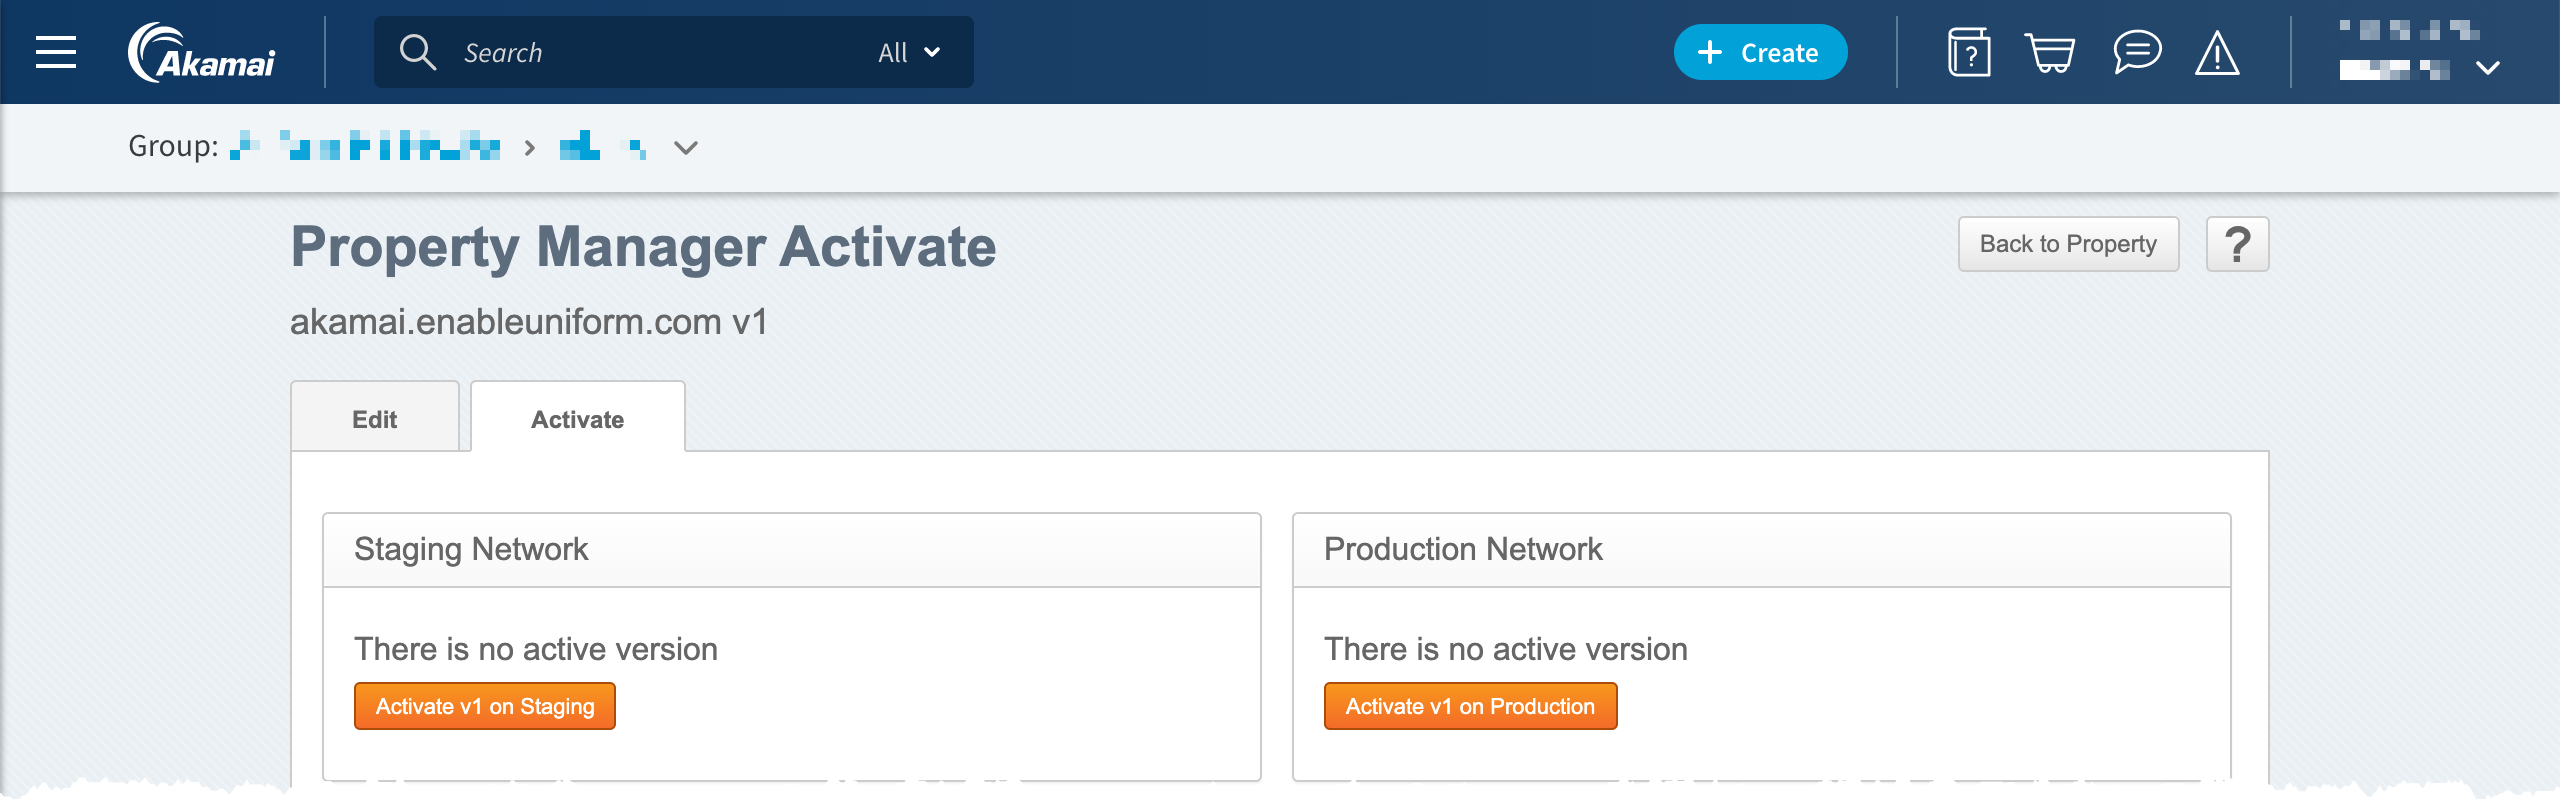
Click the tab Activate.
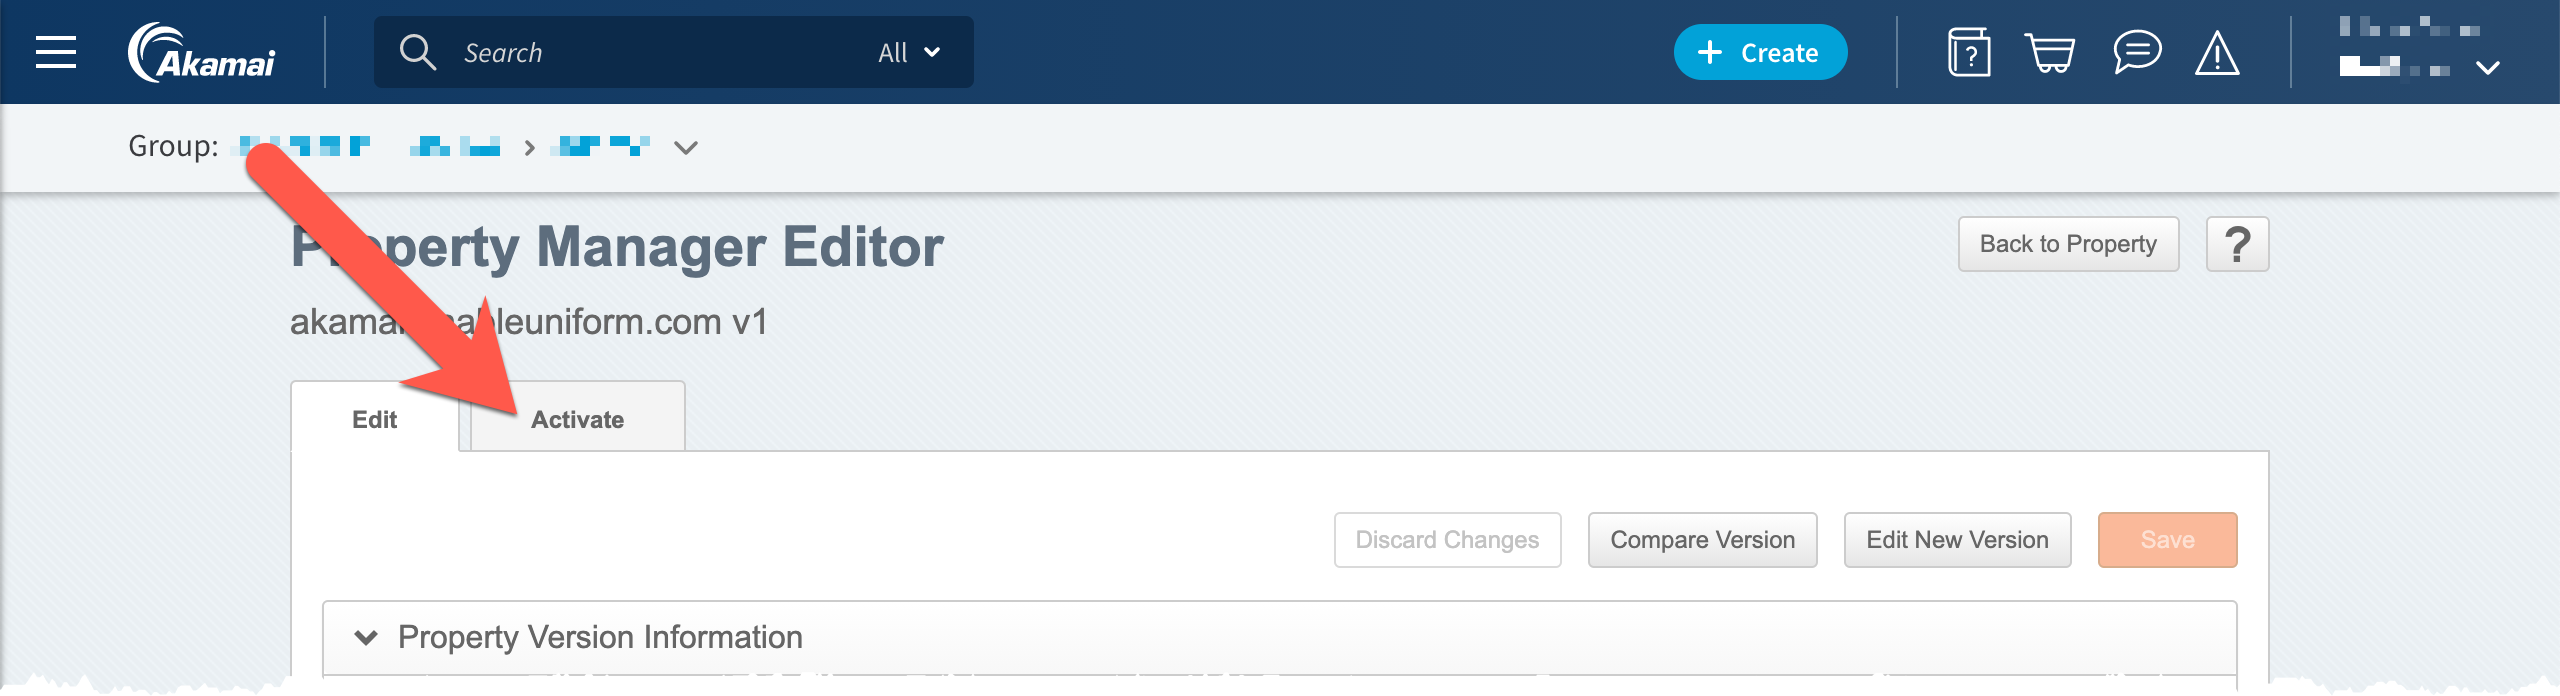
Click Activate v1 on Production.
Tick the checkbox at the top of the page.
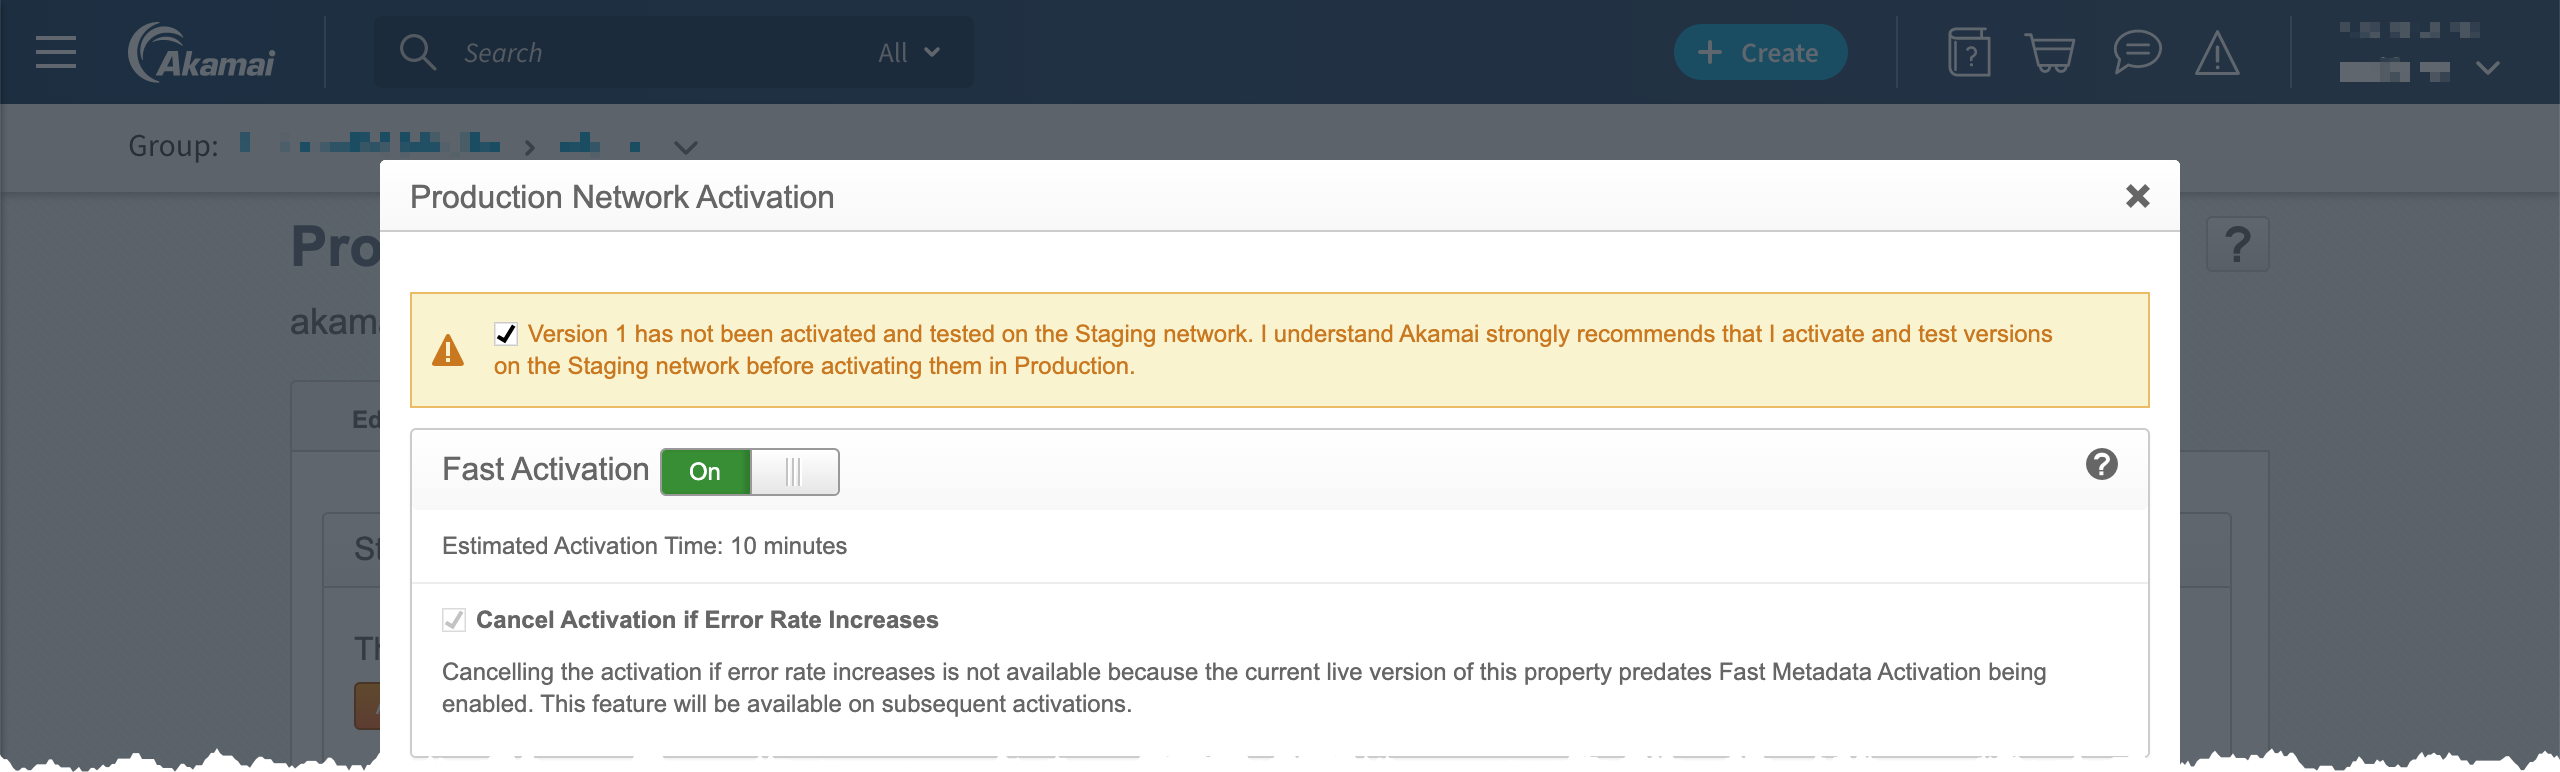
Scroll to the bottom of the page and click Activating v1 on Production.
Install Uniform Upload Tool (optional)#
The Uniform deployment process uploads files to Akamai NetStorage. By default, Uniform uses the Akamai NetStorage API to do this. Uniform also provides an upload tool that offers improved performance. This is a tool that is triggered by the Uniform service during the deployment process.
important
Make sure you have a version of the Uniform Upload Tool that is compatible with the operating system on which the Uniform service is running. Windows and Linux are supported.
- Copy the upload tool to a folder on the machine that runs the Uniform service.
- Make sure the Uniform service has access rights to the upload tool.
Collect settings#
In order for the Uniform deployment process to be able to upload static files to Akamai NetStorage, several settings must be configured.
The section describes how to find these settings.
- In Akamai, in the left menu, navigate to ORIGIN SERVICES > NetStorage.
- In the left menu, click Storage Groups.
- Click the row for the storage group you created in the previous section.
- Note the value of HTTP Domain Name.
- In the left menu, click Upload Accounts.
- In the section Upload Account Details, note the value Id.
- In the section Upload Directories, note the value Upload Directory. This is the CP code for the upload directory.
- Click the button Edit.
- In the section Access Methods, click Netstorage HTTP CMS API.
- In the column Actions, click the icon Copy Key. Note the value copied into the clipboard.
- At the bottom of the page, click the button Cancel.
- If you are using the optional Uniform Upload Tool, note the path to the
executable (e.g. If your Uniform service is running on Windows,
the path might be
D:\tools\uniform\Uniform.Akamai.Upload.exe).
Configure deployment service#
The deployment service in Sitecore is responsible for triggering the Uniform service during the Sitecore publishing process. In order to trigger the Uniform service, a number of settings must be added to Sitecore. These settings are used in several ways:
- Locate the Uniform service.
- Provide settings to the Uniform service that are used to communicate with Akamai.
There are two ways you can configure these settings.
Option 1. Sitecore config files#
This option is recommended for production environments.
<sitecore> <uniform> <siteConfigurations> <siteConfiguration name="<YOUR-SITECORE-SITE-NAME>"> <site inherits="<YOUR-SITECORE-SITE-NAME>"/> <deployment> <deploymentService set:ref="uniform/services/hostedDeploymentService"> <ServiceUrl><URL-TO-UNIFORM-SERVICE></ServiceUrl> <environmentVariables hint="raw:AddEnvironmentVariable"> <variable name="UNIFORM_PUBLISH_TARGET">akamai</variable> <variable name="AKAMAI_NETSTORAGE_HOSTNAME"><YOUR-HTTP-DOMAIN-NAME></variable> <variable name="AKAMAI_NETSTORAGE_KEY"><YOUR-HTTP-API-KEY></variable> <variable name="AKAMAI_NETSTORAGE_ID"><YOUR-ACCOUNT-ID></variable> <variable name="AKAMAI_NETSTORAGE_CPCODE"><YOUR-UPLOAD-DIRECTORY-CP-CODE></variable> <variable name="AKAMAI_NETSTORAGE_UPLOAD_TOOL_PATH"><YOUR-UPLOAD-TOOL-PATH></variable> </environmentVariables> </deploymentService> </deployment> </siteConfiguration> </siteConfigurations> </uniform> </sitecore>note
If you are not using the Uniform Upload Tool, you should remove the variable AKAMAI_NETSTORAGE_UPLOAD_TOOL_PATH.
Option 2. Sitecore items#
- In Sitecore, open Content Editor.
- Navigate to sitecore > system > Uniform > Site Configurations.
- Select the item that corresponds to your site.
- Add a new item using the template Configure Site.
- Enter the following field values:
- Inherits:
<YOUR-SITECORE-SITE-NAME>
- Inherits:
- Save the item.
- Add a new item using the template Connect: Self-Hosted Deployment Service....
- Enter the following field values:
- ServiceUrl: Url to the Uniform service that is used to generate static pages. (For example, if you are using Next.js, this is the url to the Next.js application.)
- In the field EnvironmentVariables, enter the following values:
- UNIFORM_PUBLISH_TARGET =
akamai - AKAMAI_NETSTORAGE_HOSTNAME =
<YOUR-HTTP-DOMAIN-NAME> - AKAMAI_NETSTORAGE_KEY =
<YOUR-HTTP-API-KEY> - AKAMAI_NETSTORAGE_ID =
<YOUR-ACCOUNT-ID> - AKAMAI_NETSTORAGE_CPCODE =
<YOUR-UPLOAD-DIRECTORY-CP-CODE>
- UNIFORM_PUBLISH_TARGET =
- If you are using the Uniform Upload Tool, add the following values to the field EnvironmentVariables:
- AKAMAI_NETSTORAGE_UPLOAD_TOOL_PATH =
<YOUR-UPLOAD-TOOL-PATH>
- AKAMAI_NETSTORAGE_UPLOAD_TOOL_PATH =
- Save the item.
Configure cache purge#
When a file in NetStorage is changed, the Akamai cache must be purged in order for Akamai to deliver the latest version of the file.
Follow the instructions on how to configure cache purge.
important
For the CP code, you should use the value for your upload directory,
meaning the value set for the environment variable
AKAMAI_NETSTORAGE_CPCODE.
Start Uniform service#
- In the terminal window, navigate to the root folder of your Uniform service.
- Enter the following command:
npm run start
Trigger deployment#
- In Sitecore, republish of any page-level item under the
/sitecore/content/<YOUR-SITECORE-SITE-NAME>item. - The console for your Uniform service will show something like the following:
07/05-10:44:34 info: Received deploy status request, ticket: 0, message: Uploading HTML site files07/05-10:44:35 info: Successfully deployed C:\sitecore-jss-nextjs-starterkit\.temp\0 folder07/05-10:44:35 info: Deleting temp dir: C:\sitecore-jss-nextjs-starterkit\.temp\007/05-10:44:36 info: Temp dir was deleted: C:\sitecore-jss-nextjs-starterkit\.temp\007/05-10:44:36 info: Received deploy status request, ticket: 0, message: Deployment is complete
Configure DNS#
You should talk with your network administrator before making any changes to DNS. The instructions below may not be appropriate for your environment.
- In Akamai, navigate to your property.
- In the section Active Production Version, click the link next to Version:.
- In the section Property Hostnames, find the value of Edge Hostname.
- In your DNS settings, add a CNAME record using the Edge Hostname value.
Troubleshooting#
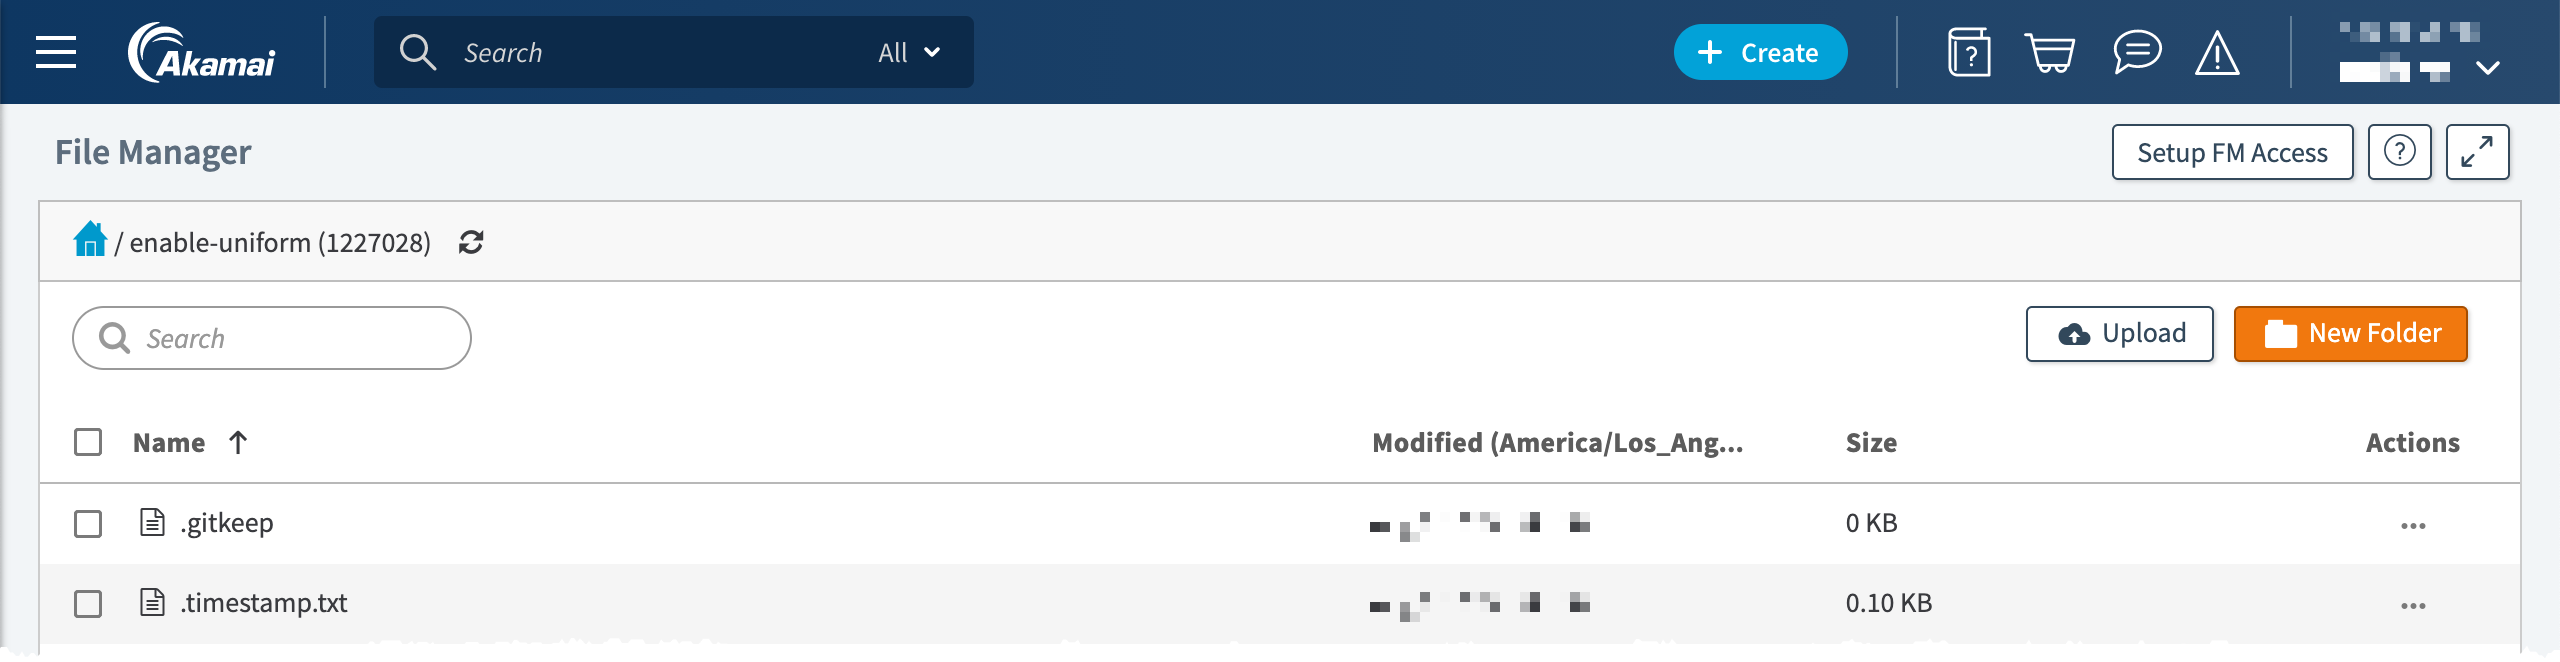
File Manager setup#
Akamai offers a tool named File Manager that gives you the ability to view the files in NetStorage from the Akamai Control Center.
- Log into Akamai.
- In the left menu, navigate to ORIGIN SERVICES > NetStorage.
- Click File Manager.

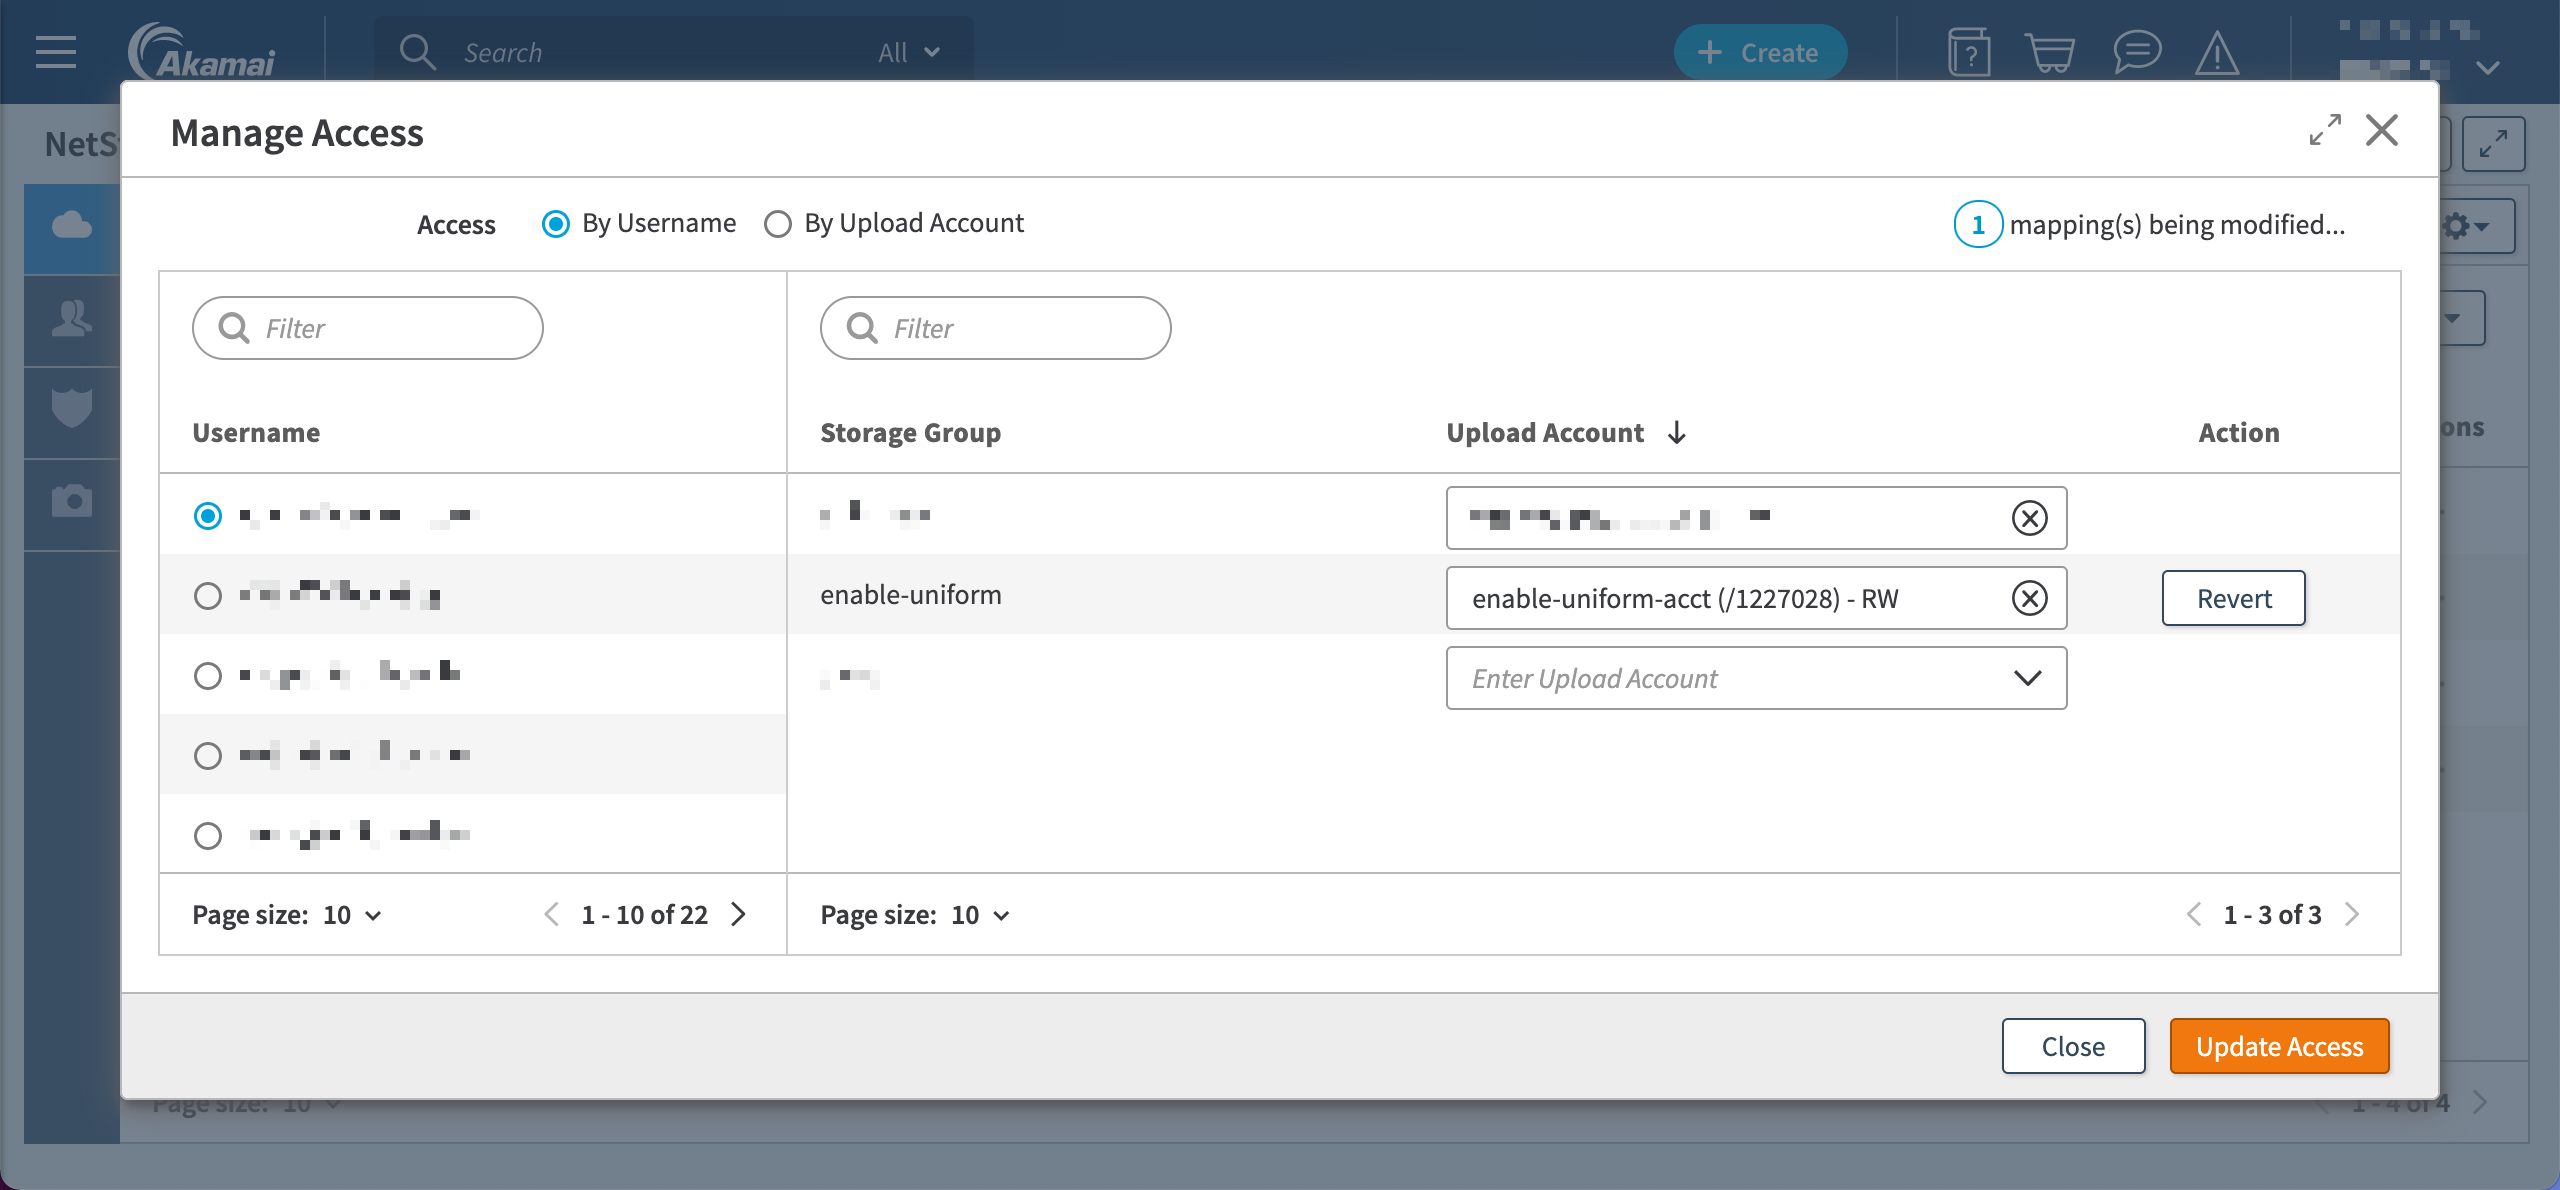
- Click Setup FM Access.

- In the row for your storage group, select the upload account you created, then click Update Access.
- Click File Manager.
- Click the name of your storage group.
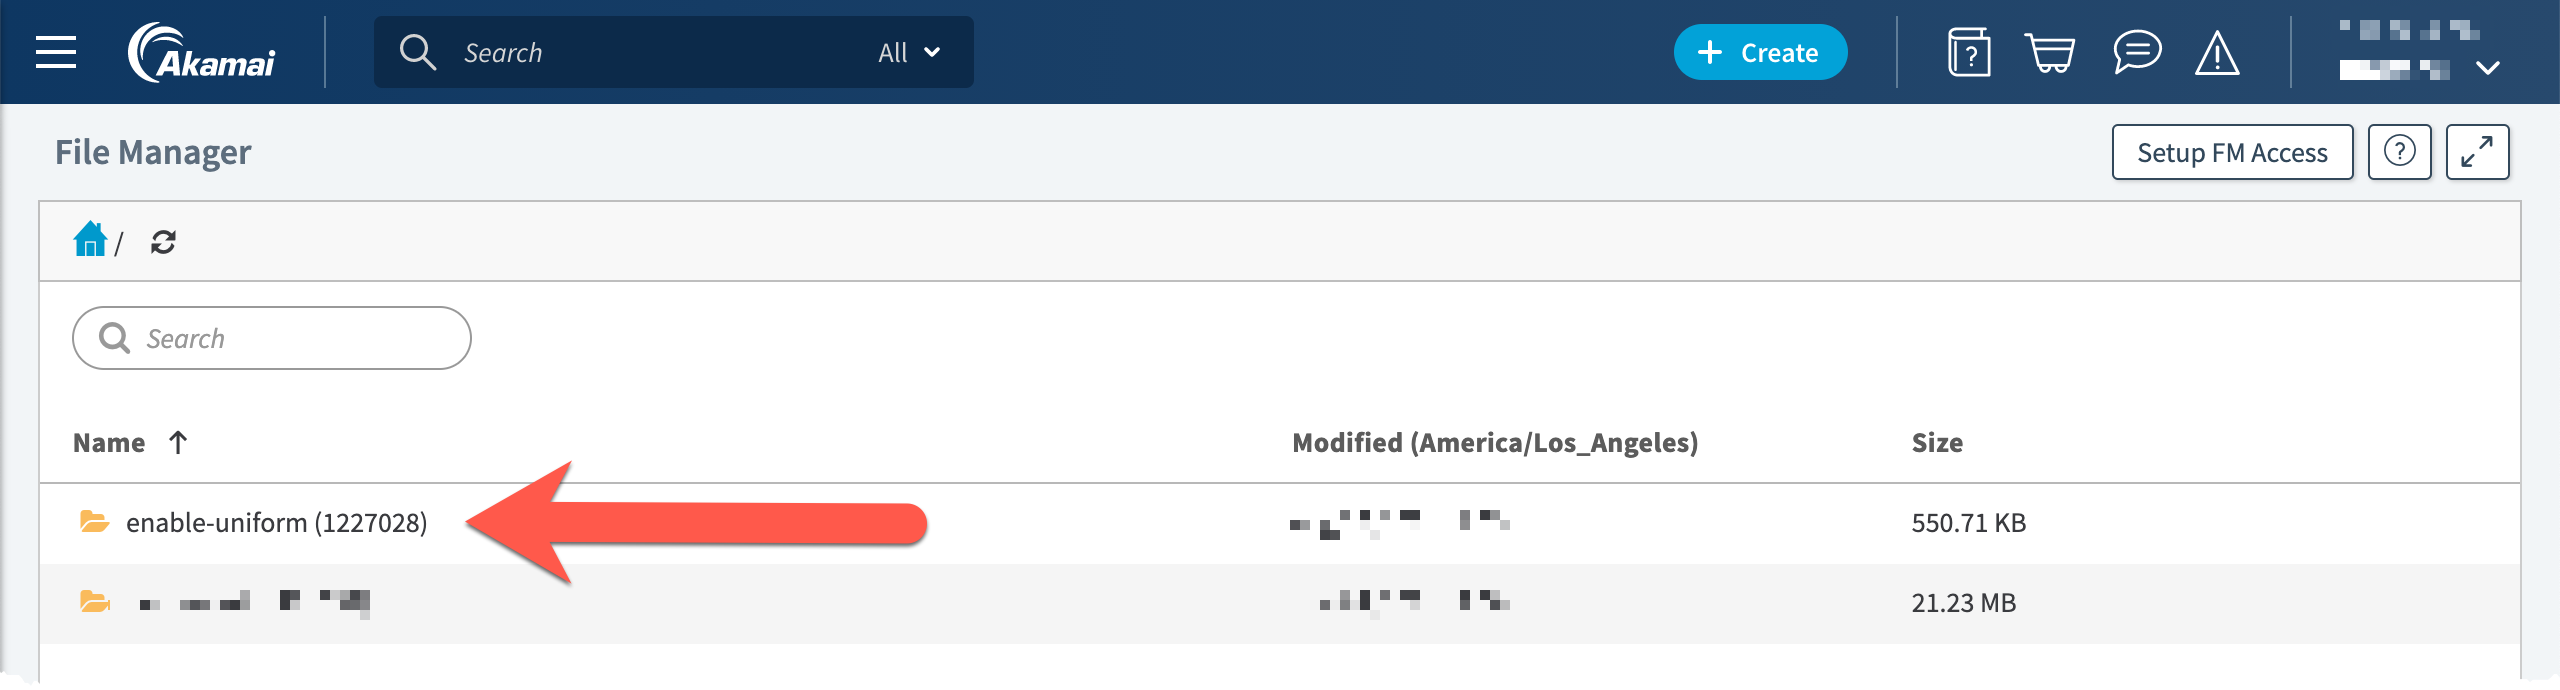
- Now you can access the files in the storage group.