How to add a Deployment Service to a Site Configuration
Prerequisites#
- You completed the "How to create a Site Configuration" guide.
- You completed one of the tutorials and able to run your app connected to your Sitecore instance:
- Sitecore JSS tutorial (Except of Step 6)
- Sitecore MVC tutorial (Except of Step 6) Step 6 in both tutorials is "Trigger static export from the publishing pipeline", which is described in this article in a more detailed way.
- If configuring a Netlify-based Deployment Service, you need the Netlify account and the site created connected to your git repo using one of our starter kits:
Introduction#
In order to make a Site Configuration valid for any site deployment activity (Content Sync, Media Sync or Static Site Export), we must configure a Deployment Service.
What is Deployment Service?#
It is an instance of your Next.js or Nuxt application running in a node.js server. This application has Uniform plugin activated, extending the capability of that service with a deployment endpoint, which the Sitecore Connector part of Uniform for Sitecore interacts with. It initiates the process of Static Site Generation (SSG).
The act of activation of a Deployment Service also activates other capabilities, such as Content Sync and Media Sync. These are optional capabilities, however, a given Site Configuration must have a valid Deployment Service configured before these additional services can be activated.
There are two flavors of Deployment Service supported now out of the box:
- Self-Hosted Deployment Service
This option means that you are self hosting the Deployment Service (that runs Next.js or Nuxt depending on your setup), so this configuration needs to provide connection details to where this service is running. This service can run locally on
http://localhost:3000. This option is valid when you want to run the service on-prem, in Azure (AKS or as a Web Service) or with other managed NodeJs hosting platforms like Heroku. With this option, you must provide the URL the Sitecore CM instance can call to in order to initiate site deployment operation. - Netlify Deployment Service With this service type, the Deployment Service is managed by the Netlify Platform, and the connection details will be related to your Netlify site and your Netlify account. The method of operation is quite different in this case, as Netlify runs the build completely statelessly, meaning that the instance of the Deployment Service is spun up on demand, so there is no known endpoint to execute. Therefore this option requires a slightly different setup.
If you want to run your Deployment Service on an alternative platform, please reach out to our support so we can assess the feasibility. The Deployment Service implementation is extensible and should accommodate other scenarios.
Configuration steps#
Option 1: using Sitecore items#
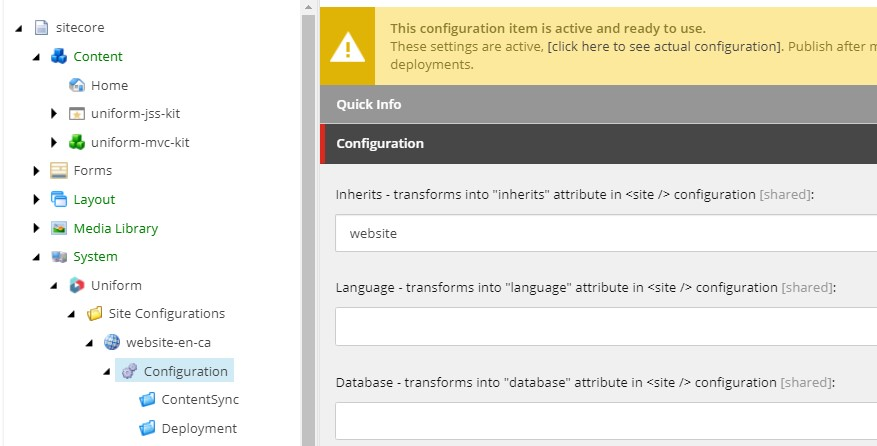
All Site Configurations for Uniform are managed in the master database under /sitecore/system/Uniform/SiteConfigurations
First, locate the Configuration item for your desired Site Configuration:
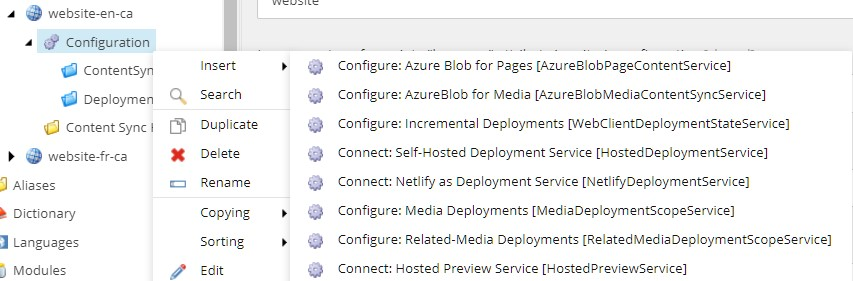
Right click on the Configuration item and notice plenty of options to facilitate further configuration. Since we are interested in a Deployment Service, there are two options:
- Connect: Self-Hosted Deployment Service
- Connect: Netlify as Deployment Service
Self-Hosted Deployment Service#
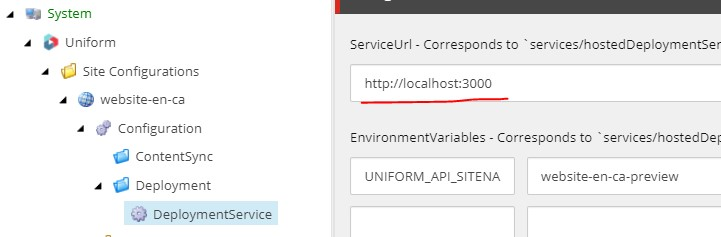
After the DeploymentService item is created, you can specify the endpoint of your Deployment Service (where the Next/Nuxt app runs) and optionally you can override any Uniform environment variables that your Deployment Service is configured with.
These values will be supplied with the runtime call to the Deployment Service, overriding any fixed environment variables specified there. This allows to reuse the instances of Deployment Service across various site configurations. For multi-site environments, for example, this allows overriding the site configuration name (UNIFORM_API_SITENAME env. var.) during the site deployment:
Netlify-based Deployment Service#
You will have to delete the recently created Deployment Service as you cannot have more than one. If you want to try different deployment options at the same time, you can add a new Site Configuration with a different name. You need to have only one Deployment Service per Site Configuration.
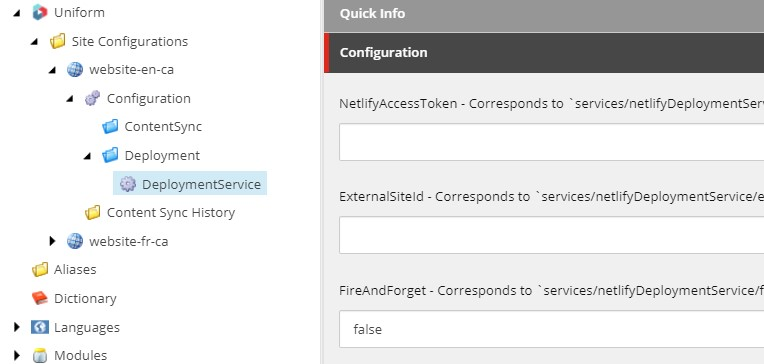
After the Netlify-based Deployment Service item is created, you will have different settings to provide here:
NetlifyAccessToken- create one with Netlify, see this doc.ExternalSiteId- the Netlify site id that can be retrieved from your site dashboard.FireAndForget- when set to true, Sitecore will trigger the export process on Netlify, but the publishing dialog won't wait till the end of the whole build process and just report that the publishing finished successfully.If exporting fails on Netlify for some reason you won't know about the issue unless you check Netlify itself. Therefore, we recommend setting up build notifications in Netlify, so the business users who publish the site are notified when the deployment goes live.
Option 2: using config files#
Add a config patch with the <deploymentService /> element under a /sitecore/uniform/siteConfigurations/siteConfiguration/deployment section. Naturally, this should be placed under the desired Site Configuration.
Self-Hosted Deployment Service#
The configuration parameters are identical to the item-based configuration. For the self-hosted service, the deploymentService must reference the uniform/services/hostedDeploymentService type and must provide at least the value of the ServiceUrl which must be callable from the Sitecore CM instance where you are configuring all this:
<configuration xmlns:patch="http://www.sitecore.net/xmlconfig/" xmlns:set="http://www.sitecore.net/xmlconfig/set/"> <sitecore> <uniform> <siteConfigurations> <siteConfiguration name="your-site-configuration-name"> <deployment> <deploymentService set:ref="uniform/services/hostedDeploymentService"> <ServiceUrl>http://localhost:3000</ServiceUrl> <!-- <environmentVariables hint="raw:AddEnvironmentVariable"> <variable name="UNIFORM_API_SITENAME">your-site-configuration-name</variable> </environmentVariables> --> </deploymentService> </deployment> </siteConfiguration> </siteConfigurations> </uniform> </sitecore></configuration>In addition, you can override any Uniform environment variables from here. These values will be supplied with the runtime call to the Deployment Service, overriding any fixed environment variables specified there. This allows to reuse the instances of Deployment Service across various site configurations. For multi-site environments, for example, this allows overriding the site configuration name (UNIFORM_API_SITENAME env. var.) during the site deployment:
Netlify-based Deployment Service#
Create a new config patch with the following configuration element:
<configuration xmlns:patch="http://www.sitecore.net/xmlconfig/" xmlns:set="http://www.sitecore.net/xmlconfig/set/"> <sitecore> <uniform> <siteConfigurations> <siteConfiguration name="your-site-configuration-name"> <deployment> <deploymentService ref="uniform/services/netlifyDeploymentService"> <ExternalSiteId>netlify-site-id</ExternalSiteId> <NetlifyAccessToken>netlify-access-token</NetlifyAccessToken> <!-- Experimental feature that prevents checking netlify build status and blocking Sitecore publish--> <FireAndForget>false</FireAndForget> </deploymentService> </deployment> </siteConfiguration> </siteConfigurations> </uniform> </sitecore></configuration>Fill in the values within the
<deploymentService />element:
NetlifyAccessToken- create one with Netlify, see this doc.ExternalSiteId- the Netlify site id that can be retrieved from your site dashboard.FireAndForget- when set to true, Sitecore will trigger the export process on Netlify, but the publishing dialog won't wait till the end of the whole build process and just report that the publishing finished successfully.If exporting fails on Netlify for some reason you won't know about the issue unless you check Netlify itself. Therefore, we recommend setting up build notifications in Netlify, so the business users who publish the site are notified when the deployment goes live.
Verify Deployment Service configuration#
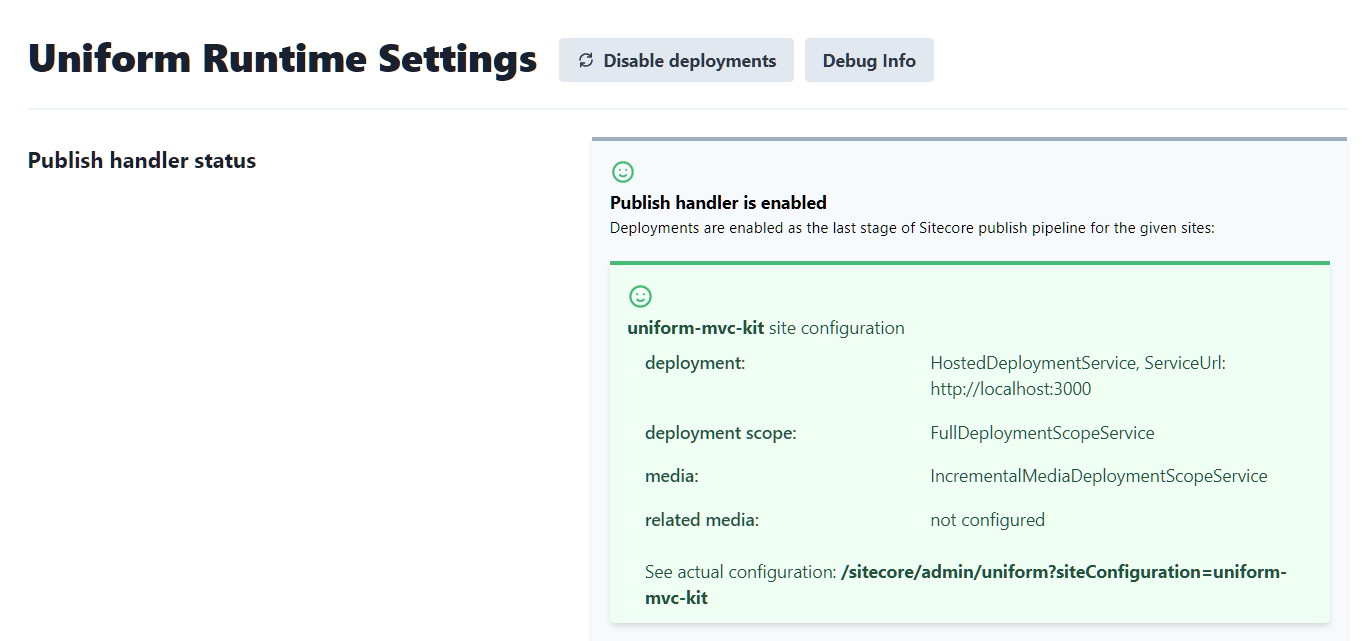
In order to verify that your site has deployment service configured correctly, open the Uniform admin page: https://your-sitecore-instance/sitecore/admin/uniform and make sure you see the green status and has the "deployment" provider configured next to your Site Configuration:
Test Deployment Service#
Test the Self-hosted Deployment Service#
Prerequisites#
Make sire you completed one of the tutorials and able to run your app connected to your Sitecore instance:
Steps#
First, need to ensure that the following environment variables are in place.
## ensures we are not deploying anywhere yet, just doing a local static site generationUNIFORM_PUBLISH_TARGET=fake## ensures the deployment service is activeUNIFORM_MODE=mixedStart up your app with
npm run startand make sure it responds on localhost:3000.Publish any item under the site that you have configured. After a second or so you should see the following messages in the console of your app, indicating that the deployment was initiated. This process performs the check of the version of
@uniformdevpackages the service is running, receives environment variable overrides from Sitecore (if any), then initiates static export of the site using a fake publish provider. No actual deployment takes place, but this verifies that the handshake between the Sitecore Connector and the app acting as a Deployment Service is successful:3/00-14:41:00 info: Received service status (and version) request03/00-14:41:14 info: Received deploy request. 03/00-14:41:14 info: Deploy request contains ENV variables: config will be merged for the current deploy request 03/00-14:41:14 info: ENV delta: {} 03/00-14:41:14 info: Initializing FakePublishProvider 03/00-14:41:14 info: Saving .temp/.publish-map.json 03/00-14:41:14 info: Creating output dir: C:\app\.temp\k 03/00-14:41:14 info: Starting export for 5 page(s)://album/contact/login/thanks03/00-14:41:14 info: Starting build and export...03/00-14:41:14 info: UNIFORM_PUBLISH_NEXT_EXPORT_COMMAND is not defined, so switching to default: node node_modules/next/dist/bin/next build && node node_modules/next/dist/bin/next export --outdir "__DIR__" 03/00-14:41:14 info: Starting custom exec nextjs export process (with UNIFORM_API_SITENAME = uniform-mvc-kit)03/00-14:41:14 info: Received deploy status request, ticket: k, message: Generating HTML site files 03/00-14:41:16 info: Received deploy status request, ticket: k, message: Generating HTML site files 03/00-14:41:18 info: Received deploy status request, ticket: k, message: Generating HTML site files 03/00-14:41:20 info: Received deploy status request, ticket: k, message: Generating HTML site files 03/00-14:41:22 info: Received deploy status request, ticket: k, message: Generating HTML site files 03/00-14:41:22 info: Exporting has succeeded. 03/00-14:41:22 info: Creating .timestamp.txt file 03/00-14:41:22 info: Starting deployment03/00-14:41:22 info: Deploying C:\app\.temp\k (FakePublishProvider) 03/00-14:41:22 info: Successfully deployed03/00-14:41:24 info: Received deploy status request, ticket: k, message: Deployment is complete
Test the Netlify-based Deployment Service#
Prerequisites#
Make sure to complete Step 1 and 2 of the Netlify deployment guide. You must have the following in place:
- Netlify site configured with your git repo (Step 1 of the guide).
- The site can build and statically export manually (Step 2 of the guide).
- Environment variables required for Uniform. (Step 1.6 of the guide)
Steps#
- Publish any item under the site that you have configured. After a second or so you should see a new build triggered for your Netlify site in the Netlify dashboard. This verifies that the handshake between the Sitecore Connector and the site in Netlify is successful.
Next steps#
- Complete the Deployment to Azure Blob Storage following this document, or to Netlify following this document.
- Configure Content Sync (if needed)
- Setup Media Sync capability (if needed) using this guide.
- Configure Incremental Static Site Generation using this guide.